AssistiveTouch is a helpful iPhone and iPad feature that makes your device easier to use. It adds a virtual button to your screen that gives you quick access to common actions. To turn on AssistiveTouch, go to Settings > Accessibility > Touch > AssistiveTouch, then slide the switch to turn it on or simply ask Siri to open AssistiveTouch. This feature is perfect for anyone who has trouble with physical buttons or wants a more customized way to control their device.
Many people don’t know about this handy tool that comes built into every Apple mobile device. AssistiveTouch creates a floating button that stays on your screen and opens a menu of shortcuts when tapped. You can use it to take screenshots, adjust volume, or even create custom gestures without pressing physical buttons. It’s especially useful if your home button or power button isn’t working properly.
How to Turn On AssistiveTouch on iPhone or iPad (Step‑by‑Step Guide)
AssistiveTouch is a built-in accessibility feature on iPhone and iPad that adds a floating on‑screen button to help you perform gestures, press hardware buttons, take screenshots, lock your device, and more — without physically using the buttons.
It’s especially helpful if:
- Your Home or Side button isn’t working
- You have difficulty performing gestures
- You want quick access to shortcuts
- You use your device one‑handed
Here’s how to turn on AssistiveTouch and customize it.
What Is AssistiveTouch?
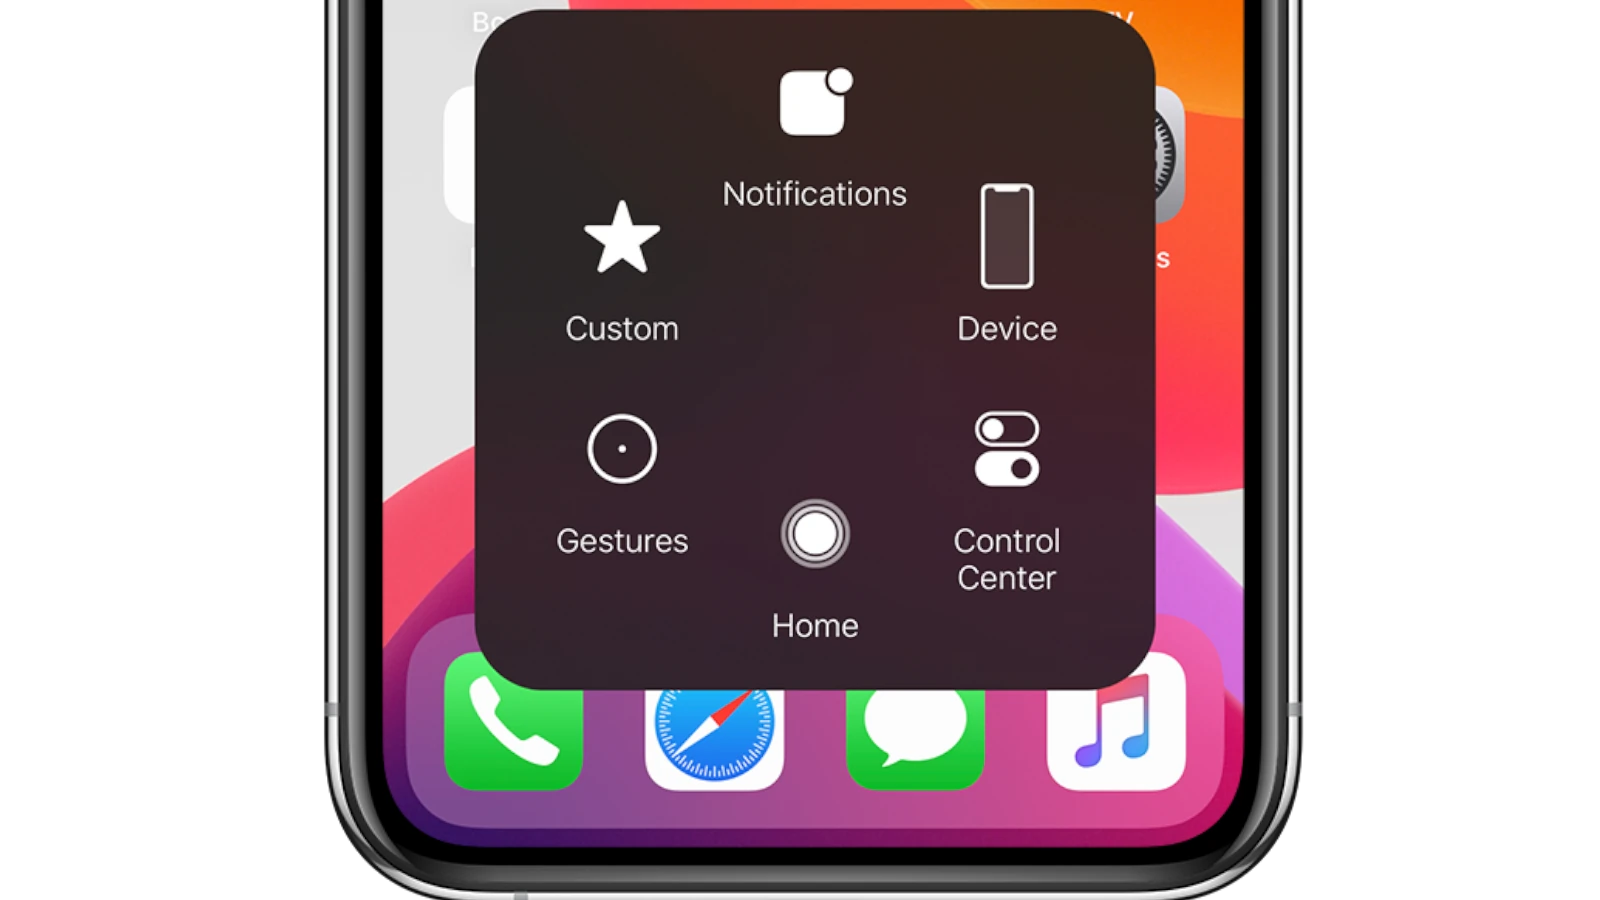
AssistiveTouch places a floating virtual button on your screen. When tapped, it opens a customizable menu with options like:
- Home
- App Switcher
- Control Center
- Notifications
- Siri
- Screenshot
- Volume controls
- Custom gestures
You can move the button anywhere on your screen.
How to Turn On AssistiveTouch (iPhone & iPad)
Method 1: Through Settings
- Open Settings
- Tap Accessibility
- Under “Physical and Motor,” tap Touch
- Tap AssistiveTouch
- Toggle AssistiveTouch to ON
Once enabled, you’ll see a floating button appear on your screen.
Method 2: Using Siri
You can simply say:
“Hey Siri, turn on AssistiveTouch.”
Siri will enable it instantly.
Method 3: Accessibility Shortcut (Quick Toggle)
You can assign AssistiveTouch to a triple-click shortcut.
- Go to Settings
- Tap Accessibility
- Scroll down to Accessibility Shortcut
- Select AssistiveTouch
Now, triple-click the Side button (or Home button on older devices) to turn AssistiveTouch on or off.
How to Customize AssistiveTouch
AssistiveTouch is fully customizable.
Go to:
Settings → Accessibility → Touch → AssistiveTouch
Here’s what you can adjust:
1. Customize Top-Level Menu
You can change which icons appear in the AssistiveTouch menu.
- Tap Customize Top Level Menu
- Add, remove, or rearrange icons
- Assign actions like Screenshot, Lock Screen, Control Center, etc.
You can have up to 8 icons.
2. Change Single-Tap, Double-Tap, or Long Press Actions
Under AssistiveTouch settings, you can assign actions to:
- Single-Tap
- Double-Tap
- Long Press
For example:
- Single-tap → Open Control Center
- Double-tap → Screenshot
- Long press → Siri
This makes the floating button even more powerful.
3. Adjust Opacity
You can reduce how visible the button is when idle:
- Adjust Idle Opacity
- Lower percentage = more transparent
This helps reduce visual distraction.
4. Create Custom Gestures
You can record your own gestures.
- Tap Create New Gesture
- Perform a gesture (like a pinch or multi-finger swipe)
- Save it
You can then trigger complex gestures with a single tap.
What Can You Do With AssistiveTouch?
Here are some of the most useful functions:
✅ Take screenshots without pressing buttons
✅ Lock your screen
✅ Adjust volume
✅ Open App Switcher
✅ Access Control Center
✅ Restart your device
✅ Use multi-finger gestures easily
✅ Simulate button presses
It’s especially helpful if your physical buttons are damaged.
How to Turn Off AssistiveTouch
To disable it:
- Go to Settings → Accessibility → Touch → AssistiveTouch
- Toggle it OFF
Or triple-click your Side/Home button if you enabled the Accessibility Shortcut.
Why Use AssistiveTouch?
AssistiveTouch is ideal if:
- Your Home button is broken
- Your Side button is unreliable
- You want one-handed shortcuts
- You have limited mobility
- You prefer touch controls over hardware buttons
It’s also a great temporary solution while waiting for a device repair.
Does AssistiveTouch Drain Battery?
AssistiveTouch uses minimal power. In normal use, it has no noticeable impact on battery life.
Final Thoughts
AssistiveTouch is one of the most useful built-in accessibility features on iPhone and iPad. Whether you need it for accessibility, convenience, or to replace broken buttons, it’s easy to enable and fully customizable.
Key Takeaways
- AssistiveTouch adds a virtual button to your screen for easier navigation and access to common functions on iPhone and iPad.
- You can customize the AssistiveTouch menu to include the actions you use most often for a more personalized experience.
- When physical buttons are hard to use or not working, AssistiveTouch provides a simple touchscreen alternative for essential device controls.
Understanding AssistiveTouch
AssistiveTouch is a powerful accessibility feature on iOS devices that creates a virtual button on your screen. This tool makes iPhone and iPad navigation easier, especially for those with physical limitations.
What Is AssistiveTouch?
AssistiveTouch is a helpful feature built into iPhones and iPads that adds a floating button to your screen. When tapped, it opens a menu with shortcuts to common actions. This virtual button can replace physical buttons like the Home button, volume controls, or power button.
You can customize the AssistiveTouch menu to include the functions you use most. The menu can hold up to eight custom actions, making device navigation faster.
Many people use AssistiveTouch when their physical buttons aren’t working well. Others use it to avoid excessive wear on buttons. The feature is part of Apple’s broader accessibility efforts to make devices usable for everyone.
Benefits of Using AssistiveTouch
AssistiveTouch makes using your iPhone or iPad easier in several ways. For people with motor limitations, it reduces the need for multi-finger gestures or hard button presses.
With AssistiveTouch, you can:
- Take screenshots without pressing physical buttons
- Lock your screen without reaching for the side button
- Adjust volume without using side buttons
- Create custom gestures for actions you frequently perform
The feature is also useful when physical buttons break or become less responsive. Many users without disabilities still turn on AssistiveTouch for convenience.
AssistiveTouch works on all modern iPhones and iPads. It’s especially helpful on newer models that lack a physical Home button.
Enabling AssistiveTouch
AssistiveTouch creates a virtual button on your screen that helps you navigate your device without using physical buttons. You can turn on this helpful feature in several ways depending on what works best for you.
Through Settings App
To enable AssistiveTouch on your iPhone or iPad, the most direct method is through the Settings app. First, open the Settings app on your device. Then tap on “Accessibility” from the main menu options.
Next, select “Touch” from the Accessibility menu. Here you’ll find the AssistiveTouch option – tap on it to access its settings.
Toggle the switch next to AssistiveTouch to turn it on. Once enabled, a circular button will appear on your screen. You can drag this button anywhere along the edges of your display.
The AssistiveTouch menu gives you access to many functions like Home, Control Center, and custom gestures. You can also customize the menu by adding or removing actions based on your needs.
Using Siri
If you prefer using voice commands, Siri offers a quick way to enable AssistiveTouch. Simply activate Siri by saying “Hey Siri” or by pressing and holding the side button.
Then clearly say, “Siri, open AssistiveTouch” or “Turn on AssistiveTouch.” Siri will immediately enable the feature without requiring you to navigate through multiple settings screens.
This method is especially helpful if you have difficulty using the touchscreen or if your physical buttons aren’t working properly. It’s also useful when you need to enable AssistiveTouch during device setup if your home button isn’t functioning.
Voice activation makes accessibility features more accessible, which is the whole point!
Accessibility Shortcut
For quick access to AssistiveTouch, you can set up an Accessibility Shortcut on your iPhone or iPad. This allows you to turn AssistiveTouch on or off with just a triple-click of the side button.
To set this up, go to Settings > Accessibility > Accessibility Shortcut (at the bottom). Select AssistiveTouch from the list of options.
Now whenever you triple-click your side button (or Home button on older devices), AssistiveTouch will toggle on or off. This is especially useful if you only need AssistiveTouch occasionally.
You can select multiple features in the Accessibility Shortcut menu. If you do, a menu will appear when you triple-click, letting you choose which feature to activate.
This shortcut method saves time and makes it easy to enable AssistiveTouch exactly when you need it.
Navigating the AssistiveTouch Menu
The AssistiveTouch menu gives you quick access to many iPhone and iPad functions without needing to use physical buttons. This floating button opens a world of shortcuts that can be customized to fit your needs.
Opening the AssistiveTouch Menu
To use AssistiveTouch, first make sure it’s turned on. Go to Settings > Accessibility > Touch > AssistiveTouch and toggle the switch to on.
You can also ask Siri to open AssistiveTouch by saying “Hey Siri, turn on AssistiveTouch.”
Once enabled, a small circular button appears on your screen. This is the AssistiveTouch icon. You can drag this button anywhere along the edge of your screen.
Simply tap the AssistiveTouch icon once to open the main menu. It shows several options like:
- Device
- Control Center
- Home
- Siri
- Custom actions
- Notifications
Customizing the Top-Level Menu
You can make AssistiveTouch work better for you by changing what appears in the main menu. To customize it, go to Settings > Accessibility > Touch > AssistiveTouch > Customize Top Level Menu.
Here you can:
- Add or remove menu items (up to 8 total)
- Change the order of icons
- Reset to default settings if needed
Try adding functions you use often. For example, you might add Screenshot, Volume Controls, or App Switcher to your top menu.
You can also adjust how the AssistiveTouch button looks on your screen. Some users prefer to make it more transparent when not in use.
For advanced users with pointer devices, you can enable Mouse Keys in the AssistiveTouch settings to control cursor movement more precisely.
Troubleshooting Common Issues
AssistiveTouch can sometimes experience problems that prevent it from working properly. These issues have simple solutions that get your virtual button working again quickly.
When AssistiveTouch Is Not Responding
If your AssistiveTouch button freezes or doesn’t respond to your taps, try these fixes:
Restart your device – This solves most temporary glitches. Press and hold the top button and either volume button until the power off slider appears. Drag the slider, then turn your device back on.
Check AssistiveTouch settings – Make sure it’s actually turned on. Go to Settings > Accessibility > Touch > AssistiveTouch and check the toggle is green.
Update iOS – Outdated software can cause problems. Check for updates in Settings > General > Software Update.
Sometimes dirt or a screen protector might block touch sensitivity. Clean your screen with a soft cloth and make sure nothing blocks the touch area.
Resetting AssistiveTouch Settings
When AssistiveTouch behaves strangely or shows the wrong options, resetting its settings often helps:
- Go to Settings > Accessibility > Touch > AssistiveTouch
- Turn AssistiveTouch off, wait 30 seconds, then turn it back on
For more stubborn problems, reset all settings (this won’t delete your data):
- Go to Settings > General > Transfer or Reset iPhone/iPad > Reset
- Tap Reset All Settings
- Enter your passcode when prompted
You’ll need to set up AssistiveTouch again after this reset. The good news? It’s often like having a fresh start that fixes odd behavior.
What to Do When Your Home Button Is Broken
A broken Home button is one of the main reasons people use AssistiveTouch. Here’s what to do:
Enable AssistiveTouch immediately – Go to Settings > Accessibility > Touch > AssistiveTouch and turn it on. This gives you a virtual Home button.
Create a backup – Connect to iTunes or use iCloud to back up your device in case you need repairs later.
Customize for better use – Adjust the AssistiveTouch menu to include functions you use most. This helps when you can’t use the physical button.
If water damage caused the Home button failure, put your device in rice for 24 hours before trying repairs. For permanent damage, AssistiveTouch becomes your main navigation tool while you decide if repair is worth the cost.
Maintaining AssistiveTouch Functionality
Keeping your AssistiveTouch feature working properly requires some regular maintenance and awareness of your device settings. These simple practices help ensure this helpful accessibility tool remains available whenever you need it.
Regularly Updating iOS
Keeping your iPhone or iPad updated with the latest iOS version is crucial for AssistiveTouch to work correctly. Apple often improves accessibility features with each update.
To check for updates:
- Go to Settings > General > Software Update
- If an update is available, tap “Download and Install”
- Make sure your device has enough battery and is connected to Wi-Fi
Sometimes updates can fix bugs that affect AssistiveTouch functionality. If you notice your AssistiveTouch button disappearing or not responding properly, updating iOS might solve the problem.
When iOS updates, your AssistiveTouch settings typically remain intact. However, it’s good practice to check your settings after each update to make sure everything still works as expected.
Backing Up Your AssistiveTouch Settings
Saving your AssistiveTouch setup prevents you from having to reconfigure everything if you get a new device or need to reset your current one.
To back up your settings:
- Use iCloud Backup which includes your accessibility settings
- Or create an iTunes Backup on your computer for a complete device backup
To set up iCloud Backup:
- Go to Settings > [your name] > iCloud > iCloud Backup
- Toggle on “iCloud Backup”
- Tap “Back Up Now” to create an immediate backup
If you need to restore your AssistiveTouch settings after a reset, simply sign in with your Apple ID during setup and choose to restore from backup. Your device will reinstall all your previous accessibility settings, including your custom AssistiveTouch configuration.
Advanced AssistiveTouch Features
AssistiveTouch on iPhone and iPad offers powerful customization options beyond basic functionality. These advanced features let you tailor the experience to your specific needs and preferences.
Creating Custom Gestures
Custom gestures make your iPhone or iPad easier to use with AssistiveTouch. To create a new gesture, go to Settings > Accessibility > Touch > AssistiveTouch and tap “Create New Gesture.” When the recording screen appears, make the gesture you want to save.
You can create gestures for actions you do often. For example, make a “Z” shape to open your camera or a circle to toggle Dark Mode. After recording, name your gesture something easy to remember.
Custom gestures can have up to five touch points. This means you can use multiple fingers at once in your gesture. Your saved gestures appear in the Custom section of the AssistiveTouch menu.
Try simple gestures first. Complex movements might not work as well as straightforward ones.
Adjusting AssistiveTouch Responsiveness
The way AssistiveTouch responds to your touch can be fine-tuned to match your needs. In the AssistiveTouch settings, you can adjust the Idle Opacity slider to make the button more or less visible when not in use.
For better control, change the tracking speed. This setting affects how quickly the cursor moves when you drag the AssistiveTouch button. Lower speeds offer more precision while higher speeds require less effort.
Users can also adjust the Touch Duration settings. This controls how long you need to hold your finger on the screen for a touch to register. This helps people who might accidentally trigger touches.
If you have trouble with the menu size, use the Always Show Menu option. This keeps the menu open without having to tap the button first.
Frequently Asked Questions
AssistiveTouch provides helpful options for iPhone and iPad users who need alternative ways to navigate their devices. Here are answers to common questions about this accessibility feature.
How do I enable AssistiveTouch on iOS?
You can turn on AssistiveTouch through your device settings. Go to Settings > Accessibility > Touch > AssistiveTouch, then slide the switch to turn it on.
A quicker way is to simply ask Siri by saying, “Siri, open AssistiveTouch”. The AssistiveTouch menu button will appear on your screen after activation.
What steps are required to deactivate AssistiveTouch on my iPhone?
Turning off AssistiveTouch follows the same path as turning it on. Navigate to Settings > Accessibility > Touch > AssistiveTouch, then toggle the switch to the off position.
The floating AssistiveTouch button will disappear from your screen immediately.
Why can’t I see the AssistiveTouch icon on my iPad screen?
If you can’t see the AssistiveTouch icon, check if it’s actually enabled. Go to Settings > Accessibility > Touch > AssistiveTouch and confirm the toggle is on.
Sometimes the icon may move to the edge of the screen or have low opacity settings. Try restarting your iPad if the icon should be active but remains hidden.
How can I add the AssistiveTouch menu to my device’s control center?
Adding AssistiveTouch to Control Center makes it easier to access. Go to Settings > Control Center, then find AssistiveTouch in the list.
Tap the green plus icon next to AssistiveTouch to add it to your included controls. Now you can quickly toggle this feature on or off without digging through settings.
What should I do if AssistiveTouch is not responding on my iOS device?
If AssistiveTouch stops working, first try restarting your device. This often fixes temporary software glitches affecting the feature.
If problems continue, go to Settings > Accessibility > Touch > AssistiveTouch, turn the feature off, wait a few seconds, then turn it back on. Consider resetting your accessibility settings if the issue persists.
How can I use AssistiveTouch to perform actions when my iPhone is locked?
AssistiveTouch can work on the lock screen for certain functions. You’ll need to make sure AssistiveTouch is enabled before locking your device.
The menu allows basic navigation even on the lock screen. You can use it to adjust volume, take screenshots, or access Control Center without unlocking your device.