Moving files around on your Mac doesn’t need to be hard. Drag and drop is one of the easiest ways to move files, pictures, and text on your Mac computer. To drag and drop on Mac, simply select an item with your mouse or trackpad, hold down the button while moving to your destination, and then release to drop the item. This simple action works across apps and folders, making file management quick and easy.
If you’re using a trackpad and find it tricky to drag items, try using three fingers on the trackpad while hovering over the files you want to move. For those who prefer keyboard shortcuts, you can also use cmd+c to copy, cmd+tab to switch apps, and cmd+v to paste – a handy trick when drag and drop feels awkward.
Mac’s drag and drop feature works with files, folders, text, images, and more. You can drag items between different folders, apps, and even to the dock. This makes organizing your digital workspace faster and helps you stay productive without hunting through menus for the right commands.
1. The Basics: Moving a File
The most common use for drag and drop is moving a file from one folder to another.
- Click and Hold: Place your cursor over the file you want to move. Click and hold the mouse button (or press down on the trackpad).
- Slide: While keeping the button pressed, move your cursor to the destination (a folder, the desktop, or an app icon).
- Release: Let go of the button to “drop” the file.
Note: If you are moving a file to a different disk (like a USB drive), macOS will copy the file by default rather than moving it.
2. Moving vs. Copying (Modifier Keys)
You can change how a drag-and-drop behaves by holding down a key on your keyboard while you move the file:
- To Force a Copy: Hold the Option (⌥) key while dragging. You will see a green plus (+) icon appear next to your cursor. This leaves the original file where it is and puts a duplicate in the new location.
- To Force a Move: If you are dragging to an external drive but want to move the file (deleting it from the Mac), hold the Command (⌘) key while dragging.
- To Create an Alias (Shortcut): Hold Option (⌥) + Command (⌘) while dragging. This creates a shortcut to the file in the new location rather than moving the actual file.
3. Advanced Technique: Spring-Loading Folders
If you want to drop a file into a folder that is buried deep inside other folders, you don’t need to open every window first.
- Grab your file and drag it over a folder.
- Hold it there for a second. The folder will “flash” and spring open.
- Continue holding the file and hover over the next sub-folder. It will also open.
- Once you reach the final destination, release the file.
Pro Tip: To make a folder spring open instantly, tap the Spacebar while hovering over it with a file.
4. Dragging Between Apps
You can drag more than just files. You can drag content directly between open applications.
- Images: Drag an image from a website in Safari directly into a Pages document or a Desktop folder.
- Text: Highlight a sentence in an email, click and hold the highlighted text, and drag it into a Note or a Word document.
- Attachments: Drag an email attachment directly onto the Photos app icon in your Dock to save it.
5. Using Mission Control (The “Pro” Way)
If the window you want to drop a file into is hidden behind other windows:
- Start dragging the file.
- While still holding the file, use your other hand to swipe up with three fingers on the trackpad (or press F3) to enter Mission Control.
- Hover the file over the window you want to use.
- Mission Control will bring that window to the front. Drop the file.
6. The “Three-Finger Drag” (Accessibility)
Many Mac power users prefer to drag without “clicking” or pressing down hard on the trackpad. You can enable a feature that lets you move files by simply touching the trackpad with three fingers.
- Go to System Settings > Accessibility.
- Select Pointer Control.
- Click Trackpad Options.
- Toggle on Use trackpad for dragging and select Three Finger Drag from the dropdown menu.
7. How to Cancel a Drag
If you are in the middle of dragging a file and realize you don’t want to move it:
- While still holding the file, hit the Escape (Esc) key on your keyboard.
- The file will snap back to its original position.
Summary Table: Drag & Drop Shortcuts
| Action | Shortcut |
|---|---|
| Copy File | Hold Option (⌥) while dragging |
| Move File (to different drive) | Hold Command (⌘) while dragging |
| Create Shortcut (Alias) | Hold Option + Command while dragging |
| Open Folder Instantly | Hover + Spacebar |
| Cancel Drag | Press Escape |
Key Takeaways
- Click and hold an item, move it to your target location, and release to complete a basic drag and drop on Mac.
- Use three-finger dragging on trackpads or keyboard shortcuts (cmd+c, cmd+tab, cmd+v) when traditional dragging feels difficult.
- Drag and drop works across different apps, folders, and file types for quick and simple file management.
Understanding Drag & Drop on Mac
Drag and drop is a key feature of Mac computers that makes moving files, images, and text quick and simple. This handy tool lets users grab items with their mouse or trackpad and place them exactly where needed, saving time on everyday tasks.
Basics of Dragging and Dropping
To drag an item on Mac, click and hold on the file or text you want to move. Keep holding as you move your cursor to the destination, then release to drop the item. Mac offers several ways to drag files using either a mouse or trackpad.
With a trackpad, you can use one finger to click and drag. For those who find this difficult, Mac also offers these options:
- Three-finger drag: Enable this in Accessibility settings for easier dragging
- Drag Lock: Double-tap and hold to start dragging
- Two-finger dragging: Works in some applications for scrolling content
If using a mouse, simply press and hold the button while moving. The cursor changes to show you’re in drag mode.
The Role of Finder in Drag & Drop
Finder serves as the command center for drag and drop operations on Mac. It provides a visual interface that makes it easy to see file locations and destinations.
When dragging files between folders, Finder shows visual cues to help understand what’s happening. A green plus sign appears when copying to a new location, while moving between folders on the same drive doesn’t show this indicator.
Finder also allows dragging files to the Dock for quick opening with specific applications. Simply drag a file onto an app icon in the Dock to open it with that program.
For moving multiple files at once, hold Shift or Command while selecting items before dragging them all together.
Common Use Cases for Drag and Drop
File management tops the list of drag and drop uses on Mac. Users can easily:
- Move files between folders
- Organize documents into new locations
- Create copies by holding Option while dragging
- Transfer photos from one application to another
Text manipulation becomes faster with drag and drop too. Select text in a document, then drag it to:
- Move it to a new position in the same document
- Transfer it to another document
- Place it into a search field
Application interactions benefit greatly from this feature. Users can drag images directly into emails, documents, or design apps without saving and reopening files. Some applications may show greyed out folders when dragging certain file types, indicating they can’t accept that content.
Setting Up Your Mac for Drag & Drop
Configuring your Mac properly can make drag and drop operations smoother and more intuitive. A few simple adjustments to your system settings can significantly improve your file management experience.
Adjusting Trackpad Settings
For effective drag and drop on Mac, your trackpad settings need proper configuration. Open System Preferences by clicking the Apple menu in the top-left corner. Select Trackpad to view all available options.
Enable Three-finger drag for easier file movement. To activate this:
- Go to Accessibility in System Preferences
- Select Pointer Control
- Click Trackpad Options
- Check the box for Enable dragging
- Choose three finger drag from the dropdown menu
If you struggle with holding the trackpad button while moving items, turn on Drag Lock. This feature lets you start dragging, release the pressure, and continue moving the pointer before tapping to drop.
For older Macs, adjust tracking speed for better control. A medium-fast setting works best for most users when dragging files across the screen.
Customizing Finder Preferences
Finder settings can make drag and drop operations more convenient. Open Finder, click the Finder menu, and select Preferences.
Enable Spring-loaded folders and windows in the General tab. This helpful feature automatically opens folders when you drag items over them. You can adjust the delay using the slider – shorter times speed up your workflow.
Set up your sidebar with favorite locations for quick drag and drop:
- Add commonly used folders
- Include cloud storage options
- Create smart folders for frequent operations
Choose List view or Column view in Finder windows for easier drag and drop between locations. These views provide clearer folder structures than icon view.
For enhanced drag and drop functionality, try iBoysoft MagicMenu or similar tools that add right-click features for moving files between recently used folders.
Executing Drag & Drop Actions
Drag and drop is one of the most useful features on Mac computers. It helps you manage files quickly without using menu commands or keyboard shortcuts.
How to Select and Move Multiple Files
To select multiple files on your Mac, you have several options. For files next to each other, click the first file, hold the Shift key, and click the last file. This selects all files between them.
For non-adjacent files, hold the Command (⌘) key while clicking each file you want to select.
Once selected, press and hold the trackpad or mouse button while dragging the files to their new location. Release to drop them there.
Having trouble with your trackpad? Try using three fingers on the trackpad while the pointer is over the files. This makes dragging easier for many users.
You can also drag files to the Dock to open them in specific apps.
Copying Files vs. Moving Files
When you drag files between folders on the same drive, Mac moves them by default. To copy instead, hold the Option key while dragging.
For files being dragged between different drives, Mac does the opposite. It copies them by default. To move files instead, hold the Command (⌘) key while dragging.
You can also use keyboard shortcuts alongside drag and drop:
- Option + Drag: Creates a copy of the file
- Command + Drag: Moves the file between drives
- Option + Command + Drag: Creates an alias (shortcut) to the file
Watch the cursor icon while dragging. A plus (+) sign appears when copying, and nothing appears when moving.
Using Drag and Drop with External Devices
Working with external hard drives, USB drives, or SD cards? Drag and drop makes file transfers simple.
When dragging files to an external device, Mac copies the files by default. This keeps the original files on your Mac while creating duplicates on the external device.
To move files to an external device (deleting them from your Mac), hold the Command key while dragging.
Having trouble dragging between apps? Try this trick: Start dragging the file, then use your other hand to press Command+Tab to switch applications. Keep holding the file while switching, then drop it in the new app.
For large file transfers, watch for the progress bar that appears. You can continue working while files copy in the background.
Advanced Drag & Drop Techniques
Mac users can take their file management to the next level with several powerful drag and drop methods. These techniques save time and make organizing files much easier once you learn how to use them properly.
Utilizing Drag Lock
Drag Lock is a helpful feature for Mac users who find it hard to hold down the trackpad button while moving files. To enable this feature, go to System Preferences > Accessibility > Pointer Control > Trackpad Options.
Once enabled, you can double-tap to initiate a drag without holding down the button. This works great for people with mobility issues or anyone who needs to drag items across long distances.
The process is simple:
- Double-tap on the item you want to move
- Move your finger to drag the item
- Tap once when you reach the destination
This method reduces hand strain during long file organization sessions. Many users find this more comfortable for extensive drag and drop operations.
Keyboard Shortcuts to Enhance Drag & Drop
Combining the Command key with drag and drop unlocks powerful functions that many Mac users don’t know about.
Essential keyboard modifiers:
- Command + Drag: Creates a copy instead of moving the file
- Option + Drag: Always copies the file even within the same volume
- Command + Option + Drag: Creates an alias (shortcut) to the original file
When dragging items between split-view windows, hold the Shift key to maintain the original arrangement of files. This helps keep your organizational structure intact.
For folder navigation, try dragging a file to a folder icon while holding Command + Down Arrow to open the folder automatically. This technique makes filing documents into nested folders much faster.
Troubleshooting Common Drag & Drop Issues
If you can’t drag and drop documents on your Mac, try these fixes for the most common problems:
First, restart the Finder by holding Option, right-clicking the Finder icon in the Dock, and selecting “Relaunch.” This often fixes temporary glitches affecting drag operations.
Check your permissions settings. If you can’t move files to certain locations, you might not have write access. Right-click the destination folder and select “Get Info” to adjust permissions.
Quick fixes for common issues:
- Clean your trackpad of dirt and oils
- Update macOS to the latest version
- Check if the destination drive is locked or full
- Force quit and restart apps that aren’t accepting dropped files
Sometimes the trackpad settings need adjustment. Try increasing the tracking speed in System Preferences to make drag operations more responsive.
Drag & Drop in Applications
Mac apps offer convenient drag and drop features that help you work faster and more efficiently. This functionality makes moving files between applications simple and organizing your digital workspace easier.
Adding Attachments in Apple Mail via Drag & Drop
Adding files to emails in Apple Mail is quick with drag and drop. Simply find the file you want to attach in Finder or on your desktop. Click and hold the file, then drag it directly into your email message.
You can drag multiple files at once by selecting them first. Hold Command (⌘) while clicking each file, then drag the group into your email.
If you’re having trouble with the trackpad, try using three fingers on the trackpad while hovering over the files. This makes dragging easier on some Mac models.
For attachments from other applications, you can also use the application switcher method. Start dragging the file, then press ⌘+Tab with your other hand to switch to Mail, and drop the file.
Organizing Applications with Drag & Drop
Moving applications to the Applications folder is essential for proper Mac organization. When installing new software, drag the app icon to the Applications folder when prompted.
To move apps manually, open Finder and locate your application. Click and drag it to the Applications folder in the sidebar. You can also access Applications through the Dock by clicking the Trash icon, then clicking the Applications icon in the window that appears.
Rearranging apps in your Dock is just as simple. Click and hold an app icon, then drag it to a new position. The other icons will shift to make room.
You can also create app groups in Launchpad. Drag one app onto another to create a folder. Keep related apps together for better workflow organization.
Best Practices for File Management
Good file management on Mac helps you stay organized and work faster. These tips will help you handle files more efficiently when using drag and drop features.
Avoiding Duplicates While Dragging Files
When dragging files on Mac, it’s easy to create unwanted duplicates. To prevent this, look at the small plus (+) icon that appears when dragging. This icon indicates you’re making a copy rather than moving the file.
Hold the Command key while dragging to move files between different volumes instead of copying them. This works great when transferring between external drives and your Mac.
For more control, use the three-finger drag on your trackpad. This makes it easier to precisely move files without accidentally creating copies.
Check Finder’s sidebar regularly for the “Recents” folder. This helps you spot duplicates you may have created during drag operations.
Always verify the destination folder after dragging files to ensure they went where you intended.
Properly Tagging Files During Drag & Drop
Tags offer a powerful way to organize files beyond basic folders. In Finder, you can tag folders you use frequently to access them quickly later.
To add tags while dragging:
- Select your file(s)
- Start dragging
- Press Control+Click while still dragging
- Select a tag color from the menu
You can also tag files by selecting them in Finder and clicking the tag icon in the toolbar. Create custom tags by opening Finder preferences and clicking the Tags tab.
Color-code your projects with consistent tag colors. For example, use green for completed work and red for urgent files.
Tags work across your Mac, so files with the same tag will appear together when you click that tag in Finder’s sidebar.
Working with File Extensions and URLs
File extensions tell your Mac what app should open a file. When dragging files, you can see the extension if you have “Show all filename extensions” enabled in Finder preferences.
To quickly share files between apps, drag directly from the title bar of one app to another. This works for documents, images, and many other file types.
For URLs, drag them from your browser directly to folders or documents. This creates a web location file that opens the website when clicked.
When dragging with one or two fingers doesn’t feel comfortable, try enabling Drag Lock in Accessibility settings. This lets you start dragging with a double-tap and release without holding down.
Remember that some file extensions change when dragging between apps, which might affect compatibility.
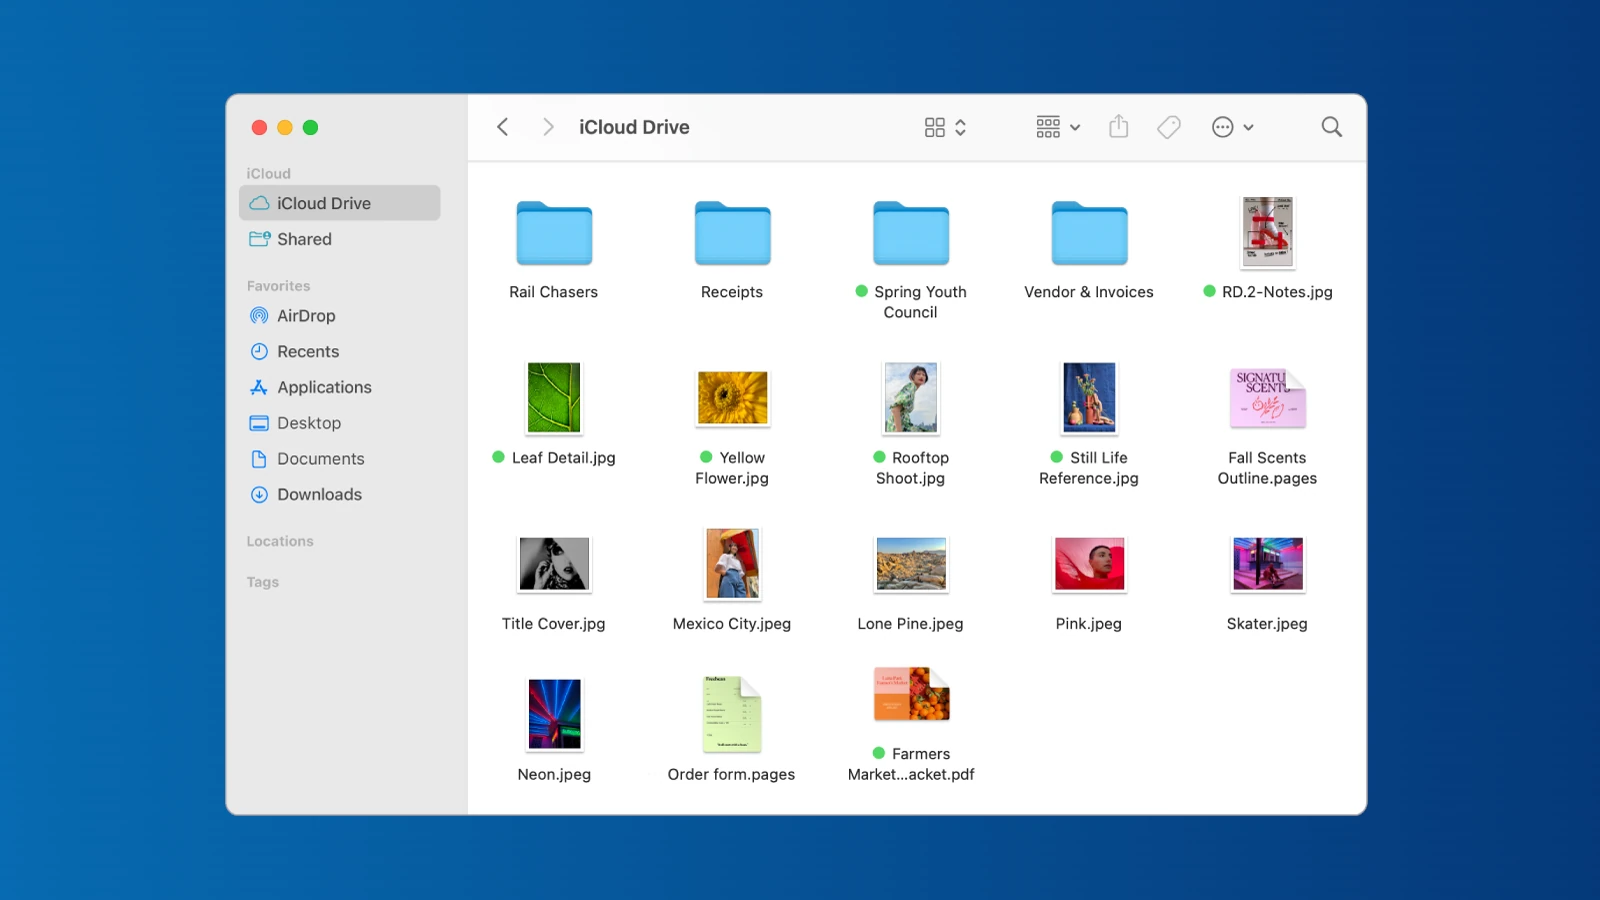
Integrating Drag & Drop with Cloud Services
Mac’s drag and drop functionality works seamlessly with cloud storage platforms, making file management between your local computer and online storage quick and simple. This integration helps keep your files synced across all your devices while saving valuable disk space.
Uploading to Cloud Storage via Drag & Drop
Uploading files to cloud services on your Mac is straightforward using drag and drop. With most cloud services like Google Drive, iCloud, or Dropbox, you can upload files by simply dragging them from your Mac into the cloud service window.
For Google Drive users, after installing Drive for desktop on your MacBook Pro, you can:
- Open Finder and locate the files you want to upload
- Open your Google Drive folder in another window
- Drag the files from Finder and drop them into Google Drive
Some cloud services offer desktop apps that create special folders on your Mac. Files placed in these folders automatically sync to the cloud. This works great for frequent uploads or when working with multiple files.
Syncing Files Across Devices
Cloud syncing lets you access your files on any device. When you drag items to Google Drive folders, the system creates copies while keeping cloud versions intact.
Most cloud services offer these sync options:
- Selective sync: Choose which folders download to your Mac
- Online-only files: Access cloud files without using local storage
- Two-way sync: Changes made on any device update everywhere
On your MacBook Pro, you can check sync status through the cloud service’s menu bar icon. Green checkmarks or similar indicators show fully synced files.
For large file transfers, watch for upload progress indicators. Some services limit file sizes or apply daily transfer quotas depending on your subscription level.
Educational Resources for Drag & Drop
Learning how to efficiently use drag and drop on Mac can save you time and make your workflow smoother. There are many helpful resources available online to improve your skills.
Finding Online Tutorials and Guides
YouTube offers excellent visual tutorials for Mac users wanting to master drag and drop. Channels dedicated to Mac tips often show step-by-step instructions for basic and advanced techniques. These videos typically run 5-10 minutes and cover everything from simple file transfers to complex multi-app workflows.
Apple’s developer website provides detailed documentation for those interested in understanding the technical aspects. These guides explain how drag and drop works within the OS X system.
Many Mac blogs and websites like Setapp offer written guides with screenshots. These resources often include keyboard shortcuts and trackpad gestures that enhance the drag and drop experience.
Practicing Drag & Drop Skills
Start practicing with simple tasks like moving files between folders. This builds muscle memory for more complex actions later.
Try the title bar trick highlighted by The Verge – dragging documents directly from one app to another using the title bar. This lesser-known feature saves time when working with multiple applications.
For handling multiple files, practice selecting groups of items using Command+click or Shift+click before dragging. Creating a practice folder with dummy files helps build confidence without risking important data.
Mac’s built-in apps like Notes, Pages, and Photos offer safe environments to practice drag and drop between applications. Try moving text between documents or images into presentations to get comfortable with cross-app operations.
Frequently Asked Questions
Mac users often face challenges when handling files through drag and drop. These common questions address typical issues with this essential function and provide simple solutions for better file management.
How can I move files on a MacBook Air using drag and drop?
Moving files on a MacBook Air is simple. Click and hold the file you want to move, then drag it to your desired location.
For trackpad users, you can use three fingers on the trackpad while the pointer is over the files. Then move the files to your destination and release your fingers.
Another option is to use the drag lock feature which lets you tap and hold briefly before dragging.
What steps are needed to enable drag and drop functionality on a Mac?
Drag and drop is turned on by default on Mac, but you might need to adjust settings for optimal use. Open System Preferences and select Trackpad or Mouse settings.
For trackpad users wanting easier drags, enable three-finger drag in Accessibility settings. Go to System Preferences > Accessibility > Pointer Control > Trackpad Options and check the box for three-finger drag.
Check that your input device is working properly if drag and drop doesn’t function as expected.
What should I do when drag and drop is not working on my Mac?
When drag and drop fails, try restarting your Mac first. This often fixes temporary glitches with the operating system.
Check if your trackpad or mouse has adequate battery power. Low batteries can cause erratic behavior with dragging functions.
Try different dragging techniques such as pressing the physical button and then dragging. Some users find this more reliable than tap-and-drag methods.
Is it possible to drag and drop on a Mac without using a mouse?
Yes, Mac users can drag and drop without a mouse. The built-in trackpad offers several options for drag and drop operations.
The three-finger drag technique works well for most trackpad users. Simply place three fingers on the trackpad while hovering over the file, then move to your destination.
For those who find multi-finger gestures difficult, enable drag lock in Accessibility settings for easier trackpad dragging.
How can files be moved on a Mac without duplicating them?
To move files without creating duplicates, drag and drop between locations on the same storage device. This performs a move operation rather than a copy.
When dragging between different drives, hold the Command key while dragging to move instead of copy. Without this key, the default action creates a duplicate.
For folder navigation while dragging, hover over folders for a moment and they’ll open automatically, allowing you to place items in subfolder locations.
What is Drag Lock and how does it affect dragging and dropping files on a Mac?
Drag Lock is a helpful feature for users who struggle with standard drag and drop. It allows clicking an item once to “pick it up” and clicking again to “put it down.”
To enable Drag Lock, go to System Preferences > Accessibility > Pointer Control and select the “Enable dragging without drag lock” option. This setting makes dragging easier for those with dexterity challenges.
With Drag Lock active, users can press the trackpad button, initiate the drag, and then reposition their finger without losing the item being dragged.