
Saving files on a Mac is a necessary task that you’ll need to do often. It’s a straightforward process that becomes easier with time. The Finder is the main tool for accessing, managing, and saving files on a Mac. To save a file for the first time, you need to select ‘File’ and then ‘Save’ from the menu bar, or press Command (⌘) + S on your keyboard. A dialog box will appear, allowing you to name your file and select where to save it. You can save the latest changes to your file quickly by clicking the ‘Save’ option again, which will overwrite the previous version of the file. If you want to keep the original file unchanged and save the new changes as a separate version, you can select ‘File’ and then ‘Save As.’ This way, you can have multiple versions of a document, which is beneficial for tracking progress or maintaining a record of changes.
Tips for Managing Files on Your Mac
Saving and organizing files on your Mac is essential for keeping your work secure and easy to find. Whether you’re new to Macs or want to improve your file management skills, here’s a breakdown to help you master the process.
Understanding the Finder
The Finder is your Mac’s built-in file manager. It’s the gateway to accessing and organizing everything on your computer. Think of it like a supercharged version of Windows File Explorer.
- Sidebar: Located on the left side of the Finder window, this provides quick access to common locations like your Desktop, Documents folder, and connected drives.
- Main Window: Displays the contents of the currently selected folder.
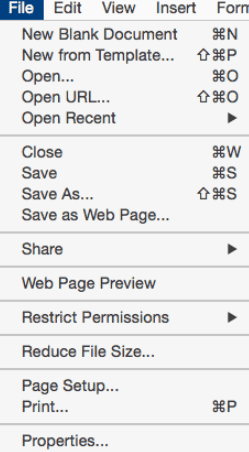
Saving a File for the First Time
Here’s how to save a new document:
- Open Your Application: Open the program you are working in, such as Pages, Word, or Photoshop.
- Create or Open a Document: Either start a new document or open an existing one.
- Save Command: Go to “File” in the top menu bar and select “Save” (or press Command + S).
- Choose a Location: Navigate to where you want to save the file (Documents folder, Desktop, etc.).
- Name Your File: Give it a descriptive name that helps you easily find it later.
- Click “Save”: Your file is now saved in the chosen location.
Creating New Folders
Keep your files organized with folders:
- Go to Desired Location: Open a Finder window and go to where you want to create a new folder (e.g., your Documents folder).
- New Folder: Right-click (or Control-click) in an empty area and choose “New Folder”.
- Name It: Type a name for your folder.
- Move Files: Drag and drop files into your new folder to organize them.
Saving Subsequent Changes
Once your initial file is saved, you can quickly save any further changes as you work:
- Shortcut: Press Command + S frequently to save your progress.
- Auto-Save: Some applications have an auto-save function that saves your work periodically in the background.
The “Save As” Function
Use “Save As” to create a copy of your file, preserve an older version, or save in a different format.
- File Menu: Go to “File” > “Save As”.
- New Name or Location: Choose a different name or navigate to a new location if desired.
- File Format: Some applications let you select a different file format (e.g., .docx vs. .pdf).
- Click “Save”: A copy of your file will be created with the specified changes.
Key Locations for Saving Files
- Desktop: Provides quick access, but can get cluttered easily.
- Documents: The default location for most programs, best for long-term storage.
- iCloud Drive: For backup and syncing files across your Apple devices.
- External Drives: Useful for very large files or for creating secondary backups.
| Location | Benefits | Considerations |
|---|---|---|
| Desktop | Quick access to frequently used files | Can easily become cluttered |
| Documents | Default location for many applications | Best for general organization and long-term storage |
| iCloud Drive | Automatic backup and syncing across Apple devices | May require additional iCloud Storage space |
| External Drives | Ideal for very large files or secondary backups | Requires an external drive |
Key Takeaways
- Mac’s Finder is the main tool for saving files.
- Use ‘Save As’ to create different versions of a document.
- Regular saving prevents data loss.
Saving Files on Your Mac
Saving files on a Mac is a straightforward process. Familiarity with the Mac file system and organizing tools like Finder can help you manage your files effectively. iCloud integration also allows for easy backup and access across devices.
Understanding Mac File Systems
The Mac file system organizes data into files and folders. When you save a document, you’re adding it to this system. MacOS uses a structure that includes a Documents folder, a Desktop, and other locations to store your files. It’s important to know where your documents go when you hit ‘Save’.
Using Finder to Organize and Save Files
Finder is the tool for finding and organizing files on a Mac. To save a file, you go to the File menu and choose ‘Save’ or ‘Save As’. ‘Save As’ is used for saving a new file or saving an existing file with a new name. When you create a new folder in Finder, you click on ‘File’ and then ‘New Folder’. This helps you group related documents.
Creating Folders to Manage Documents
Folders help you keep your files organized. In Finder, you make a new folder to group files by different kinds like projects or topics. To create one, click ‘File’ then ‘New Folder’. Name your folder clearly so you’ll remember what’s in it. Drag files into your new folder to keep related documents together.
Utilizing iCloud for File Storage and Backup
iCloud Drive is where your Mac keeps files for cloud storage. You can turn it on in System Preferences under iCloud. Once on, your files, including your Desktop and Documents folders, are stored in iCloud. They sync across all your Apple devices. This means easy backup and access, even when you’re away from your Mac.
Naming and Tagging for Efficient File Retrieval
Choosing the right file name and adding tags helps you find your files later. Use clear names that describe the content or the purpose of the file. Add tags by right-clicking the file and selecting ‘Tags’. You can use colors or keywords. Tags make files easy to find with Spotlight search, even if you don’t remember the file name.
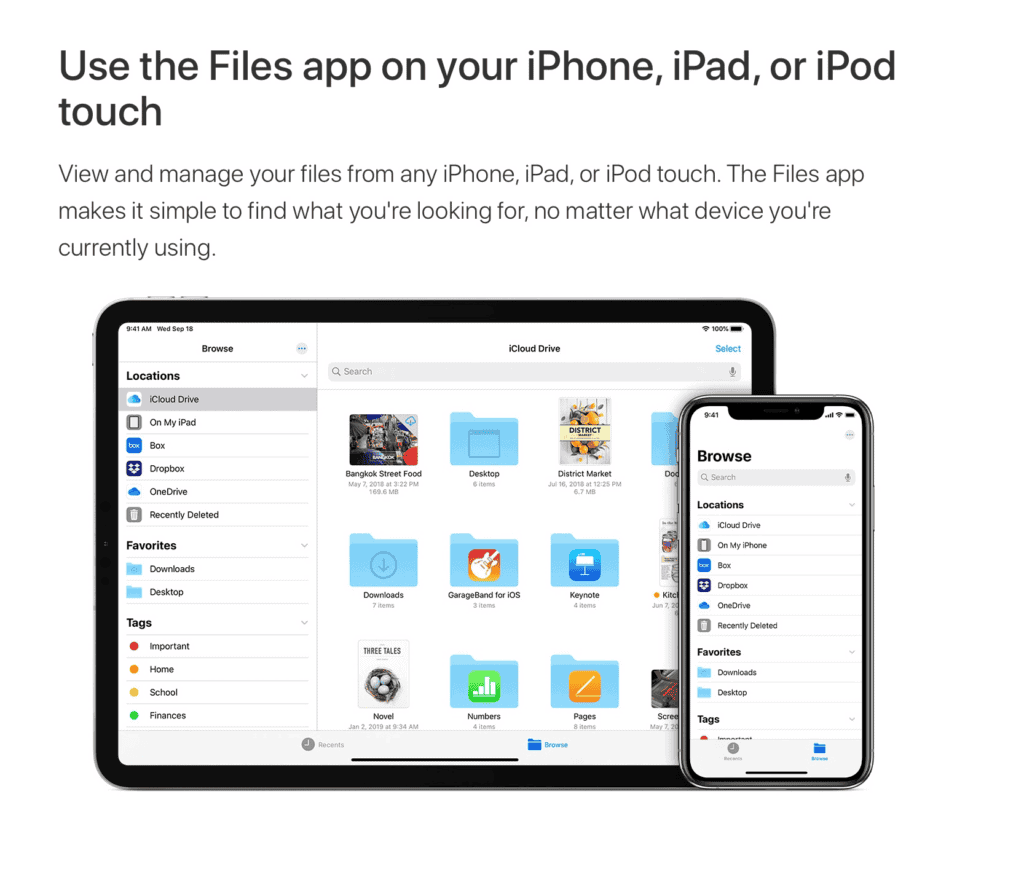
Where Are Downloads Saved on An iPad
Files on an iPad are saved in different folder depending on the file type. For most general types, you’ll find your downloaded files in your iPad Files app under the “Downloads” folder. Most files downloaded from Safari and other apps are stored in this folder.
For photos and videos, you’ll find them in the Photos app instead. Understanding the iPad’s file storage system is simple once you know where to look. This guide will show you how to find and manage your downloads, making your iPad usage more efficient.
Where To Find iPad Downloads
No matter what you download, it’s easy to find on your iPad.
The Files App
Apple’s Files app is your go-to spot. It’s where most downloads land, like documents or PDFs from Safari.
Downloads Folder
- Open the “Files” app.
- Tap “Browse” at the bottom.
- Under “Locations,” you might see “Downloads.” If not, tap “iCloud Drive.”
- Your downloaded files are inside the “Downloads” folder.
Other Apps
Sometimes, downloads go straight to specific apps. For example:
- Photos: Images and videos usually land here.
- Music: Songs and albums from the iTunes Store go to the Music app.
- Books: Ebooks and audiobooks can be found in the Books app.
Finding Different File Types
This table shows you where your downloads are saved on your iPad.
| File Type | Usual Download Location |
|---|---|
| Documents (PDF, Word, etc.) | Files app > Downloads folder |
| Images and videos | Photos app |
| Music and audiobooks | Music app |
| Ebooks | Books app |
| Apps | Home screen |
Helpful Tips
- Search: Use the search bar in the Files app to find downloads quickly.
- Recent Downloads: The Files app often shows recent downloads first, even if they’re in different folders.
Understanding iPad Downloads
Learn how to find and manage your downloaded files on an iPad. This guide will explain where your downloads go and how you can easily access them using the built-in apps and tools.
Defining Downloads on iPad
Downloaded files on an iPad include documents, images, and other files you save from the internet. These might come from email attachments, websites, or apps. Downloads often go to the Files app.
Knowing where your files are saved helps access them quickly. Most downloads are stored locally on your device for easy access.
iOS and iPadOS File Management
Both iOS and iPadOS manage files using the Files app. This app is where you’ll find all your documents, including those you’ve downloaded. It organizes files from different locations like On My iPad and iCloud Drive.
On My iPad stores files locally, while iCloud Drive keeps them in the cloud. This setup helps keep your files safe and accessible. Understanding this lets you manage storage space and find files quickly.
Navigating the Files App
To open the Files app, tap the icon on your iPad’s home screen. This app shows locations like On My iPad and various cloud services.
To find the Downloads folder, tap Browse at the bottom of the screen, then tap On My iPad. Inside, you’ll see the Downloads folder, which holds all files you’ve saved from the internet.
If you can’t find a file, use the search bar at the top of the Files app and type the file name. This helps quickly find anything you’re looking for.
Safari Download Manager
Safari on iPad has a built-in download manager. When you download something using Safari, it goes to the Downloads folder in the Files app.
To view your current downloads in Safari, tap the icon next to the search field. This shows all your recent downloads and lets you open them directly.
Managing downloads through Safari is straightforward, ensuring that all files end up in one place for easier access later.
Frequently Asked Questions
This section answers some of the common questions people have about finding and managing downloads on an iPad. Learn how to locate, access, and manage your downloaded files.
How can I locate downloaded files on my iPad?
To find your downloaded files, open the Files app. Look for the “Downloads” folder either in the “On My iPad” location or in a cloud service like iCloud Drive.
What is the default location for Safari downloads on an iPad?
When you download a file using Safari, it usually goes into the “Downloads” folder within the Files app. You can find this folder in the “On My iPad” location.
Where can I find my Downloads folder on an iOS device?
The Downloads folder is inside the Files app. Open Files and look under the “On My iPad” section or in any synced cloud services.
How do I access my downloaded files on an iPhone or iPad?
To access your downloaded files, open the Files app. Tap on the “Downloads” folder. This is where you will find the files you have downloaded.
What happened to a file after I downloaded it on my iPad?
After you download a file, it is saved in the Downloads folder within the Files app. Open the Files app and navigate to the Downloads folder to view your file.
How can I open my Downloads folder on an iPad?
Open the Files app on your iPad. Tap on the “Downloads” folder. This will let you see all the files you have downloaded.


