Losing track of your iPad can be stressful, but Apple’s Find My app makes it easy to locate your device. You can use Find My to see your iPad’s last known location on a map, even if it’s offline. This feature is a lifesaver when you’ve misplaced your tablet at home or left it behind somewhere.
The Find My app works with all your Apple devices, including iPhones, Macs, and AirPods. It uses GPS and internet connectivity to pinpoint your device’s location. If your iPad is offline, Find My can still help by showing its last known position or by using the Find My network to locate it.
To use Find My, make sure it’s turned on in your iPad’s settings. You can then access it through the Find My app on another Apple device or by logging into iCloud.com from any web browser. This gives you the flexibility to find your iPad from anywhere.
| Feature | Description |
|---|---|
| Last Known Location | Shows where your iPad was last connected |
| Play Sound | Helps find a nearby iPad by making it play a sound |
| Lost Mode | Locks your iPad and displays a custom message |
| Erase iPad | Removes all data if you can’t recover your device |
Find My iPad Last Location: A Step‑by‑Step Guide
Losing an iPad can be stressful, especially if the battery is dead or the device is offline. Fortunately, Apple’s Find My feature can still show your iPad’s last known location, helping you track where it was before going offline. This guide walks you through how to find your iPad’s last location and what to do next.
What Is “Last Known Location” on iPad?
The last known location is the most recent place your iPad reported to Apple before:
- The battery ran out
- The device was turned off
- It lost internet connectivity
This location is saved automatically if Find My was enabled on the iPad.
Requirements to See Your iPad’s Last Location
Before proceeding, make sure:
- You signed in to the iPad with your Apple ID
- Find My iPad was enabled before it was lost
- The iPad was online at least once before going offline
If these conditions are met, you can view the last recorded location.
How to Find Your iPad’s Last Location (iPhone, iPad, or Mac)
Method 1: Using the Find My App
- Open the Find My app on your iPhone, iPad, or Mac
- Tap the Devices tab
- Select your missing iPad from the list
- Look at the map to see:
- Current location (if online)
- Last known location (if offline)
If the iPad is offline, you’ll see a message such as:
“Last seen at [location] on [date and time].”
Method 2: Using iCloud.com (Any Browser)
- Go to https://www.icloud.com/find
- Sign in with your Apple ID
- Click All Devices
- Select your iPad
The map will display the last known location if the device is offline.
Enable “Notify When Found”
If your iPad is offline:
- Select your iPad in the Find My app
- Turn on Notify When Found
You’ll receive a notification as soon as the iPad comes back online and its location updates.
What to Do If Your iPad Is Offline
If the last location appears but the iPad is still missing, take these steps:
1. Play a Sound (If Nearby)
If you think the iPad is nearby but silent, tap Play Sound to help locate it.
2. Enable Lost Mode
Lost Mode locks your iPad and displays a custom message:
- Select your iPad in Find My
- Tap Activate under Mark as Lost
- Enter a contact phone number and message
This protects your data and helps someone return it.
3. Erase iPad (Last Resort)
If you believe your iPad is stolen and unrecoverable:
- Choose Erase This Device in Find My
⚠️ Only do this if recovery seems unlikely, as location tracking will stop after erasing.
Can You Find an iPad If the Battery Is Dead?
Yes—but only the last recorded location. Once the battery dies, the iPad can’t update its location until it’s recharged and connected to the internet.
Newer Apple devices can sometimes update their location briefly after powering off, but this depends on model and settings.
Why the Last Location May Not Appear
You may not see a last location if:
- Find My was disabled
- The iPad was never connected to the internet
- The Apple ID was removed
- The device hasn’t reported its location recently
Tips to Prevent Future Loss
- Keep Find My always enabled
- Turn on Find My network in Settings
- Enable Send Last Location (Settings → Apple ID → Find My)
- Use a passcode and Face ID/Touch ID
Final Thoughts
Finding your iPad’s last known location can significantly improve your chances of recovery. Even if the device is offline or out of battery, Apple’s Find My service provides valuable clues about where it was last seen.
If your iPad doesn’t reappear, enabling Lost Mode and monitoring notifications is your best next step.
Setting Up Find My on Your Apple Device
Find My is a crucial feature for locating lost Apple devices. It offers peace of mind and helps recover misplaced items quickly. Proper setup ensures maximum protection for your iPad and other Apple products.
Enabling Find My on iPad
To set up Find My on your iPad, follow these steps:
- Open Settings
- Tap your name at the top
- Select Find My
- Tap Find My iPad and toggle it on
This activates the feature on your device. You can also enable “Send Last Location” which sends the iPad’s location when the battery is critically low.
Make sure your iPad is signed in to your Apple ID. If you don’t have one, create it during setup. Keep your Apple ID password secure as it’s needed to turn off Find My or erase your device remotely.
Understanding Location Sharing and Family Sharing
Find My allows you to share your location with friends and family. This is useful for meetups or keeping track of loved ones. To share your location:
- Open the Find My app
- Tap the People tab
- Select “Share My Location”
- Choose a contact and duration
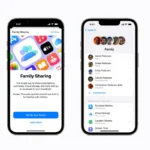
Family Sharing enhances Find My functionality. It lets you locate devices of family members. To set up Family Sharing:
- Go to Settings > Your Name > Family Sharing
- Tap “Add Member”
- Follow the prompts to invite family members
| Feature | Benefit |
|---|---|
| Location Sharing | Easy meetups, safety tracking |
| Family Sharing | Locate family devices, share purchases |
The Importance of Two-Factor Authentication
Two-Factor Authentication (2FA) adds an extra layer of security to your Apple ID. It’s crucial for protecting Find My and your device data. When enabled, you’ll need a verification code along with your password to access your account.
To turn on 2FA:
- Go to Settings > Your Name > Password & Security
- Tap “Turn On Two-Factor Authentication”
- Follow the setup process
2FA uses trusted devices or phone numbers to verify your identity. Keep these up to date in your Apple ID settings. This ensures you can always access your account and Find My features.
Remember, 2FA is required to use Find My on newer iOS versions. It’s a small step that greatly enhances your device’s security.
Accessing Find My Features
The Find My app offers powerful tools to locate Apple devices and items. It provides options through mobile apps and iCloud.com with features like device tracking and notifications.
Using the Find My App
The Find My app is available on iPhone, iPad, and Mac. To use it, open the app and sign in with your Apple ID. The main screen shows a map with your devices’ locations.
Tap Devices at the bottom to see a list of your Apple products. Select a device to view its location and access options. These include:
- Play Sound
- Mark as Lost
- Erase This Device
You can also set up notifications to alert you if a device is left behind. This helps prevent accidentally forgetting items in public places.
Locating Devices on iCloud.com
For web access, use Find Devices on iCloud.com. Sign in with your Apple ID. Click All Devices at the top to see your items on a map.
Select a device to view options similar to the mobile app:
| Option | Description |
|---|---|
| Play Sound | Makes the device emit a noise |
| Lost Mode | Locks the device and displays a message |
| Erase | Removes all data from the device |
This web interface is helpful when you don’t have access to your mobile devices.
Features of Find My Network
The Find My Network extends location capabilities to offline devices. It uses nearby Apple devices to relay the position of your lost item securely.
Key benefits include:
- Locating devices even when they’re offline
- End-to-end encryption for privacy
- Works with AirTags and other Find My accessories
This network greatly improves your chances of finding lost items. It’s especially useful for locating devices that are out of battery or not connected to the internet.
In Case of a Lost or Stolen iPad
If your iPad goes missing, swift action is crucial. Apple provides tools to protect your data and increase the chances of recovery. These steps can help you secure your device and potentially retrieve it.
Activating Lost Mode
Lost Mode locks your iPad with a passcode and displays a custom message on the screen. To activate it:
- Open Find My on another Apple device or iCloud.com
- Select your iPad from the device list
- Choose “Mark as Lost” or “Lock”
- Follow the prompts to set a passcode and message
Lost Mode disables Apple Pay and hides notifications. It tracks the iPad’s location when online. You can update the message or phone number anytime.
Reporting a Stolen Device
If you believe your iPad was stolen:
- File a police report immediately
- Provide the device’s serial number to law enforcement
- Contact your cellular carrier to suspend service (if applicable)
- Change passwords for important accounts
- Mark the device as lost in Find My
Keep records of all actions taken. This information may help in recovery efforts or insurance claims.
Remote Actions to Secure Your Data
Protect your personal information with these remote actions:
- Erase iPad: Use Find My to delete all data if recovery seems unlikely
- Change Apple ID password: Prevent unauthorized access to your account
- Remove payment methods: Log into appleid.apple.com to delete cards
- Turn on two-factor authentication: Add extra security to your Apple ID
| Action | Purpose | How to Do It |
|---|---|---|
| Erase iPad | Delete all data | Use Find My app or iCloud.com |
| Change password | Secure account | Visit appleid.apple.com |
| Remove payments | Prevent charges | Log into Apple ID settings |
| Enable 2FA | Extra protection | Set up in Apple ID security settings |
Remember, these steps help safeguard your information but may limit your ability to track the device.
Preventive Measures and Additional Tips
Taking proactive steps can significantly improve your chances of finding a lost iPad. These measures also offer extra protection against theft and unauthorized access.
Linking Airtag and Other Accessories
AirTags and similar tracking devices can be invaluable for locating a lost iPad. Attach an AirTag to your iPad case or sleeve. This allows you to track its location even if the iPad is turned off or the battery is dead.
Other useful accessories include:
- GPS-enabled cases
- Bluetooth trackers
- Smart locks for your iPad storage
These tools work alongside the Find My app to enhance your iPad’s security. They provide an extra layer of protection, especially in situations where the iPad’s built-in tracking might fail.
AppleCare+ and Stolen Device Protection
AppleCare+ with Theft and Loss offers comprehensive coverage for your iPad. It includes:
| Feature | Benefit |
|---|---|
| Theft protection | Replacement of stolen iPad |
| Loss coverage | Replacement if iPad is lost |
| Express replacement | Quick device replacement |
| Technical support | 24/7 priority access |
This plan reduces your financial liability if your iPad is stolen or lost. It’s particularly useful for iPads used in high-risk environments or for frequent travelers.
To activate Stolen Device Protection:
- Update to the latest iOS version
- Enable two-factor authentication
- Turn on Find My iPad
- Set up Stolen Device Protection in settings
These steps add extra security layers to your device, making it harder for thieves to access or reset your iPad.
Frequently Asked Questions
Locating a lost iPad can be challenging. These common questions address key methods to find your device using Apple’s tools and services.
How do I locate my iPad using the iCloud website?
Go to iCloud.com and sign in with your Apple ID. Click “Find iPhone” and select your iPad from the list of devices. A map will display your iPad’s location if it’s online. You can also play a sound or put the device in Lost Mode from this interface.
What are the steps to access my iPad’s last location through Find My iPhone app?
Open the Find My app on another Apple device. Tap “Devices” at the bottom and choose your iPad. The map will show its current or last known location. You can also use options like Play Sound or Lost Mode from here.
Is it possible to track my iPad’s last location after it has been turned off or the battery has died?
Yes, Find My can show the last known location before your iPad was turned off or died. This feature works even if the device is offline. The location data remains available for up to 24 hours after the last connection.
How can I view the location history of my iPad using Find My app?
The Find My app doesn’t provide a built-in location history feature. It only shows the current or last known location. To track movement over time, you’d need to check and note locations manually at regular intervals.
Can I enable Lost Mode on my iPad if I cannot find it?
Yes, you can activate Lost Mode remotely through iCloud.com or the Find My app. This locks your iPad, displays a custom message on the screen, and tracks its location. It also disables Apple Pay as a security measure.
What should I do if my iPad is offline but I need to know its last recorded location?
Check the Find My app or iCloud.com. These services store the last known location when your iPad was online. If it’s offline, you’ll see “No location found” but can still view its last recorded position. Enable notifications to alert you when it comes back online.
| Feature | iCloud.com | Find My App |
|---|---|---|
| View Location | Yes | Yes |
| Play Sound | Yes | Yes |
| Lost Mode | Yes | Yes |
| Erase iPad | Yes | Yes |
| Offline Tracking | Limited | Limited |
| Notify When Found | Yes | Yes |