The Terminal on Mac is a powerful command-line interface that gives you direct access to the macOS operating system. For users who want to go beyond the graphical interface, Terminal provides a way to execute commands, run scripts, and perform advanced system operations. You can open Terminal on Mac in multiple ways, including using Spotlight Search, Finder, Launchpad, or even asking Siri.
Many Mac users avoid Terminal because it seems complicated, but accessing it is actually quite simple. The quickest method is pressing Command+Space to open Spotlight, typing “Terminal,” and pressing Enter. Alternatively, you can find Terminal in the Applications folder under Utilities, or use Launchpad to locate and launch it with a single click.
Once you’ve opened Terminal, you can keep it in your Dock for easy access in the future. This makes it readily available for any command-line tasks you need to perform regularly. Terminal’s power becomes apparent when you start using basic commands to navigate your file system, manage files, or install developer tools.
What Is Terminal?
Terminal is macOS’s built-in command-line interface. It allows you to control your Mac using text-based commands — perfect for developers, system administrators, or anyone who wants more control over their system.
🚀 How to Open Terminal on a Mac
There are several convenient ways to launch Terminal, depending on your preference.
🟢 Option 1: Open Terminal via Spotlight Search (Fastest Way)
- Press Command (⌘) + Spacebar to open Spotlight Search.
- Type Terminal.
- Press Return (Enter) when it appears.
✅ Tip: You can also click the Terminal icon directly from the Spotlight results.
🟣 Option 2: Open Terminal from Finder
- Open Finder.
- Go to Applications → Utilities.
- Double-click Terminal.app.
💡 Shortcut tip: Drag Terminal to your Dock for one-click access in the future.
🔵 Option 3: Open Terminal via Launchpad
- Open Launchpad (click the rocket icon in the Dock or press F4).
- In the search bar at the top, type Terminal.
- Click the Terminal icon to open it.
🟠 Option 4: Open Terminal Using Siri
If Siri is enabled:
- Click the Siri icon in the menu bar or press and hold Command (⌘) + Spacebar.
- Say: “Open Terminal.”
- Siri will launch it for you automatically.
🔴 Option 5: Open Terminal from Dock or Desktop Shortcut (Optional Setup)
If you use Terminal often, you can make it easier to access:
- Add to Dock: Right-click the Terminal icon → Options → Keep in Dock.
- Create a Desktop Shortcut:
- Open Finder → Applications → Utilities.
- Hold Option + Command, then drag Terminal to your desktop to create a shortcut.
⚙️ Bonus: Open a Terminal Window in a Specific Folder
You can open Terminal directly in a folder using Finder:
- Open the folder in Finder.
- Right-click (or Control-click) inside the folder.
- Select Services → New Terminal at Folder.
🧩 If you don’t see this option, enable it under:
System Settings → Keyboard → Keyboard Shortcuts → Services → Files and Folders → New Terminal at Folder.
🧰 Customizing Terminal
Once open, you can personalize Terminal:
- Go to Terminal → Settings (or Preferences).
- Change the theme, font size, or shell (e.g., zsh, bash).
✅ Summary
| Method | Shortcut / Path | Best For |
|---|---|---|
| Spotlight | ⌘ + Space → “Terminal” | Quick access |
| Finder | Applications → Utilities → Terminal | Manual navigation |
| Launchpad | Search “Terminal” | Visual access |
| Siri | “Open Terminal” | Voice control |
| Folder Shortcut | Right-click → Services → New Terminal at Folder | Folder-specific work |
Sources:
- Apple Support – Open or Quit Terminal on Mac
- GeeksforGeeks – How to Open the Terminal on a Mac
- wikiHow – How to Open Terminal on Mac
Key Takeaways
- Terminal can be opened using Spotlight Search, Finder’s Utilities folder, Launchpad, or Siri voice commands.
- You can keep Terminal in your Dock for quicker access to command-line functions in the future.
- Basic Terminal commands give you powerful control over your Mac beyond what’s possible with the graphical interface.
Accessing Terminal on MacOS
Terminal provides a command-line interface that gives users powerful control over their Mac systems. There are several convenient methods to open Terminal, each offering quick access depending on your workflow preferences.
Using Spotlight Search
Spotlight Search offers the quickest way to open Terminal on a Mac. To use this method:
- Press Command (⌘) + Space on your keyboard to open Spotlight
- Type “Terminal” in the search field
- Press Return or click on the Terminal app when it appears in the results
This method works from anywhere in macOS, making it particularly convenient when you’re in the middle of other tasks. Spotlight remembers frequently used apps, so Terminal will appear higher in results if you use it often.
Many Mac users prefer this approach because it doesn’t require navigating through folders or menus. The keyboard shortcut also becomes second nature with regular use.
Through Finder and Utilities
The Finder method provides a traditional way to access Terminal through the macOS file system:
- Open Finder (click the face icon in the Dock)
- Click on Go in the menu bar at the top of the screen
- Select Utilities from the dropdown menu
- Double-click the Terminal application icon
Alternatively, you can navigate directly to the Applications folder:
- Open Finder
- Click Applications in the sidebar
- Open the Utilities folder
- Find and launch Terminal
This method helps users understand where Terminal is actually stored on their Mac. The Utilities folder contains many other system tools worth exploring.
Via Launchpad
Launchpad provides a visual, iOS-like interface for launching applications:
- Click the Launchpad icon in the Dock (it resembles a rocket)
- Type “Terminal” in the search field at the top of the screen
- Click the Terminal app icon when it appears
You can also browse through Launchpad pages to find Terminal manually:
- Look for the Other folder or the Utilities folder
- Terminal is typically grouped with other system utilities
Launchpad offers a touch-friendly approach for those who prefer visual navigation. It’s particularly helpful for users transitioning from iOS devices to Mac.
Employing Siri for Opening Terminal
Siri provides a hands-free option for opening Terminal:
- Activate Siri by saying “Hey Siri” (if enabled) or by pressing and holding the Command + Space keys until Siri appears
- Say “Open Terminal“
Siri will immediately launch the Terminal application without requiring any typing or clicking. This method is especially useful when:
- Your hands are occupied with other tasks
- You’re working in a hands-free environment
- You have accessibility needs that make voice commands preferable
Siri can also handle more complex requests like “Open a new Terminal window” if you already have Terminal running but need an additional instance.
Terminal Basic Commands
Once you’ve opened Terminal on your Mac, understanding basic commands will help you navigate and control your system efficiently. These essential commands form the foundation for interacting with macOS through the command line interface.
Listing Files with ‘ls’
The ls command displays the contents of a directory. By itself, ls shows files and folders in the current directory.
ls
To see hidden files (those starting with a dot), use the -a flag:
ls -a
For detailed information including permissions, size, and modification date, add the -l flag:
ls -l
These flags can be combined for more comprehensive output:
ls -la
To list files in a specific directory, add the path after the command:
ls /Applications
The ls command supports color-coding with the -G flag on Mac, making it easier to distinguish between files and directories.
Managing Processes
The Terminal offers powerful commands for viewing and controlling running processes on your Mac.
To see all running processes:
ps aux
This displays a list including process IDs (PIDs), CPU usage, memory usage, and command names.
The top command provides a real-time, dynamic view of running processes:
top
To quit top, press q.
To terminate a process, use the kill command followed by the process ID:
kill PID
For stubborn processes that won’t close normally, use the force option:
kill -9 PID
The killall command terminates all processes with a specific name:
killall Safari
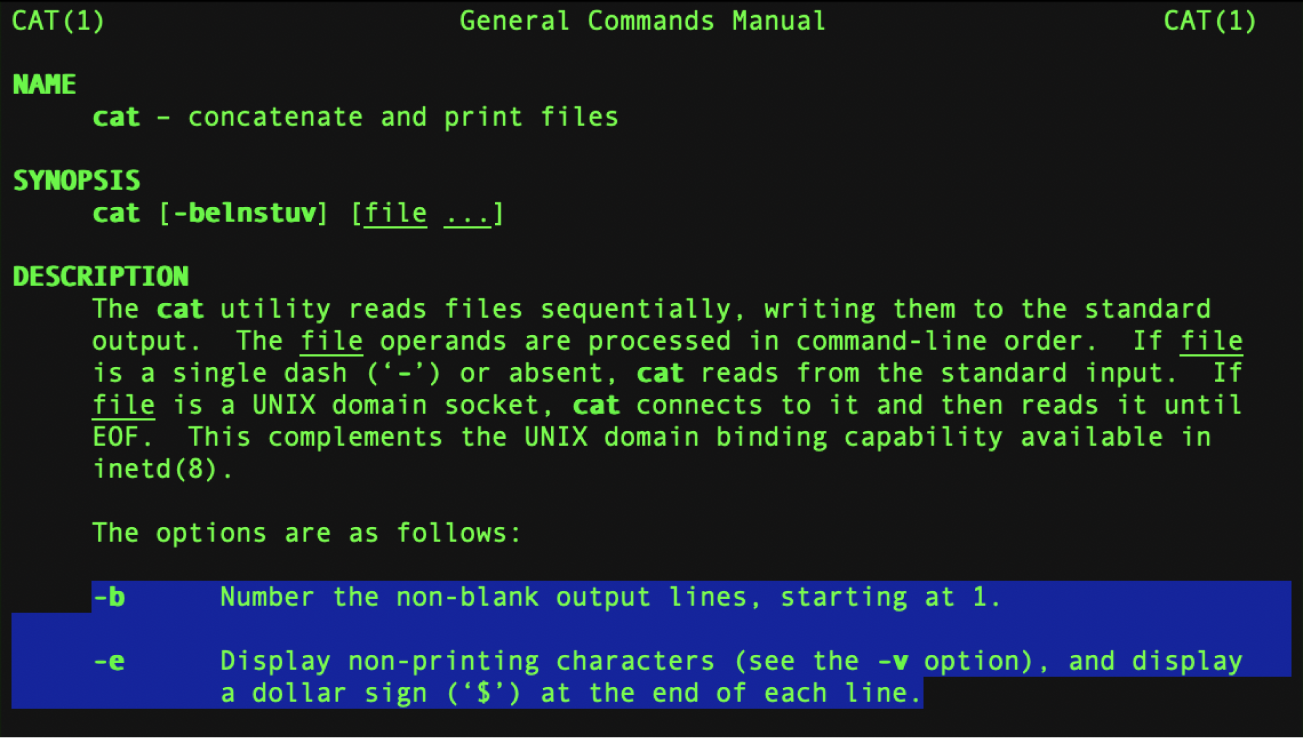
Navigating Man Pages
Man pages (manual pages) provide built-in documentation for nearly every Terminal command.
To access a command’s manual, type:
man command_name
For example:
man ls
Navigate through man pages using these keyboard shortcuts:
Spaceorf: Move forward one pageb: Move backward one page/text: Search for “text” in the documentn: Find the next occurrence of your search termq: Quit and return to Terminal
If you’re unsure which command you need, search man pages by keyword:
man -k keyword
The -h or --help flag often provides quick reference information:
ls --help
Customizing the Terminal Environment
The Terminal app on Mac offers extensive customization options that can enhance productivity and create a more personalized experience. Users can modify visual elements, change shells, and adjust settings to better suit their workflow needs.
Changing Terminal Profiles
Terminal profiles control the appearance and behavior of your Terminal windows. To access profiles, open Terminal and go to Terminal > Settings, then click the “Profiles” tab. Here you’ll find several pre-configured profiles like Basic, Pro, and Homebrew.
Each profile lets you customize:
- Text appearance: Change the font type, size, and color
- Background color/opacity: Adjust for better visibility
- Window size: Set default dimensions
- Cursor options: Modify blinking rates and appearance
To apply a profile, select it and click “Default” to make it your standard setup. For better readability, consider installing custom fonts like MesloLGS NF, which improves terminal text legibility.
Users who spend significant time in Terminal may want to create multiple profiles for different tasks. This setup allows quick switching between environments optimized for coding, server management, or file operations.
Switching Shells from bash to zsh
Since macOS Catalina, zsh (Z shell) has replaced bash as the default shell on Mac. Zsh offers improvements including:
- Better tab completion
- Spelling correction
- Enhanced customization options
- More powerful prompt styles
To check your current shell, type echo $SHELL in Terminal. The output will show the path to your active shell.
Switching to zsh is straightforward if you’re still using bash. Enter chsh -s /bin/zsh in Terminal and enter your password when prompted. After restarting Terminal, you’ll be using zsh.
Many users enhance zsh with frameworks like Oh My Zsh, which adds themes and plugins. Install it by running:
sh -c "$(curl -fsSL https://raw.github.com/ohmyzsh/ohmyzsh/master/tools/install.sh)"
This framework significantly improves the shell experience with colorful prompts, git integration, and shortcuts for common commands.
Navigating Mac Terminal
Terminal on Mac provides powerful command-line capabilities for advanced users. Once you’ve opened Terminal, understanding how to navigate through folders, execute commands, and use keyboard shortcuts will make your experience more efficient.
Using Keyboard Shortcuts
Keyboard shortcuts in Terminal can significantly speed up navigation and command execution. The Tab key helps complete file and folder names automatically – simply type the first few characters and press Tab.
To clear the screen, use Command+K or type clear and press Return. This creates a fresh workspace without closing the Terminal window.
Moving between commands is simple with the Up and Down arrow keys, which cycle through previously executed commands. This saves time when repeating or modifying recent commands.
Command+T opens a new tab within the same Terminal window, while Command+N creates an entirely new Terminal window. For quick navigation between multiple tabs, use Command+Shift+Left or Right arrow.
The keyboard shortcut Control+C is essential as it stops currently running commands or processes.
Running Tools and Applications
Terminal provides access to powerful command-line tools that aren’t available through the Mac’s graphical interface. To run a basic tool, simply type its name and press Return.
Common tools include:
lsto list files in the current directorycdto change directoriesmkdirto create new folderstouchto create new filesrmto remove files
To navigate folders, use the cd command followed by the folder path. For example, cd Documents moves you to the Documents folder. To move up one level in the folder hierarchy, type cd ...
The ~ symbol represents your home directory. Typing cd ~ from anywhere will take you back to your home directory.
Terminal can also launch applications with the open command. For instance, open -a Safari launches Safari. This command works for any application in your Applications folder.
Advanced Terminal Usage
Terminal on Mac offers powerful capabilities beyond basic commands. Users can automate tasks with scripts and resolve common issues with specific troubleshooting techniques.
Writing and Executing Shell Scripts
Shell scripts help automate repetitive tasks on a Mac. To create a script, open Terminal and use a text editor like nano:
nano myscript.sh
Begin each script with a shebang line specifying the shell:
#!/bin/bash
echo "Hello, world!"
Save the file and make it executable with the chmod command:
chmod +x myscript.sh
Run the script using:
./myscript.sh
Scripts can perform complex operations like file management, backups, or system maintenance. Users can create variables, use conditional statements, and implement loops for advanced functionality.
# Example script to back up documents
#!/bin/bash
backup_dir="/Users/username/Backups/$(date +%Y-%m-%d)"
mkdir -p $backup_dir
cp -R /Users/username/Documents $backup_dir
echo "Backup completed to $backup_dir"
Terminal Troubleshooting Tips
When Terminal commands fail, users should first check syntax errors. The man command provides documentation for any command:
man ls
If Terminal becomes unresponsive, force-quit by pressing Control+C or Control+Z. For persistent issues, restart Terminal or use Activity Monitor to end the process.
Permission problems are common in Terminal. The “Permission denied” error typically requires using sudo before commands:
sudo command_name
This prompts for the administrator password.
Network connection issues can be diagnosed with:
ping google.comto test internet connectivitynetworksetup -listallhardwareportsto view network interfaces
Terminal history can help recover lost commands. Press the up arrow or use the history command to view previously executed commands.
Optimizing Terminal Workflow
Once you’ve mastered opening Terminal on Mac, optimizing your workflow can save valuable time and increase productivity. Simple customizations can transform Terminal from a basic command-line interface into a powerful tool that’s ready when you need it.
Pinning Terminal to Dock
Adding Terminal to the Dock provides instant access to this powerful utility. Users can right-click on the Terminal icon while it’s running and select “Options” > “Keep in Dock” to make it permanently accessible. This eliminates the need to search through Applications or use Spotlight each time.
For frequent Terminal users, positioning the icon strategically in the Dock makes sense. Place it among other commonly used utilities for quick visual recognition.
The Dock icon also supports drag-and-drop functionality. Users can drag folders directly onto the Terminal icon to automatically open a new Terminal window at that location. This feature saves time when navigating to specific project directories.
Setting Up Login Items
Configuring Terminal as a login item ensures it’s ready immediately after system startup. This setup is particularly useful for developers and system administrators who use Terminal commands throughout their workday.
To add Terminal to login items:
- Open System Preferences/Settings
- Navigate to “Users & Groups”
- Select the “Login Items” tab
- Click the “+” button
- Locate and select Terminal from Applications > Utilities
- Click “Add”
Terminal will now launch automatically at startup, with your preferred settings already applied. For those concerned about system resources, Terminal uses minimal memory when idle.
Users can further enhance this setup by creating custom Terminal profiles with specific working directories and command-line tools loaded. These profiles can be saved and set as the default startup configuration.
Frequently Asked Questions
Terminal is a powerful macOS utility that allows users to execute commands directly through a text-based interface. Many Mac users have common questions about accessing and using this essential tool.
What are the steps to access Terminal on a Mac?
The simplest way to open Terminal on Mac is through Spotlight Search. Press Command + Space to open Spotlight, then type “Terminal” and press Enter.
Users can also find Terminal in the Applications folder within the Utilities subfolder. Open Finder, click on Applications, then open the Utilities folder and double-click on Terminal.
Another method involves using Launchpad. Click the Launchpad icon in the Dock, then type “Terminal” in the search field and click on the Terminal app icon.
Can you list the common keyboard shortcuts for opening Terminal on a Mac?
The most direct keyboard shortcut is Command + Space to open Spotlight, followed by typing “Terminal” and pressing Enter.
Users can create a custom keyboard shortcut for Terminal through System Preferences > Keyboard > Shortcuts > App Shortcuts.
Some third-party apps like Alfred or BetterTouchTool allow custom shortcuts to open any application, including Terminal.
How can I run Terminal commands on a macOS system?
To run commands in Terminal, first open the application using one of the methods described above. At the command prompt, type the desired command and press Enter to execute it.
Basic commands include ls (list directory contents), cd (change directory), and mkdir (make directory).
For commands that might affect system files, users may need to use sudo before the command, which will prompt for the administrator password.
Where can I find the Terminal application in macOS?
Terminal is located in the Utilities folder within the Applications folder. The full path is /Applications/Utilities/Terminal.app.
Users can also access Terminal through Spotlight Search or Launchpad, as previously mentioned.
Finder’s Go menu provides quick access to the Utilities folder where Terminal resides – simply click Go > Utilities, then locate Terminal.
What options are there for customizing the Terminal interface on a Mac?
Terminal preferences allow users to modify the appearance with different themes, font sizes, and colors. Access these by opening Terminal and selecting Terminal > Preferences from the menu bar.
Users can create profiles with different settings for various tasks. Each profile can have unique text colors, background colors, and even different window sizes.
Advanced users can customize the command prompt by editing the .bash_profile or .zshrc file, depending on which shell they use.
How does one quickly access the console on Mac within web browsers like Chrome?
Web browsers like Chrome have their own developer console, which is different from the macOS Terminal. Open Chrome’s console by pressing Command + Option + J.
For Safari, use Command + Option + C to open the developer console.
These browser consoles are specifically for web development and debugging, not for general system commands that Terminal handles.


