When an iPhone stops working properly, iOS Recovery Mode serves as a vital tool for troubleshooting and fixing software issues. Recovery Mode allows users to update or restore their iPhone’s operating system, providing a solution for devices that won’t boot normally or are experiencing severe software problems.
Getting into Recovery Mode varies by iPhone model. For newer models without a home button, users press and quickly release the volume up button, then volume down button, and hold the side button until the recovery screen appears. Older models with a home button require pressing both the home and side buttons simultaneously.
The recovery process gives users two options through iTunes or Finder: Update or Restore. The Update option attempts to fix iOS issues while preserving data, making it the preferred first choice. If updating fails, a full restore will erase the device but can resolve more serious software problems.
iOS Recovery Mode
If your iPhone, iPad, or iPod touch isn’t working properly — maybe it’s stuck on the Apple logo, frozen during an update, or you’ve forgotten your passcode — iOS Recovery Mode can help.
Recovery Mode allows you to restore or update your device using a computer when normal startup or software repair isn’t possible. This guide walks you through everything you need to know about entering, using, and exiting iOS Recovery Mode safely.
🧩 What Is iOS Recovery Mode?
Recovery Mode is a built-in troubleshooting feature on iOS and iPadOS devices. It allows your computer (via Finder or iTunes) to communicate with your device when the operating system can’t load properly.
You can use Recovery Mode to:
- Fix iOS update or restore errors
- Remove a forgotten passcode
- Restore a disabled or unresponsive device
- Reinstall iOS without erasing data (if possible)
If Recovery Mode doesn’t solve the issue, you may need to use DFU Mode (Device Firmware Update) — a deeper restore option.
🧰 What You’ll Need
Before starting, make sure you have:
- A Mac or Windows PC
- The latest version of Finder (macOS Catalina or later) or iTunes (Windows or macOS Mojave and earlier)
- A USB or USB‑C cable
- A stable internet connection
💡 Tip: Always back up your device to iCloud or your computer before entering Recovery Mode if possible. This process can erase your data.
🔌 Step 1: Turn Off Your Device
- Disconnect your iPhone or iPad from your computer.
- Power off your device:
- Face ID models (iPhone X and later / iPad Pro 2018+): Press and hold the Side (or Top) button and either Volume button until the power slider appears. Drag the slider to turn off.
- Home button models: Press and hold the Side (or Top) button until the power slider appears, then drag it to turn off.
💻 Step 2: Enter Recovery Mode
The button combinations vary depending on your device model:
🔹 iPhone 8 or later / iPad with Face ID
- Connect your device to your computer while holding the Side (or Top) button.
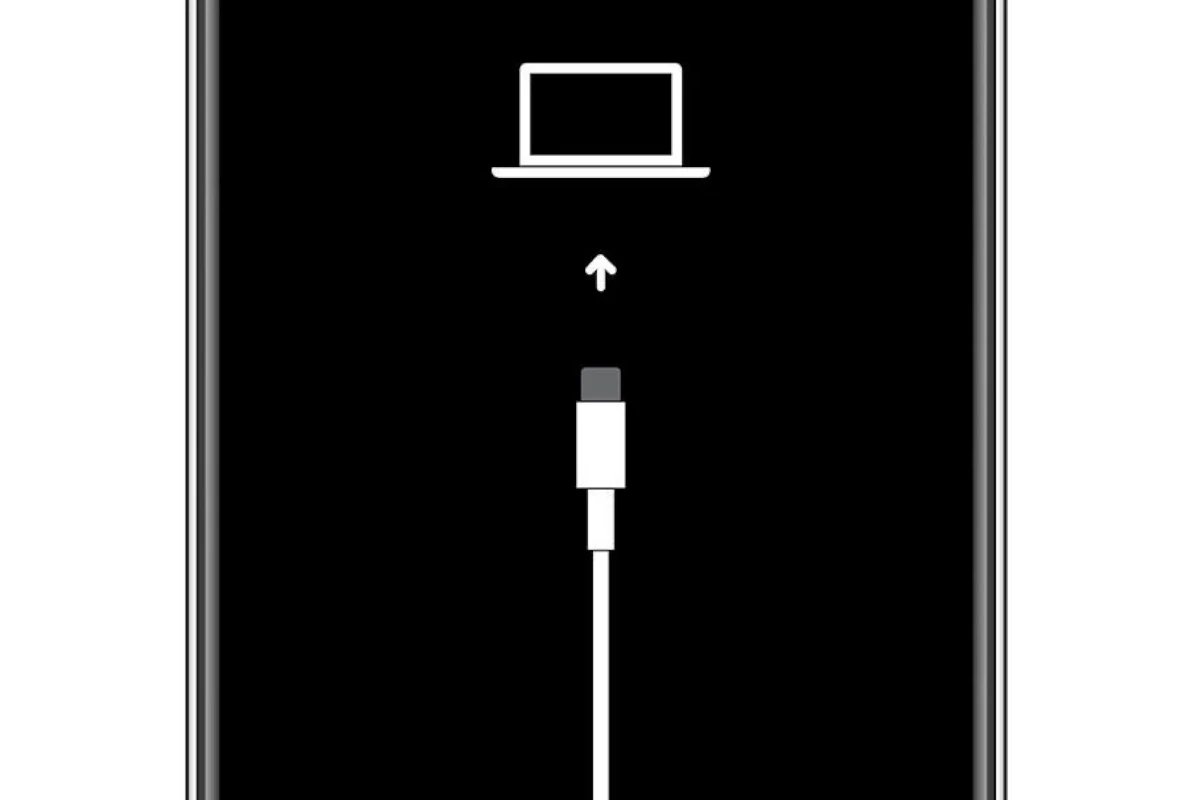
- Keep holding until you see the Recovery Mode screen (a cable pointing to a computer or iTunes logo).
🔹 iPhone 7 or iPhone 7 Plus
- Hold the Volume Down button while connecting your iPhone to the computer.
- Keep holding until the Recovery Mode screen appears.
🔹 iPhone 6s or earlier / iPad with Home button
- Hold both the Home and Top (or Side) buttons while connecting to your computer.
- Keep holding until you see the Recovery Mode screen.
🧑💻 Step 3: Choose Update or Restore
Once your device is in Recovery Mode, Finder or iTunes will detect it and display a pop-up window with two options:
- Update: Reinstalls iOS without erasing your data (try this first if you’re fixing a software issue).
- Restore: Erases your device and installs the latest version of iOS (necessary if you forgot your passcode or your device is disabled).
⚠️ If the download takes more than 15 minutes, your device may exit Recovery Mode automatically. If that happens, repeat Step 2 to re-enter it.
🔄 Step 4: Wait for the Process to Complete
- Finder or iTunes will download the latest iOS firmware and begin restoring or updating your device.
- Once finished, your iPhone or iPad will restart automatically.
- You can then set it up as new or restore from a backup.
🔓 Step 5: Exit Recovery Mode (If Needed)
If you entered Recovery Mode by mistake or want to exit without restoring:
- Unplug your device from your computer.
- Force restart it using the button combination for your model (e.g., Volume Up → Volume Down → hold Side button until you see the Apple logo).
Your device should boot normally.
🧠 Troubleshooting Tips
- Device not recognized by Finder/iTunes:
Try a different USB cable, restart your computer, or update to the latest version of iTunes/Finder. - Stuck in Recovery Mode loop:
Force restart your device or use DFU Mode to perform a deeper restore. - Can’t restore due to Activation Lock:
You’ll need to enter your Apple ID credentials or reset your password at iforgot.apple.com.
⚙️ DFU Mode vs. Recovery Mode
| Feature | Recovery Mode | DFU Mode |
|---|---|---|
| Restores iOS | ✅ Yes | ✅ Yes |
| Reinstalls firmware | ⚠️ Partial | ✅ Full |
| Fixes deep software issues | ❌ Sometimes | ✅ Always |
| Recommended for | Update/restore issues | Advanced troubleshooting |
If Recovery Mode doesn’t fix your issue, try DFU Mode next — it reinstalls both iOS and the device firmware.
✅ Summary
| Step | Action |
|---|---|
| 1 | Turn off your device |
| 2 | Use the correct button combo to enter Recovery Mode |
| 3 | Choose “Update” or “Restore” in Finder/iTunes |
| 4 | Wait for the process to finish |
| 5 | Set up your device or restore from backup |
🔗 Related Resources
- If you can’t update or restore your iPhone or iPad – Apple Support
- If you forgot your iPhone passcode or your iPhone is disabled – Apple Support
- About Recovery Assistant for iPhone and iPad – Apple Support
🏁 Final Thoughts
iOS Recovery Mode is a powerful tool for fixing software problems, restoring locked devices, and reinstalling the operating system safely. Whether you’re dealing with a stuck update or a forgotten passcode, following these steps can bring your device back to life.
Key Takeaways
- Recovery Mode provides essential iPhone repair options for software issues
- Different iPhone models require specific button combinations to enter Recovery Mode
- Users can choose between updating iOS or performing a full system restore
Understanding iOS Repair Mode
iOS Repair Mode provides essential tools for fixing software issues on iPhones and iPads. These built-in recovery features help users restore device functionality when standard troubleshooting fails.
The Basics of Repair State and Ready for Repair
iOS devices enter Repair Mode to fix critical software problems or restore factory settings. This mode disconnects normal device functions and creates a direct connection to iTunes or Finder.
The process starts by connecting the device to a computer with the latest version of iTunes or macOS Finder. A black screen with an Apple logo indicates the device is in Repair Mode.
Users can choose between two options in Repair Mode:
- Update: Reinstalls iOS while preserving data
- Restore: Erases all content and installs a fresh copy of iOS
Navigating Recovery Mode, DFU Mode, and Troubleshooting Steps
Recovery Mode and DFU Mode serve different purposes for iOS repairs. Recovery Mode handles basic software issues, while DFU Mode addresses deeper system problems.
Recovery Mode Steps:
- Connect iPhone to computer
- Press and release Volume Up
- Press and release Volume Down
- Hold Side button until recovery screen appears
DFU Mode works when Recovery Mode fails. It bypasses the bootloader and allows complete system restoration. DFU Mode shows only a black screen, unlike Recovery Mode which displays the “Connect to iTunes” cable image.
Face ID devices need special button combinations for Recovery Mode. A progress bar appears during the restore process to show completion status.
Boot loops often require Recovery Mode to fix. The repair process typically takes 15-20 minutes to complete.
Frequently Asked Questions
iOS repair mode provides essential tools and methods for fixing software issues on iPhones, with multiple options available depending on the specific problem and device model.
How do I put my iPhone into repair mode?
Connect the iPhone to a computer using a USB cable. Press and quickly release the Volume Up button. Press and quickly release the Volume Down button. Press and hold the Side button until the recovery mode screen appears.
The process varies slightly for older iPhone models with a Home button. Press and hold both the Home and Side buttons simultaneously until the recovery mode screen appears.
What should I do if iOS repair mode is not functioning correctly?
Try a different USB cable and port. These components often cause connection issues during the repair process.
Check that iTunes or Finder is up to date on the computer. Outdated software can prevent proper device recognition.
If standard repair fails, a DFU (Device Firmware Update) restore offers a deeper level fix. This process erases all data but can resolve persistent software issues.
How can I disable repair mode on my iPhone?
Press and hold the Side button (or Home button on older models) until the Apple logo appears. The device will restart normally.
If the device doesn’t exit repair mode, try force restarting by quickly pressing Volume Up, Volume Down, then holding the Side button.
What are the steps for booting an iPhone into recovery mode?
Start with the iPhone unplugged and turned on. Connect it to a computer with iTunes or Finder open.
Press the volume buttons in sequence, then hold the Side button. Keep holding until the recovery mode screen appears.
Are there specific settings for accessing iOS repair mode on the iPhone 13?
The iPhone 13 uses the button sequence method: Volume Up, Volume Down, then Side button. No special settings are required.
The process works the same across all iPhone 13 models, including mini, Pro, and Pro Max versions.
Can you turn off iPhone repair mode without using a computer?
Press and hold the Side button for several seconds until the Apple logo appears. This method works on most iPhone models.
If the first attempt fails, perform a force restart using the volume buttons and Side button sequence.


