Spending too much time on your iPhone can affect your sleep, work, and relationships. If you want to cut back, Apple has built tools right into your device. To limit screen time on your iPhone, go to Settings > Screen Time, then tap App Limits to set time restrictions for specific apps or entire categories. You can also use Downtime to schedule periods when only certain apps are available.
Many people don’t realize how easy it is to set these limits. With just a few taps, you can block distracting apps after a set amount of time each day. You can even set a Screen Time passcode to make sure you stick to your goals when temptation strikes.
The best part about Screen Time is that it gives you detailed reports about your usage. You’ll see exactly how much time you spend on each app and when you use your phone most. This awareness is often the first step toward healthier habits with your iPhone.
How to Limit Screen Time on iPhone (Complete Guide)
If you want to reduce distractions, manage your child’s iPhone usage, or build healthier phone habits, Apple’s Screen Time feature makes it easy to set limits and track usage.
This guide explains how to limit screen time on an iPhone, what each setting does, and tips to make the limits stick.
What Is Screen Time on iPhone?
Screen Time is a built‑in iOS feature that lets you:
- See how much time you spend on your phone
- Set daily app and category limits
- Schedule downtime
- Block or restrict content
- Manage a child’s device remotely
How to Turn On Screen Time
- Open Settings
- Tap Screen Time
- Tap Turn On Screen Time
- Choose:
- This is My iPhone, or
- This is a Child’s iPhone
✅ For children, use Family Sharing for full parental control.
Set Daily App Limits
Limit how long you can use specific apps or categories.
Steps
- Go to Settings → Screen Time
- Tap App Limits
- Tap Add Limit
- Choose an app category (e.g., Social) or a specific app
- Set the daily time limit
- Tap Add
✅ Once the limit is reached, the app locks until the next day.
Schedule Downtime
Downtime blocks most apps during certain hours.
How to Set Downtime
- Go to Screen Time
- Tap Downtime
- Turn it ON
- Choose start and end times (e.g., 10 PM – 7 AM)
✅ Only allowed apps and phone calls will work during downtime.
Always Allow Important Apps
Make sure essential apps still work.
Steps
- Go to Screen Time
- Tap Always Allowed
- Add apps like Phone, Messages, Maps, or educational apps
Set Screen Time Passcode (Highly Recommended)
A Screen Time passcode prevents changing limits.
How
- Go to Screen Time
- Tap Use Screen Time Passcode
- Create a 4‑digit passcode (different from your iPhone lock code)
✅ Essential for parental controls.
Limit Screen Time for a Child’s iPhone
Using Family Sharing, you can manage limits remotely.
Steps
- Open Settings
- Tap your Apple ID
- Select Family Sharing
- Choose your child’s name
- Tap Screen Time
- Set app limits, downtime, and content restrictions
Restrict Content and App Downloads
Block inappropriate content or purchases.
How
- Go to Screen Time
- Tap Content & Privacy Restrictions
- Turn it ON
- Set limits for:
- App Store purchases
- Explicit content
- Websites
- Movies and TV shows
Use Communication Limits
Control who can contact your child.
Steps
- Go to Screen Time
- Tap Communication Limits
- Set allowed contacts during screen time and downtime
Check Screen Time Reports
Track progress and habits.
View Usage
- Go to Settings → Screen Time
- Review:
- Daily averages
- Most‑used apps
- Pickup count
- Notifications
✅ Weekly reports help identify problem apps.
Tips to Make Screen Time Limits Stick
- ✅ Set realistic limits (start small)
- ✅ Use downtime instead of many small limits
- ✅ Remove distracting apps from the Home Screen
- ✅ Disable non‑essential notifications
- ✅ Keep the Screen Time passcode private
Common Screen Time Problems (and Fixes)
| Problem | Solution |
|---|---|
| Limits easy to bypass | Set Screen Time passcode |
| Limits reset unexpectedly | Check Apple ID and Family Sharing |
| Apps still work during downtime | Review Always Allowed list |
| Screen Time not syncing | Sign out and back into iCloud |
Key Takeaways
- You can set daily time limits for apps through Settings > Screen Time > App Limits on your iPhone.
- Use Downtime to schedule phone-free periods by selecting which apps remain available during specific hours.
- Screen Time reports show your usage patterns and help you track progress as you work to reduce phone time.
Understanding Screen Time on iOS
Screen Time is a built-in iPhone feature that helps users track and manage how much time they spend on their devices. It offers tools to set limits, block content, and get insights into device usage patterns.
The Basics of Screen Time
Screen Time lives in your iPhone Settings app. To access it, simply tap Settings and then Screen Time. When you first open it, you’ll need to set it up.
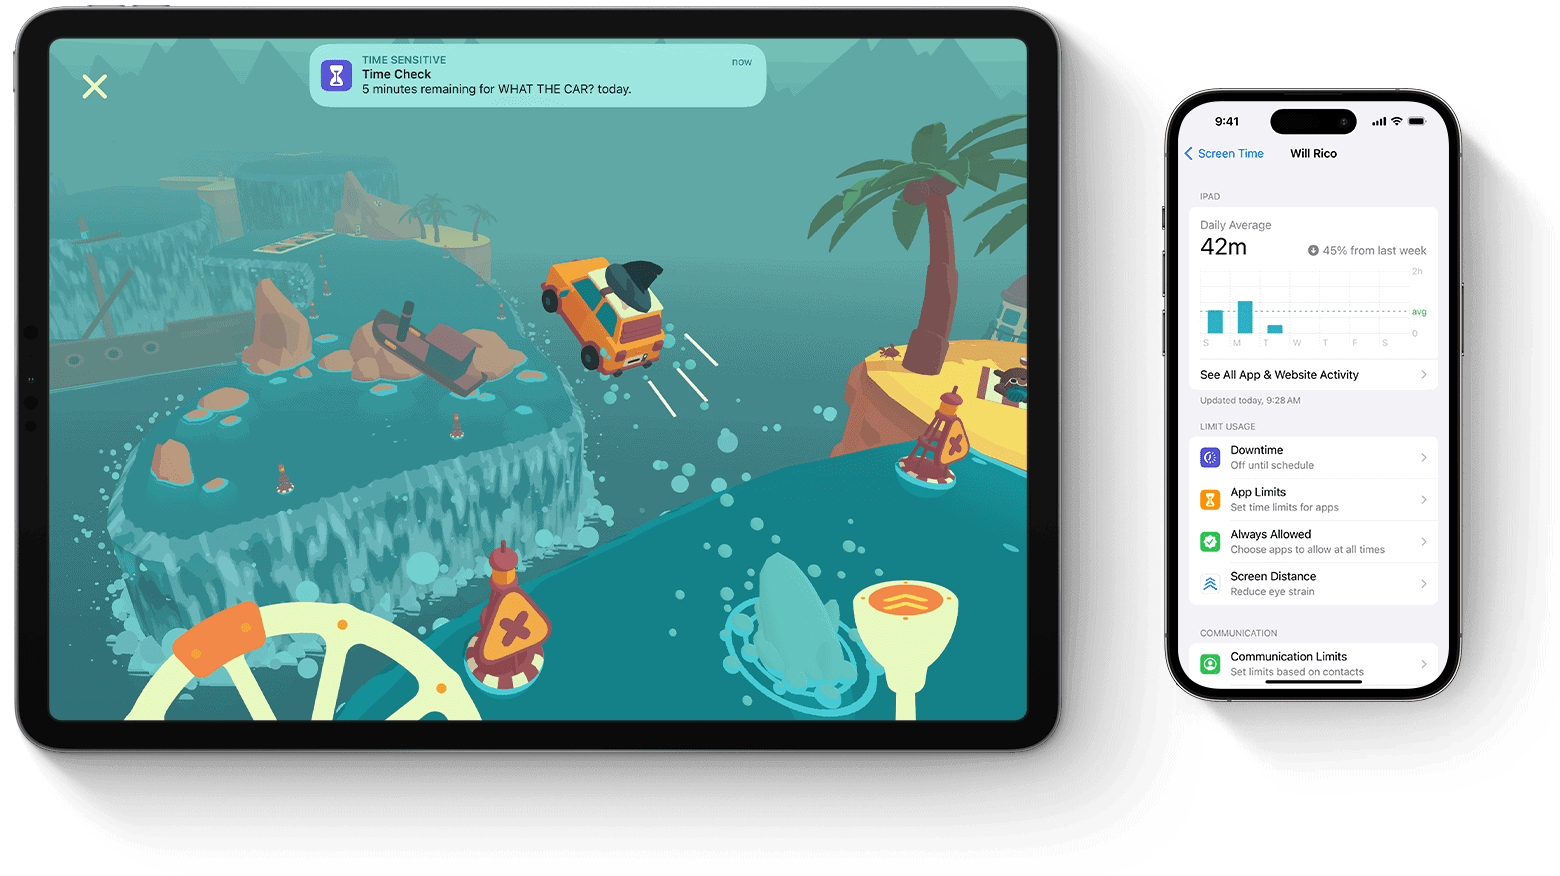
Screen Time shows several key pieces of information:
- Your total screen time for the day
- Which apps you use most
- How often you pick up your device
- How many notifications you receive
The dashboard uses easy-to-read charts that show your usage by app category. It breaks down your time into social media, games, productivity, and more.
You can view your data for the current day or the past week. This helps you spot patterns in how you use your iPhone.
Benefits of Limiting Screen Time
Setting limits on your iPhone use can improve your daily life in several ways. Many people find they sleep better when they reduce screen time before bed.
Students often see better focus on schoolwork when they set app limits. Parents appreciate how Screen Time helps them guide their children’s device use.
iPhone’s Screen Time features make it easier to:
- Stay present during family meals
- Reduce eye strain from too much screen use
- Cut back on mindless scrolling
- Make time for offline activities
The app also sends helpful reminders when you’re nearing your time limits. This gentle nudge helps users make more mindful choices about their phone use.
iOS Versions and Screen Time Features
Apple first added Screen Time in iOS 12, replacing the older “Restrictions” feature. Each iOS update has brought helpful improvements to how Screen Time works.
In newer iOS versions (13 and up), users can set limits for entire app categories or individual apps. The system allows for one-minute extensions when limits are reached.
Parents can manage Screen Time across family devices using Family Sharing. This feature lets them set app limits and content restrictions for their children remotely.
iOS 15 brought Weekly Reports that show usage trends over time. These reports highlight which apps demand the most attention and when usage spikes occur.
iOS 16 added more granular controls for communication limits, letting users choose exactly who can contact them during downtime.
Navigating to Screen Time Settings
Finding Screen Time settings on your iPhone or iPad is the first step to managing your device usage. Apple places these controls in a specific location that’s easy to access once you know where to look.
Opening the Settings App
To begin managing screen time, you need to open the Settings app on your iPhone or iPad. Look for the gray icon with gears on your home screen. This app controls all the major functions and features of your device.
Tap the Settings icon to open it. The app will display a list of options on the left side if you’re using an iPad, or it will fill the entire screen on an iPhone.
If you can’t find the Settings app on your home screen, you can also:
- Swipe down from the middle of your screen to access the search function
- Type “Settings” in the search bar
- Tap on the Settings app when it appears in the results
Locating Screen Time Settings
Once you’ve opened the Settings app, scroll down until you see Screen Time. This option usually appears between “Notifications” and “General” in the menu.
Screen Time settings have a purple icon with an hourglass symbol. Tap on this option to enter the Screen Time menu.
If you’re setting up Screen Time for the first time, you’ll see a brief introduction explaining what these settings can do. You’ll have options to:
- Set up Screen Time for yourself
- Set up Screen Time for a family member
The main Screen Time menu shows a chart of your device usage and provides access to various control options like App Limits and Content & Privacy Restrictions.
Setting Up Screen Time
Screen Time on iPhone helps you manage your device usage with easy-to-use controls. This feature allows you to set limits, schedule downtime, and choose which apps remain accessible when restrictions are active.
Creating a Screen Time Passcode
To begin setting up Screen Time, you need to create a passcode that prevents unauthorized changes to your settings. This step is especially important for parents managing their children’s devices.
To set up a Screen Time passcode:
- Open the Settings app on your iPhone
- Tap Screen Time
- Select Use Screen Time Passcode
- Enter a four-digit code
- Re-enter the code to confirm
The passcode is separate from your device passcode. Make sure to choose a number you’ll remember. If you forget your Screen Time passcode, you’ll need to reset your device settings.
For families, you can set up Screen Time for a child’s device through Family Sharing. This gives you remote access to manage their settings.
Configuring Downtime
Downtime lets you schedule periods when only phone calls and apps you specifically allow are available. This feature is perfect for bedtime hours or focused work sessions.
To set up Downtime:
- Go to Settings > Screen Time
- Tap Downtime
- Toggle Downtime to On
- Set your start and end times
You can create a schedule that applies to every day or customize different times for specific days. For example, you might want longer downtime hours on weeknights than weekends.
When Downtime is active, app icons appear dimmed and display a small clock icon. If you try to open a restricted app, you’ll see a reminder about your Downtime settings.
Choosing Allowed Apps During Downtime
Even during Downtime, you’ll probably want certain apps to remain available. Apple lets you customize exactly which apps can be used when restrictions are active.
To choose allowed apps:
- Go to Settings > Screen Time
- Tap Always Allowed
- Review the pre-selected apps (Phone, Messages, FaceTime, and Maps)
- Tap the green + next to any app you want to add to the allowed list
- Remove apps by tapping the red – and then Delete
Consider which apps are truly essential. Communication tools might be necessary, but social media apps could be blocked to reduce distractions.
You can change your allowed apps anytime. If you find you need access to something specific, you can always use your Screen Time passcode to temporarily override the restrictions.
Managing App Limits
App Limits in Screen Time lets you control how much time you can spend on specific apps or categories. This feature helps reduce distractions and promotes healthier device usage throughout your day.
Setting Time Limits for App Categories
To set time limits for app categories on your iPhone, go to Settings > Screen Time > App Limits. Tap “Add Limit” to begin. You’ll see a list of app categories like Social, Games, and Entertainment.
Select one or more categories by tapping them. A checkmark appears next to your selections.
Next, set your time allowance:
- Choose how many hours and minutes per day
- Tap “Add” to confirm your selection
These limits reset at midnight each day. When you reach the time limit, a notification appears. The app icon will dim and show a small hourglass symbol.
You can customize when these limits apply by tapping “Customize Days.” This lets you set different time allowances for weekdays versus weekends.
Customizing Limits for Individual Apps
For more precise control, you can set time limits for specific apps rather than entire categories. This is helpful when you want to limit just one app while keeping others accessible.
To set individual app limits:
- Go to Settings > Screen Time > App Limits
- Tap “Add Limit”
- Select a category
- Tap the category name to see all apps within it
- Choose specific apps from the list
- Set your desired time limit
- Tap “Add” to confirm
When setting these limits, consider which apps tend to consume most of your time. The Screen Time dashboard shows which apps you use most frequently.
You can temporarily ignore limits by tapping “One More Minute” when the limit notification appears. Or, for full access, select “Ignore Limit” and choose to ignore for the day or turn off the limit completely.
Utilizing Always Allowed Apps
Screen Time’s “Always Allowed” feature lets you access specific apps even during downtime or when app limits are in effect. This gives you flexibility to stay connected to essential services while still maintaining healthy digital habits.
Selecting Essential Apps
To add apps to your Always Allowed list, go to Settings > Screen Time and tap on “Always Allowed.” You’ll see a list of apps that can be accessed at any time.
By default, Phone, Messages, FaceTime, and Maps are always allowed. To add more apps:
- Tap the green plus icon next to apps you want to add
- To remove apps, tap the red minus icon and then “Remove”
This feature is especially helpful for keeping essential tools available. For example, allowing access to calendar apps for scheduling or navigation apps for directions.
If your Always Allowed settings keep resetting, try turning off Screen Time completely, restarting your iPhone, and then turning Screen Time back on.
Managing Communication Limits
Communication limits work alongside Always Allowed settings to control who you can talk to during downtime.
To set up these limits:
- Open Settings > Screen Time
- Tap “Communication Limits”
- Choose different settings for “During Screen Time” and “During Downtime”
You can select from options like:
- Everyone: No restrictions on contacts
- Contacts Only: Limit communications to people in your contacts list
- Specific Contacts: Choose exactly who can reach you
Parents can use this feature to ensure children only communicate with approved contacts during downtime. The system works across multiple apps including Phone, Messages, and FaceTime.
Remember that emergency calls are always permitted regardless of your settings.
Implementing Parental Controls
iPhone offers powerful tools to help parents manage their children’s screen time. Parents can set limits, block content, and track usage through Apple’s built-in features.
Setting Up Family Sharing for Screen Time
Family Sharing is the first step for managing your child’s iPhone usage. This feature lets up to six family members share purchases without sharing accounts.
- Open Settings on your iPhone
- Tap your name at the top
- Select “Family Sharing”
- Tap “Set Up Your Family”
- Follow the prompts to add family members
Once Family Sharing is active, you can manage Screen Time settings for all linked family devices. This central control helps parents keep track of all their children’s devices from one place.
Family Sharing also lets everyone share apps, music, movies, and storage plans. This makes it easier to provide content to your kids while still keeping an eye on what they access.
Creating Child Accounts
After setting up Family Sharing, you need to create accounts for your children. Child accounts have special restrictions built in.
To create a child account:
- Go to Settings > Screen Time
- Tap “Turn On Screen Time”
- Select “This is My Child’s Device”
- Create a Screen Time passcode (different from your own)
- Configure initial settings
When setting up a child’s account, you can set content restrictions right away. You can block explicit content, limit app usage, and set communication boundaries.
It’s important to use a passcode your child doesn’t know. Kids are smart and might try to change their settings. Make sure to pick something they won’t guess but that you’ll remember.
Monitoring Children’s Device Use
Once everything is set up, you can monitor your child’s screen time from your own device. This lets you make changes as needed.
Key monitoring features include:
- Activity Reports: See which apps are used and for how long
- App Limits: Set daily time limits for app categories
- Downtime: Schedule periods when only approved apps work
- Content Restrictions: Control purchases, downloads, and web content
Screen Time settings also let you approve or decline app download requests. When your child wants a new app, you’ll get a notification to review it first.
Parents should check Screen Time reports weekly to spot any concerning patterns. If your child is spending too much time on certain apps, you can adjust limits as needed.
Customizing Notifications & Distractions
Taking control of your iPhone notifications and reducing distractions can dramatically decrease your screen time. These simple adjustments can help you stay focused and use your device more mindfully.
Adjusting Notification Settings
Your iPhone offers several ways to manage notifications so they don’t constantly grab your attention. You can set up a Scheduled Summary to receive non-urgent alerts at specific times rather than throughout the day.
To set this up:
- Go to Settings > Notifications > Scheduled Summary
- Turn on Scheduled Summary
- Choose convenient times for your notification deliveries
You can also customize notifications for each app individually. For apps that tend to distract you, consider:
- Turning off sounds and banners
- Delivering notifications silently to your Notification Center
- Disabling notifications completely for non-essential apps
Many users find it helpful to customize notification settings based on different days of the week, allowing more notifications during free time and fewer during work hours.
Reducing Distractions During Screen Time
Using app blockers is one of the most effective ways to reduce distractions. These tools create friction between you and addictive apps, making you less likely to use them habitually.
Setting up app limits through Screen Time is simple:
- Go to Settings > Screen Time
- Select App Limits and tap Add Limit
- Choose app categories or specific apps
- Set a daily time limit
You can create different limits for weekdays versus weekends based on your schedule. When you reach your limit, your iPhone will show a notification. You can either respect the limit or choose to ignore it for the day.
iOS automation can also help reduce distractions. Users can set up shortcuts that display screen time data before opening distracting apps, making you more aware of your usage patterns.
Consider activating Do Not Disturb or Focus modes during important tasks to block all non-essential interruptions.
Strategies for Reducing Screen Time
Managing screen time on your iPhone doesn’t have to be difficult. With the right approach, you can create healthier technology habits that improve your focus and wellbeing.
Setting Personal Boundaries
Setting time limits for specific apps can help control your iPhone use. Open Settings, tap Screen Time, and select App Limits to restrict daily usage for certain apps or categories.
Use the Screen Time widget on your Home Screen to make yourself aware of how much time you’re spending on your device. This visual reminder can help you stay accountable to your goals.
The Downtime feature lets you schedule periods when only phone calls and approved apps are available. This is perfect for creating tech-free zones during meals, before bed, or first thing in the morning.
Try these simple tricks to break the habit:
- Set your auto-lock to 30 seconds
- Keep your phone out of the bathroom
- Use grayscale mode to make apps less appealing
- Turn off non-essential notifications
Checking your “pickups” (how often you grab your phone) can be eye-opening. Many people are surprised by how frequently they reach for their devices without thinking.
Encouraging Off-Screen Activities
Finding fulfilling alternatives to screen time is key to breaking technology dependence. Planning activities that engage your mind and body will naturally reduce the urge to check your phone.
Create a list of screen-free activities you enjoy:
- Reading physical books or magazines
- Going for walks or bike rides
- Cooking new recipes
- Playing board games with family
- Practicing a musical instrument
- Working on crafts or DIY projects
Keep your phone at a healthy distance during these activities. Having it out of sight (and ideally in another room) removes the temptation to check it constantly.
Consider setting up tech-free zones in your home, like the dining room or bedroom. These boundaries help everyone disconnect and be more present with each other.
Try the “phone stack” game when out with friends – everyone places their phones in a stack, and the first to reach for theirs pays for coffee or dessert!
Additional Resources & Tools
Beyond Apple’s Screen Time, there are many helpful resources to manage iPhone screen time. These include specialized apps and guides that can make the process easier for parents and individuals alike.
Exploring Parental Control Apps
While Apple offers built-in parental controls through Screen Time, third-party apps provide extra features. Bark helps parents monitor content and set screen time limits with advanced filtering options.
Other popular apps include:
- OurPact: Allows scheduling of screen time and blocking apps
- Canopy: Offers intentional internet downtime features
- Circle: Provides network-level controls for all devices
Most of these apps let parents set daily limits for specific apps or categories. They can be secured with Touch ID to prevent children from changing settings.
Many offer free trials before requiring a subscription. Parents should test different options to find what works best for their family’s needs.
Finding Tutorials and Guides
Apple provides detailed guides on using Screen Time features. These tutorials cover setting up app limits, scheduling downtime, and viewing usage reports.
For visual learners, YouTube offers step-by-step videos showing how to:
- Set up Screen Time from scratch
- Create and manage app limits
- Configure downtime schedules
- Use Content & Privacy restrictions
PCMag offers helpful articles with screenshots for each step. These guides work well for beginners who need clear instructions.
Apple Support communities also provide help with troubleshooting common issues. Users can ask questions about specific problems they encounter when setting up limits.
Frequently Asked Questions
Screen Time on iPhone helps manage device usage with customizable settings. Here are answers to common questions about setting up and managing this helpful feature.
How can I configure Screen Time settings for a child’s iPhone?
To set up Screen Time for a child, go to Settings > Screen Time on their device. Tap “Turn On Screen Time” and then select “This is My Child’s device” when prompted. This process allows parents to set appropriate limits for their children.
You’ll be able to create a Screen Time passcode that prevents kids from changing these settings. The passcode ensures that only parents can adjust the restrictions.
Content restrictions can also be set up to limit adult websites. Go to Settings > Screen Time > Content & Privacy Restrictions, enter your passcode, then tap Content Restrictions > Web Content to choose appropriate web filters.
What steps are involved in setting app-specific time limits on an iPhone?
Setting app time limits is simple. First, open Settings and tap on Screen Time. Then select “App Limits” and tap “Add Limit” to begin.
Choose one or more app categories you want to restrict. After selecting categories, tap “Next” and set the amount of time allowed for those apps.
You can set different time limits for specific days by tapping “Customize Days.” This flexibility helps create a schedule that fits various needs throughout the week.
How can I modify or remove existing Screen Time limits on my iPhone?
To change time limits, go to Settings > Screen Time > App Limits. Tap on the limit you want to modify and adjust the time or days as needed.
If you want to remove a limit completely, tap on the limit and select “Delete Limit” at the bottom of the screen. Confirm your choice when prompted.
You can also temporarily disable all App Limits by going to Settings > Screen Time > App Limits and toggling the switch off.
What is the procedure to enable Screen Time on an iPhone?
Enabling Screen Time takes only a few steps. Open the Settings app on your iPhone and tap on Screen Time.
Tap “Turn On Screen Time” and then select “This is my iPhone” if setting up for yourself. Review the features overview that appears.
After enabling, you’ll have access to usage reports and can set limits and restrictions by selecting categories within the Screen Time menu.
Is it possible to manage and control Screen Time for adults using an iPhone?
Yes, adults can manage their own Screen Time just like for children. Open Settings > Screen Time and select options that work for personal needs.
Adults can set App Limits for specific categories like social media or games to help maintain better digital habits. Downtime is another useful feature that restricts iPhone use during set hours.
Self-monitoring through Screen Time reports helps adults track usage patterns. Weekly reports show how time is spent across different app categories.
How do I implement parental controls on my child’s iPhone for app usage and browsing?
Set up Family Sharing first, which allows you to manage your child’s device remotely. Go to Settings > your name > Family Sharing to add your child.
Use Content & Privacy Restrictions in Screen Time to limit inappropriate content. You can restrict apps, websites, and even purchases based on age ratings.
Create a dedicated Screen Time passcode that differs from the device passcode. This extra security prevents children from changing the restrictions you’ve set.