Losing your iPhone data can be stressful, but there’s no need to worry if you’ve been making regular backups. Whether you’re setting up a new device or need to recover after a reset, restoring your iPhone from a backup is straightforward. You can restore your iPhone from either an iCloud backup or a computer backup using Finder or iTunes, bringing back your photos, messages, apps, and settings with just a few taps.
Restoring from an iCloud backup requires connecting to Wi-Fi and signing in with your Apple ID. Once you reach the “Apps & Data” screen during setup, you can tap “Restore from iCloud Backup” and choose which backup to use. For computer backups, connect your iPhone to your Mac or PC where you made the backup. On newer Macs, you’ll use Finder, while on Windows or older Macs, iTunes handles the restoration process.
The process takes time depending on your backup size and internet speed. Your iPhone will restart once complete, and you’ll find your familiar apps, photos, and settings just as you left them. Most people don’t realize that besides the standard method, there are alternative ways to access iCloud backup data for specific items without a full reset.
How to Restore an iPhone from Backup: Step-by-Step Guide
Restoring your iPhone from a backup is essential when setting up a new device, recovering lost data, or fixing software issues. Backups ensure that your photos, apps, settings, and other important information are safely stored and can be quickly restored. This guide walks you through the different methods to restore your iPhone from a backup using iCloud or your computer.
1. Prepare Before You Restore
- Ensure You Have a Backup: Verify that you have a recent backup available either in iCloud or on your computer.
- Stable Internet Connection: For iCloud restores, a strong Wi-Fi connection is needed.
- Charge Your iPhone: Make sure your device has sufficient battery or keep it plugged in during the process.
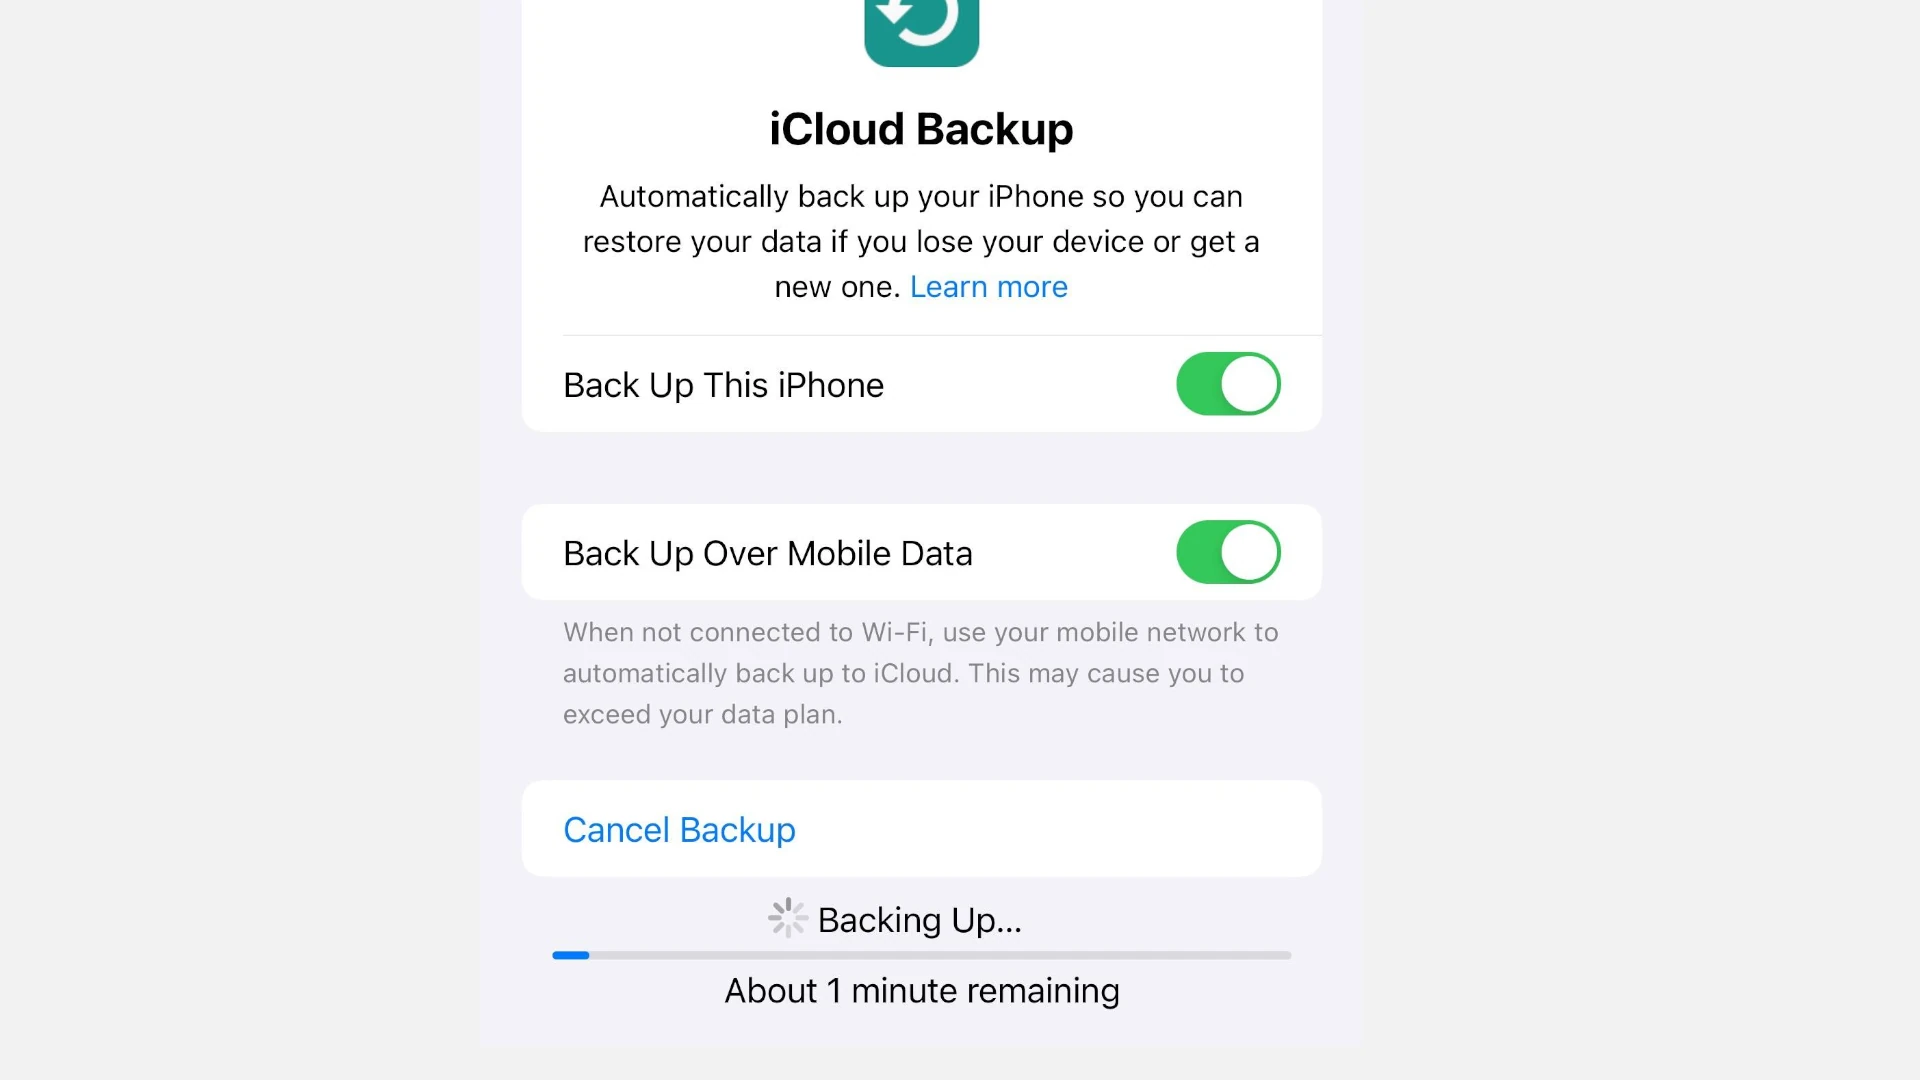
2. Restoring from iCloud Backup
If you backed up your iPhone to iCloud, follow these steps:
Step 1: Erase Your iPhone
- Go to Settings > General > Reset > Erase All Content and Settings.
- Confirm to erase the device. This will wipe your iPhone and bring you to the setup screen.
Step 2: Set Up Your iPhone
- Follow the on-screen setup instructions until you reach the Apps & Data screen.
- Tap Restore from iCloud Backup.
Step 3: Sign In and Choose Backup
- Sign in with your Apple ID.
- Select the most recent backup from the list.
- Wait for the restore process to complete. This can take some time depending on backup size and internet speed.
3. Restoring from Backup on a Mac or PC
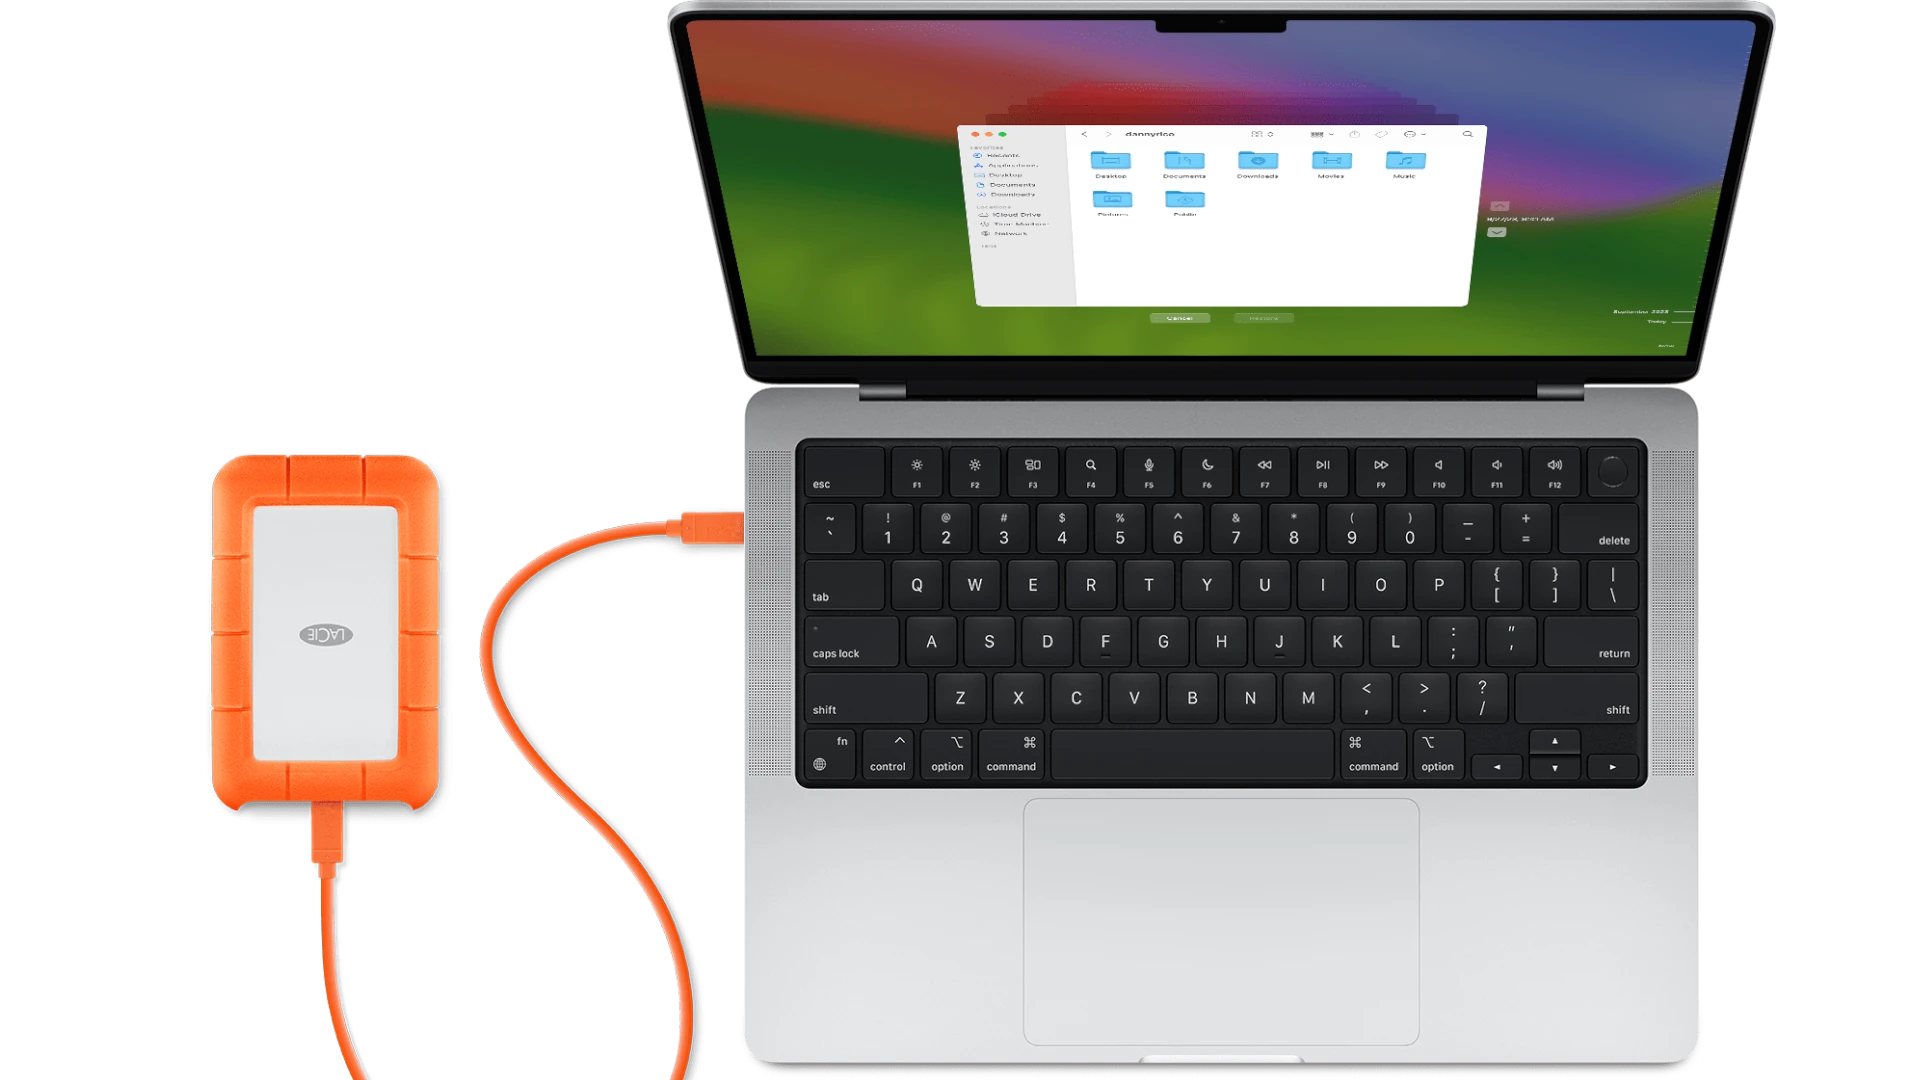
If you have a backup saved on your computer via Finder (macOS Catalina and later) or iTunes (Windows or macOS Mojave and earlier):
Step 1: Connect Your iPhone to the Computer
- Use a Lightning cable to connect your iPhone to your Mac or PC.
Step 2: Open Finder or iTunes
- Open Finder on macOS Catalina+ or iTunes on earlier macOS versions or Windows.
Step 3: Select Your iPhone
- In Finder or iTunes, click on your iPhone icon.
Step 4: Restore Backup
- Click Restore Backup.
- Choose the backup you want to restore from.
- If the backup is encrypted, enter the password.
- Click Restore and wait for the process to finish.
4. Important Tips for a Smooth Restore
| Tip | Why It Matters |
|---|---|
| Use the Latest iOS Version | Restoring backups made on newer iOS versions may not work on older iOS. |
| Keep Device Connected | Interruptions can corrupt the restore process. |
| Backup Regularly | Frequent backups minimize data loss risks. |
| Check Backup Size | Large backups take longer and require more storage. |
Summary
Restoring an iPhone from a backup can be done easily via iCloud or your computer. Always ensure your backup is current and complete before starting. Whether you’re setting up a new iPhone or recovering data, following these steps will help you get your device back to the way you like it.
For detailed official instructions, see Apple’s guide on how to restore your iPhone from a backup.
Key Takeaways
- You can restore an iPhone from backups stored in iCloud or on your computer using Finder or iTunes.
- The restoration process requires your Apple ID and password and works during initial setup or after resetting your device.
- Backup restoration times vary based on file size and connection speed but will bring back your apps, photos, and settings automatically.
Understanding iPhone Backups
iPhone backups are essential for protecting your data and making device transitions smoother. They store your personal information, settings, and app data so you can restore everything if your iPhone is lost, damaged, or replaced.
What Is a Backup
An iPhone backup is a copy of your device’s data and settings stored either in iCloud or on your computer. Backups include photos, text messages, app data, device settings, and your home screen layout.
Think of a backup as a snapshot of your iPhone at a specific moment. When you restore from a backup, your iPhone returns to that exact state.
Backups don’t typically include items already stored in iCloud like contacts, calendars, and iCloud Photos. They also don’t include data that can be re-downloaded, such as App Store purchases and books.
A standard backup contains your Health app data, passwords, and network settings – everything that makes your iPhone uniquely yours.
Differences Between iCloud and iTunes Backups
iCloud Backups:
- Store data in Apple’s cloud servers
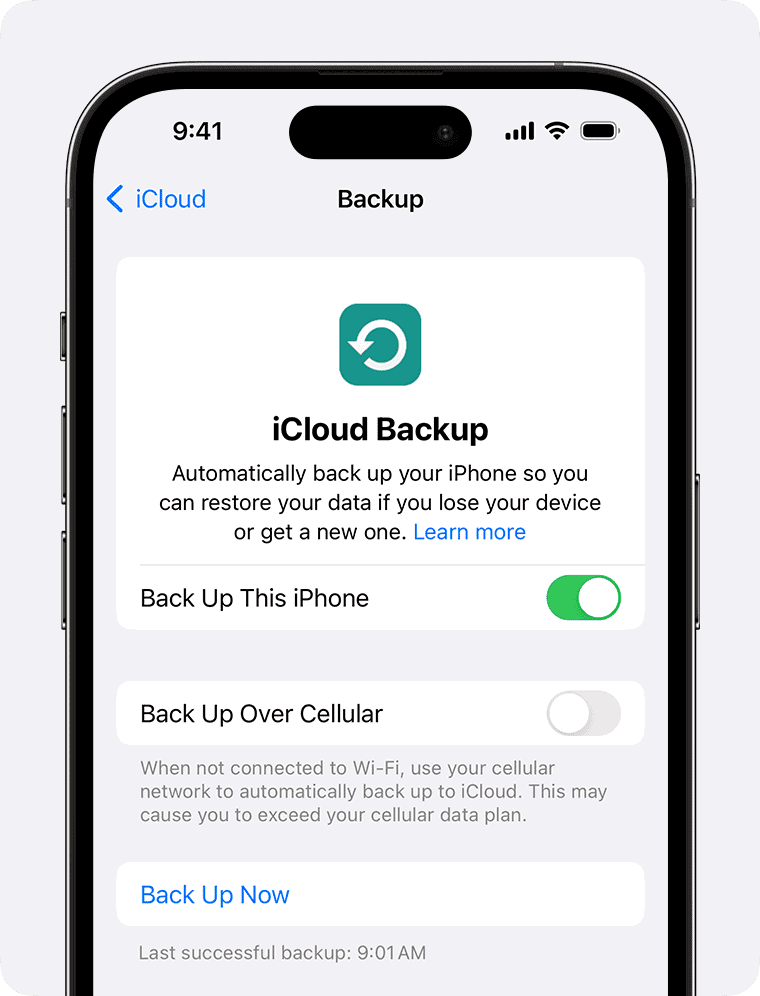
- Happen automatically when your iPhone is charging, locked, and on Wi-Fi
- Require sufficient iCloud storage space (Apple offers 5GB free)
- Can be restored directly from any location with internet
Computer Backups (via Finder or iTunes):
- Store data locally on your Mac or PC
- Must be done manually by connecting your iPhone
- Don’t require paid storage (just free space on your computer)
- Can include more data than iCloud backups
Computer backups are generally more complete. They can store your passwords and Health data more securely when encrypted. iCloud backups, however, offer convenience since they happen automatically.
Importance of Regularly Backing Up Your iPhone
Regular backups protect you from data loss if your iPhone is damaged, lost, or stolen. Without backups, your photos, messages, and app data could be gone forever.
Backups also make upgrading to a new iPhone easy. You can transfer everything from your old device to your new one in minutes.
Many users discover the value of backups only after losing data. Setting up automatic backups takes just minutes but saves hours of frustration later.
Remember that backups keep certain information like passwords, Apple Wallet data, and eSIM settings. This means you won’t need to re-enter all your passwords or reconfigure all your settings after a restore.
If you take lots of photos or use many apps, check your backup settings monthly to ensure everything is working properly.
Preparing to Restore from a Backup
Before you start the restore process, you need to make sure your device and backup are ready. Taking these steps now will help avoid problems later and make the restore go smoothly.
Ensuring Compatibility and Requirements
Your iPhone needs to meet certain conditions before you can restore it from a backup. First, make sure your iPhone has enough battery life – at least 50% is best. If it’s low, plug it in.
Connect to a stable Wi-Fi network as restoring uses a lot of data. Using cellular data might lead to extra charges or slow speeds.
Check that your iPhone has enough free storage space for the backup. If your backup is 32GB, you’ll need at least that much free space on your iPhone.
Make sure your iPhone is running a compatible iOS version. Sometimes you need to update your iOS before restoring.
You’ll also need your Apple ID and password handy, as you’ll be asked for them during the restore process.
Checking Backup Availability and Last Backup Date
Before starting, verify that you actually have a backup to restore from. For iCloud backups, go to Settings > your name > iCloud > Manage Storage > Backups. Here you can see your available backups and when they were created.
For iTunes or Finder backups, connect your iPhone to your computer. In Finder (macOS 10.15+) or iTunes (Windows or older macOS), you can check for available backups and see the dates.
Always pick the most recent backup unless you specifically want to go back to an earlier point. Check the backup size too – if it’s smaller than expected, it might be missing data.
If you’re switching iPhones, make sure your old device completed its last backup successfully before proceeding with the restore.
Steps to Restore iPhone from iCloud Backup
Restoring your iPhone from an iCloud backup is a straightforward process that puts all your data back where it belongs. You’ll need your Apple ID and password handy, plus a stable Wi-Fi connection to complete the restore.
Resetting Your iPhone
Before restoring from an iCloud backup, you need to reset your iPhone to factory settings. Go to Settings > General > Reset (or Transfer or Reset iPhone on newer models). Tap Erase All Content and Settings.
This action removes all data from your phone. Make sure you have a current backup before proceeding with this step.
Your iPhone will ask for your passcode and Apple ID password to turn off Find My iPhone. Enter these when prompted.
The reset takes a few minutes. Your iPhone will display a progress bar during this time. When it’s done, your phone will restart and show the Hello screen.
Using ‘Apps & Data’ Screen to Restore
After the reset, your iPhone will begin the setup process. Follow the initial setup steps until you reach the Apps & Data screen.
At this screen, you’ll see several options for setting up your iPhone. Look for and tap Restore from iCloud Backup to begin the restoration process.
Don’t select “Set Up as New iPhone” if you want to restore your backup. This option would create a fresh installation without any of your previous data.
The setup assistant guides you through each step with clear on-screen instructions. Just follow along carefully.
Signing in with Apple ID for iCloud Access
When prompted, enter your Apple ID and password. This is the same account you used to create your backup.
Your Apple ID gives you access to all your iCloud backups. Make sure you use the correct Apple ID if you have multiple accounts.
Two-factor authentication may be required. If prompted, enter the verification code sent to your trusted devices.
Stay connected to Wi-Fi during this process. Your iPhone needs a stable internet connection to access iCloud servers and download your backup.
Selecting the Correct iCloud Backup
After signing in, you’ll see a list of available backups. Each backup shows the date, time, and device name.
Choose the most recent backup for your iPhone unless you specifically want to restore an older version.
Look at the size of each backup to confirm it contains all your data. Larger backups typically include more photos, videos, and apps.
After selecting a backup, the restore process begins. This may take several minutes to hours depending on:
- The size of your backup
- Your internet speed
- How many apps need to be downloaded
Keep your iPhone connected to power and Wi-Fi until the process is complete. Your apps will continue to download even after your iPhone is usable.
Steps to Restore iPhone from iTunes Backup
Restoring your iPhone from an iTunes backup is a straightforward process that helps you recover your data after a reset or when setting up a new device. This method ensures all your photos, apps, and settings are transferred exactly as they were in your backup.
Connecting iPhone to Computer
First, use the Lightning or USB-C cable that came with your iPhone to connect it to your computer. Make sure your computer is turned on and unlocked. If this is your first time connecting the iPhone to this computer, you’ll need to tap “Trust This Computer” on your iPhone’s screen.
For newer iPhones, you might need to enter your passcode to allow the connection. Keep your iPhone connected throughout the entire restore process to avoid interruptions.
If your computer doesn’t recognize your iPhone, try using a different USB port or cable. Sometimes dust in the port can cause connection problems. A quick cleaning with compressed air might help.
Running iTunes and Accessing Backups
On Windows computers or older Macs (before macOS Catalina), open iTunes. If it doesn’t open automatically when you connect your iPhone, launch it manually. Make sure you’re using the latest version of iTunes for best results.
For Macs running macOS Catalina or newer, open Finder instead. Your iPhone will appear in the Finder sidebar under “Locations.”
Once connected, look for the iPhone icon that appears in the upper-left area of iTunes or in the Finder sidebar. Click on this icon to access your device options. Then click on the “Summary” tab (in iTunes) or the “General” tab (in Finder).
Choosing the Appropriate Backup to Restore
In the “Backups” section, you’ll see the option to restore from a backup. Click “Restore Backup” to see a list of available backups stored on your computer.
Choose the most relevant backup based on the date and size. The date shows when the backup was created, and the size indicates how much data it contains. Always pick the most recent backup unless you specifically need an older version.
If your backup is encrypted, you’ll need to enter the password you created when you first set up the encrypted backup. Without this password, you cannot restore from this backup.
After selecting your backup, click “Restore” and wait. Your iPhone will restart, and the progress bar will show how much longer the process will take. Do not disconnect your iPhone until the process is complete.
After Restoration Process
Once your iPhone restore is complete, there are essential steps to take to ensure everything works properly. Your restored device will need some attention to get all your apps, settings, and accounts working correctly again.
What to Do After Restoring Your iPhone
After your iPhone finishes restoring from a backup, check that all your data has transferred correctly. Look through your photos, contacts, and messages to make sure everything is there.
Next, verify that your apps are working properly. Some apps might need you to log in again. This happens because security tokens sometimes don’t transfer during the backup process.
Check your settings too. Some settings may have reverted to defaults during restoration. Restore from iCloud backup usually brings most settings back, but it’s good to double-check.
If you notice missing data, don’t panic. Sometimes it takes time for everything to download from iCloud. Wait a few hours while connected to Wi-Fi and then check again.
Setting Up Your Restored iPhone
Start by connecting to your home Wi-Fi network if you haven’t already. This helps download remaining content from iCloud faster.
Re-enter passwords for your email accounts, social media, and other apps. Your passwords might not have transferred with the backup for security reasons.
If you restored your iPhone after resetting to factory settings, you’ll need to set up Face ID or Touch ID again. This security feature requires new setup each time.
Check your Apple ID settings to make sure services like iCloud, App Store, and iMessage are working correctly.
Finally, update your apps. Go to the App Store and tap your profile picture to see available updates. Fresh versions ensure everything runs smoothly on your restored iPhone.
Additional Considerations
When restoring an iPhone from a backup, several factors can affect the process and outcome. Understanding these elements will help ensure a smooth restoration experience and protect your valuable data.
Addressing Common Restoration Issues
Connection problems often interrupt the restoration process. If this happens, check your Wi-Fi stability or try using a different network. For slow restorations, connect your device to power and make sure you have a strong internet connection.
Sometimes, your iPhone might get stuck on the Apple logo during restoration. To fix this, force restart your device and try again.
Missing data after restoration? Check if your backup was complete before restoring. Some apps may need to be manually downloaded again from the App Store.
If you get an “insufficient storage” error, delete unnecessary files or apps on your device before attempting restoration. You might also need to free up iCloud storage space if using iCloud backup.
Error codes during restoration often have specific solutions:
- Error 4xxx: USB connection issue – try another cable or port
- Error 9xxx: Network timeout – check internet connection
- Error 14: Requires update – update iTunes or Finder first
Restoring Specific Data vs. Full Backup
You don’t always need to restore everything. For contacts only, sign in to iCloud.com and select just contacts to restore. For photos, use the Photos app and sign in with your Apple ID.
Messages can be recovered by enabling iCloud Messages in Settings before restoring. App-specific data might require individual app backups through their settings.
Notes and reminders sync automatically when you sign in with your Apple ID on a new device. No full restoration needed!
When restoring from iTunes or Finder, you can select which backup to use based on date and size. Choose the most recent one for complete data.
Selective data restoration benefits:
- Faster restoration time
- Less storage space needed
- Avoids overwriting newer data
- Preserves current device settings
Managing Storage and Backups
Regular backup maintenance is essential. Delete old, unnecessary backups through Settings > Your Name > iCloud > Manage Storage > Backups.
Optimize backup size by excluding large apps or photo libraries that you’ve already saved elsewhere. This frees up space for more important data.
Consider using Finder or iTunes for larger backups as iCloud offers limited free storage. Encrypted backups store more sensitive data like passwords and health information.
Create a backup schedule—weekly for normal use, daily for important work. Before any iOS update, always back up your device!
Monitor your backup size growth over time. Unexpected increases might signal problematic apps storing excessive data.
Using third-party cloud services alongside iCloud can provide additional protection. Just remember to manage permissions carefully for each service.
Professional Assistance and Technical Support
Sometimes restoring an iPhone from backup can become complicated. Issues may arise that require expert help or more advanced solutions beyond basic troubleshooting steps.
When to Seek Professional Help
Not all backup restore problems can be solved by yourself. Consider getting professional help when:
- Your backup is corrupt or incomplete
- You’ve tried multiple restore methods without success
- You see persistent error codes during the restore process
- Your device gets stuck in restore mode
- Important data appears missing after restoration
If you’ve attempted to restore your iPhone from backup several times with no success, continuing might make things worse. Professional technicians have specialized tools that can fix corrupted backups or extract data from them.
The cost of professional help is often worth it when valuable photos, messages, or contacts are at stake. Many people wait too long before seeking help, sometimes losing their chance to recover data completely.
Contacting Verified Experts for Guidance
Apple’s official support channels should be your first stop for backup issues. Options include:
- Apple Support App – Download from App Store for direct chat support
- Genius Bar appointments – In-person help at Apple Stores
- Apple Support phone line – Speak directly with a technician
Online services like JustAnswer connect you with certified Apple technicians who can guide you through complex restore processes. These verified experts often provide step-by-step instructions tailored to your specific situation.
Before contacting any expert, write down all error messages and steps you’ve already tried. This information helps technicians diagnose your problem faster and provide better solutions. Most experts can also help with encrypted backups where you’ve forgotten the password.
Utilizing Online Resources and Tech Support
Apple’s support website contains detailed guides for different restore scenarios. The Apple Support YouTube channel features helpful videos showing the exact steps to restore from various backup types.
Online forums like Apple Communities allow you to ask questions and get answers from other users who may have faced similar issues. When posting:
- Be specific about your device model and iOS version
- Describe exactly what happens during the restore attempt
- Include any error messages you receive
Third-party recovery software can sometimes help with difficult cases, but use caution. Stick to well-reviewed options from reputable companies. Free trials often let you see if your data can be recovered before purchasing.
Many cellular carriers also offer tech support for iPhone issues, sometimes included in your service plan. These technicians may have additional tools or procedures not available to the general public.
Advanced Tips for Power Users
For those seeking deeper control over their iPhone restoration process, several advanced methods can give you more flexibility and power. These techniques go beyond the standard backup options.
Leveraging Developer Options for Restoration
iPhone power users can access hidden developer features during the restoration process. To enable these options, tap on the Settings app, go to Privacy & Security, then scroll down to Developer. If you don’t see this option, tap on About in General settings and tap the build number seven times.
Once developer options are enabled, you can select specific parts of a backup to restore rather than the entire backup. This is helpful when you only need certain data like messages or health data.
You can also use the terminal commands on Mac to interact with iPhone backups more directly. This gives you the ability to extract individual files from backups that aren’t accessible through normal means.
Utilizing Third-Party Software Solutions
Several third-party tools offer advanced backup and restoration capabilities beyond Apple’s built-in options. Programs like iMazing, Dr.Fone, and AnyTrans provide more granular control over your data.
These tools let you browse backup contents before restoration, allowing you to pick exactly what you want to recover. This is particularly useful when dealing with corrupted backups.
Some software can even extract data from otherwise inaccessible backups. If your standard iCloud restoration fails, these alternatives might save your data.
Many third-party solutions also support selective app data restoration. This means you can restore just your WhatsApp messages or game progress without affecting other apps or settings on your device.
New iPhone Models and Restoration
Restoring your data when upgrading to a newer iPhone model requires understanding specific features and compatibility issues. Each iPhone generation introduces changes that may affect how backups work and transfer.
Considerations for iPhone 16 and iPhone 15
The iPhone 15 and 16 models use different backup processes than older iPhones. Their advanced chips and larger storage capacities allow for faster restoration from iCloud backups.
For iPhone 15 users, make sure your iOS is updated before attempting a restore. This prevents compatibility issues that might occur during the transfer process.
When setting up a new iPhone 16, you can place it near your old iPhone to start automatic data transfer. This method is often faster than traditional iCloud restoration.
Both models support Quick Start, which speeds up the setup process. This feature copies settings, apps, and data wirelessly between devices.
Remember that Face ID information doesn’t transfer through backups for security reasons. You’ll need to set this up again on your new device after restoration.
Migration from iPhone SE to Newer Models
Moving from an iPhone SE to a newer model requires special attention due to size and feature differences. The smaller storage capacity of many SE models might make restoration simpler but less comprehensive.
Before upgrading from an SE, check that your backup is complete. Many users forget to back up:
- Text messages
- Health data
- Photos in non-Apple apps
- Game progress
If your iPhone SE uses Touch ID, you’ll need to adapt to Face ID on newer models after restoration. This change affects how you unlock apps and make payments.
Some older iPhone SE backups may not include all app data compatible with newer models. In these cases, you may need to restore selectively rather than using a complete backup.
For the smoothest transition, connect your iPhone SE to power and Wi-Fi before creating your final backup. This ensures all data transfers properly to your new device.
Frequently Asked Questions
Restoring your iPhone from a backup can save your data when you get a new device or need to reset your current one. Here are answers to common questions about this process.
What are the steps to restore an iPhone from an iCloud backup?
To restore your iPhone from an iCloud backup, you need to first erase your device. Go to Settings > General > Reset and tap “Erase all content and settings.”
During the setup process after the reset, you’ll reach the Apps & Data screen. Tap Restore from iCloud Backup and sign in with your Apple ID.
Choose the backup you want to use and wait for the restore process to complete. Your iPhone will restart once the process is finished.
Can I recover my iPhone data from iCloud after the initial setup?
Yes, you can still recover data from iCloud even if you’ve already completed the initial setup. You’ll need to reset your device first.
Go to Settings > General > Reset and select “Erase all content and settings.” This will wipe your device and let you start fresh.
When you reach the Apps & Data screen during setup, you can choose the iCloud backup you want to restore from.
How do I restore my iPhone from a backup on my Mac?
On a Mac running macOS 10.15 or later, connect your iPhone to your computer with a cable. Open Finder and select your iPhone in the sidebar.
Click “Trust” if prompted, then click Restore from this backup. Choose the backup you want to use.
For Mac computers with macOS 10.14 or earlier, use iTunes instead of Finder. The process is similar—connect your device, select it in iTunes, and choose the restore option.
Is it possible to restore my iPhone from a backup without having to erase the device first?
No, you cannot fully restore from a backup without erasing your iPhone first. The restore process replaces all content and settings with what’s in the backup.
This is because a backup contains system files and settings that can only be properly restored during device setup. Partial restores don’t work for complete backups.
You can, however, access some individual items from your iCloud account without a full restore. Photos, contacts, and notes sync separately if you’ve enabled those features.
How can I manually restore my iPhone using a previous backup file?
To manually restore your iPhone using iTunes or Finder, connect your device to your computer with a cable. Open iTunes (or Finder on macOS 10.15+).
Select your iPhone when it appears, then click on the Restore Backup button. Choose the backup you want from the list.
Keep your iPhone connected until the process completes. The device will restart, and you’ll need to enter your Apple ID password if the backup was encrypted.
What should I do to retrieve specific data from an iCloud backup?
If you only need specific items rather than a full restore, log in to iCloud.com with your Apple ID. You can access contacts, photos, notes, and other data there.
For files and app data, you might need to do a full restore if the app doesn’t sync with iCloud directly. Some apps store data only in backups.
Another option is to use the specific app’s cloud features if available. Many apps like WhatsApp or Google apps have their own backup systems that work independently of iCloud.