Setting up emergency contacts on your iPhone is a simple yet crucial step for your safety. In just a few taps, you can make sure your loved ones are notified if you ever need emergency help. Adding emergency contacts to your iPhone allows them to receive alerts with your location when you use Emergency SOS.
The process works through the Health app on your iPhone, where you can create a Medical ID that includes important health information along with your emergency contacts. This information becomes available to emergency responders and can be accessed even when your iPhone is locked.
When you need help, your iPhone makes it easy to reach out. After you make an emergency call, your iPhone will automatically send your emergency contacts a text with your current location. This feature gives peace of mind knowing that in stressful situations, your phone handles the task of alerting those who care about you.
How To Add Emergency Contacts to Your iPhone
Adding emergency contacts to your iPhone ensures that first responders or helpful strangers can access critical information even when your phone is locked. These contacts appear in your Medical ID, part of Apple’s Health app, and can be accessed during emergencies through the lock screen or by pressing the power button rapidly.
Here’s how to set it up:
1. Open the Health App
- Launch the Health app on your iPhone.
- Tap your profile icon in the top-right corner.
- Select Medical ID.
2. Tap Edit
- In the Medical ID section, tap Edit in the upper-right corner.
- You’ll now be able to add and update emergency info.
3. Add Emergency Contacts
- Scroll down to the Emergency Contacts section.
- Tap Add Emergency Contact.
- Choose a contact from your phonebook.
- Select their relationship to you (e.g., parent, spouse, doctor).
You can add multiple emergency contacts, and they will be listed in the order you choose.
4. Enable Access When Locked
- Make sure Show When Locked is turned on at the top of the Medical ID settings.
- This allows emergency responders to view your Medical ID without needing your passcode.
5. Save Your Info
- Once you’ve added your contacts and verified all medical info (like allergies, blood type, or medications), scroll down and tap Done.
How Emergency Contacts Are Used
- If someone finds you unresponsive, they can:
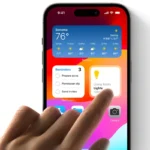
- Press and hold the Side button + Volume button to bring up the emergency slider.
- Tap Medical ID to see your emergency contacts.
- When you trigger Emergency SOS, your iPhone can also automatically text your emergency contacts with your current location (if you allow it in Settings > Emergency SOS).
Setting this up takes just a couple of minutes and could be life-saving. It’s one of the most overlooked but essential features on any iPhone.
Key Takeaways
- Emergency contacts can be added through the Health app under Medical ID settings.
- Your contacts will receive your location information automatically when you use Emergency SOS.
- Your Medical ID information is accessible to emergency responders even when your iPhone is locked.
Understanding Emergency Contacts and Medical ID
Your iPhone’s Medical ID and emergency contacts features can be life-saving tools during emergencies. These features give first responders crucial information when you can’t communicate.
What Is a Medical ID?
Medical ID is a built-in iPhone feature in the Health app that stores your essential medical information. It works like a digital medical bracelet.
Your Medical ID can include:
- Allergies and reactions
- Medications you take
- Existing medical conditions
- Blood type
- Organ donor status
- Height and weight
The best part? Emergency responders can access this information from your lock screen without needing your passcode. This quick access can be critical when every second counts.
To view someone’s Medical ID on an iPhone, anyone can press the emergency button on the lock screen. This makes your medical details available even when you’re unconscious or unable to unlock your phone.
Benefits of Having Emergency Contacts on Your iPhone
Adding emergency contacts to your iPhone provides several important safety benefits.
When you use Emergency SOS on your iPhone, it automatically calls emergency services. After the call ends, your iPhone sends your current location to your emergency contacts.
Your emergency contacts will receive:
- A text message with your location
- Updates if your location changes
These contacts also appear on your Medical ID, helping first responders notify loved ones quickly. This feature can be especially valuable for people with medical conditions or those who live alone.
Emergency contacts can provide critical information about your health history that might not be in your Medical ID. They can also make important decisions if you’re unable to do so yourself.
Setting Up Your Medical ID on iPhone
Medical ID on iPhone provides quick access to vital health information during emergencies. This feature stores your medical conditions, allergies, and emergency contacts that first responders can access even when your phone is locked.
Accessing the Health App
To set up your Medical ID, first open the Health app on your iPhone. This app comes pre-installed on all iPhones. Look for the white icon with a red heart in the top right corner.
Once in the Health app, tap on your profile picture in the top right corner. You’ll see several options appear on the screen. Tap on “Medical ID” to begin the setup process.
If you haven’t created a Medical ID before, you’ll see an option to “Create Medical ID.” Tap this button to start. If you already have one set up, you’ll see an “Edit” button instead.
Entering Medical ID Information
After accessing the Medical ID section, you’ll need to fill in your important health information. Start by adding your full name, date of birth, and photo.
Add any medical conditions you have, along with allergies and reactions. This information could be life-saving in an emergency situation.
List medications you take regularly. Include dosage information when possible.
In the Emergency Contacts section, tap the plus button to add contacts. Choose people from your address book and specify their relationship to you. These contacts will receive a message with your location if you use Emergency SOS.
Important information to include:
- Blood type
- Organ donor status
- Height and weight
- Primary language
Privacy Considerations
Your Medical ID information is private but can be made accessible from your lock screen for emergencies. To enable this feature, toggle on “Show When Locked” at the top of your Medical ID form.
When enabled, emergency responders can access your Medical ID by tapping “Emergency” on your lock screen, then tapping “Medical ID” in the bottom left corner.
This information is not shared with other apps or included in your Health data backups. Your privacy remains protected while still making critical information available when needed.
You can update your Medical ID anytime by returning to the Health app. It’s good practice to review this information regularly, especially after changes to medications or health conditions.
Adding Emergency Contacts to Your iPhone
Setting up emergency contacts on your iPhone can be life-saving in a crisis. These contacts will be notified automatically with your location when you make an emergency call using the SOS feature.
Selecting Contacts to Include
You can add emergency contacts through the Health app on your iPhone. First, open the Health app and tap your profile picture in the top right corner. Then tap Medical ID and select “Edit” in the top right corner.
Scroll down until you find the “Emergency Contacts” section. Tap the green “+” button to add an emergency contact. Your iPhone will open your contacts list.
Select the person you want to add as your emergency contact. After selecting the contact, you’ll need to choose their relationship to you (spouse, parent, friend, etc.).
You can add multiple emergency contacts by repeating these steps. Choose people who are likely to respond quickly in an emergency situation.
Editing or Removing Contacts
To edit or remove emergency contacts, open the Health app again and go to your profile. Tap on Medical ID and select “Edit” in the top right corner.
In the Emergency Contacts section, you’ll see all your current emergency contacts listed. To remove someone, tap the red minus icon next to their name, then tap “Delete” to confirm.
To change someone’s relationship status, you’ll need to remove them first and then add them again with the new relationship type.
Remember to tap “Done” in the top right corner after making changes to save your updates. Your emergency contacts will receive a text message when you use the Emergency SOS feature to call emergency services.
Using Emergency SOS on iPhone
Emergency SOS is a critical iPhone feature that connects you to help when you need it most. It allows you to quickly call emergency services and alert your emergency contacts with your location.
How to Make an Emergency SOS Call
There are several ways to trigger Emergency SOS on your iPhone. The method depends on your iPhone model.
For iPhone 8 or later:
- Press and hold the side button and either volume button until the Emergency SOS slider appears
- Drag the Emergency SOS slider to call emergency services
- Or keep holding the buttons to start a countdown and automatic call
For iPhone 7 or earlier:
- Rapidly press the side button five times
- The Emergency SOS slider will appear
After your call with emergency services ends, your iPhone can send your location to your emergency contacts with a message that you’ve called emergency services.
Your location updates are temporary and stop after 24 hours.
Customizing Emergency SOS Settings
You can adjust your Emergency SOS settings to match your preferences and needs.
To customize these settings:
- Open the Settings app on your iPhone
- Scroll down and tap “Emergency SOS”
- Toggle “Call with Hold” on or off
- Enable or disable “Countdown Sound”
- Set up your emergency contacts by tapping “Edit Emergency Contacts in Health”
The Auto Call feature automatically dials emergency services when you trigger Emergency SOS. When enabled, a countdown begins with an alert sound.
You can also choose whether to share your Medical ID information with emergency responders. This includes critical details like allergies and medical conditions.
Triggering Emergency SOS with Siri
Siri provides a hands-free way to call for help in emergencies when you can’t reach your phone buttons.
To use Siri for emergency calls:
- Say “Hey Siri, call 911” (or your local emergency number)
- Siri will confirm before dialing to prevent accidental calls
This feature works even when your iPhone is locked. The “Hey Siri” function must be enabled in your settings for this to work.
If you’re unable to speak, you can set up Emergency SOS via satellite on compatible iPhone models. This works in areas without cellular coverage.
Remember that using Emergency SOS intentionally when there’s no emergency may result in penalties.
Accessibility and Availability
iPhone emergency contact features offer important safety options for users with different needs and devices. These features work across various platforms and can be adjusted for people who may need extra help.
Using Emergency Contacts on Different Devices
Emergency contacts work differently depending on which device you use. On an iPhone, you can add emergency contacts through the Health app. These contacts will receive alerts when you use Emergency SOS.
For Mac computers, emergency features sync through your Apple ID. This means contacts you add on your iPhone will be available on your Mac too.
Android Devices have similar emergency features but set up differently. They often use the Emergency Information or Contacts app instead of Health.
From a Computer, users can manage iPhone emergency contacts by signing into their Apple ID on iCloud.com and accessing the Health data section.
Users can also receive emergency notifications through Email if they set this as a contact method in their Health app settings.
Assistance with Emergency Features
People with disabilities can access emergency features through special options. iPhones offer Assistive Access that lets users triple-click the side button or Home button to place emergency calls.
For those with vision impairments, VoiceOver can read emergency contact setup instructions aloud. Large text settings make emergency information easier to read.
People with motor limitations can use voice commands to activate Emergency SOS. Simply saying “Hey Siri, call emergency” works even when the phone is locked.
Family members can help set up emergency contacts for others. This is especially useful for:
- Elderly users
- Children with phones
- People with cognitive disabilities
- Those unfamiliar with technology
Training sessions with Apple Store staff can help users learn these safety features.
Frequently Asked Questions
Many iPhone users have questions about setting up and using emergency contacts. These features can help you stay safe and ensure help arrives when needed.
How can I add an emergency contact to my iPhone’s lock screen?
To add emergency contacts to your iPhone’s lock screen, you’ll need to set up your Medical ID. Open the Health app and tap your profile picture. Then tap Medical ID.
Scroll down to Emergency Contacts and tap Edit. From there, tap the add button to select contacts from your address book. These contacts will be visible on your lock screen through the Emergency SOS feature.
What steps are involved in updating emergency contacts on an iPhone?
Updating emergency contacts is simple. First, open the Health app on your iPhone. Then tap your profile picture in the top right corner.
Select Medical ID and tap Edit. Scroll until you find the Emergency Contacts section. Here you can add new contacts by tapping the add button or remove existing ones by tapping the red minus sign.
How can an emergency call be initiated on an iPhone without unlocking it?
Emergency calls can be made without unlocking your iPhone. Press the side button five times quickly to activate Emergency SOS. On newer models, you can also press and hold the side button and either volume button.
A countdown will begin, and an alarm will sound. When the countdown ends, your iPhone automatically calls emergency services. Your emergency contacts will receive a text message with your location after the call ends.
In what way can emergency contact information be altered on an iPhone?
To alter emergency contact information, tap your profile photo in the Health app. Select Medical ID and tap Edit at the top of the screen.
Find the Emergency Contacts section and make your changes. You can add, remove, or update the relationship type for each contact. Remember to tap Done when finished to save your changes.
What is the procedure for including an emergency address on an iPhone?
iPhones don’t have a specific feature for storing an emergency address. However, you can add important address information to your Medical ID notes section.
Open the Health app and tap your profile picture. Select Medical ID and tap Edit. Scroll down to the Notes field and enter your home address or any other important location information.
What should be done if Emergency SOS is unintentionally activated on an iPhone?
If you accidentally trigger Emergency SOS, you can stop it before the call goes through. When the countdown appears, tap the Stop button and then tap Stop Calling.
For calls already connected, stay on the line and explain to the dispatcher that it was an accident. This helps avoid sending emergency services unnecessarily. You should also message your emergency contacts to let them know you’re safe.