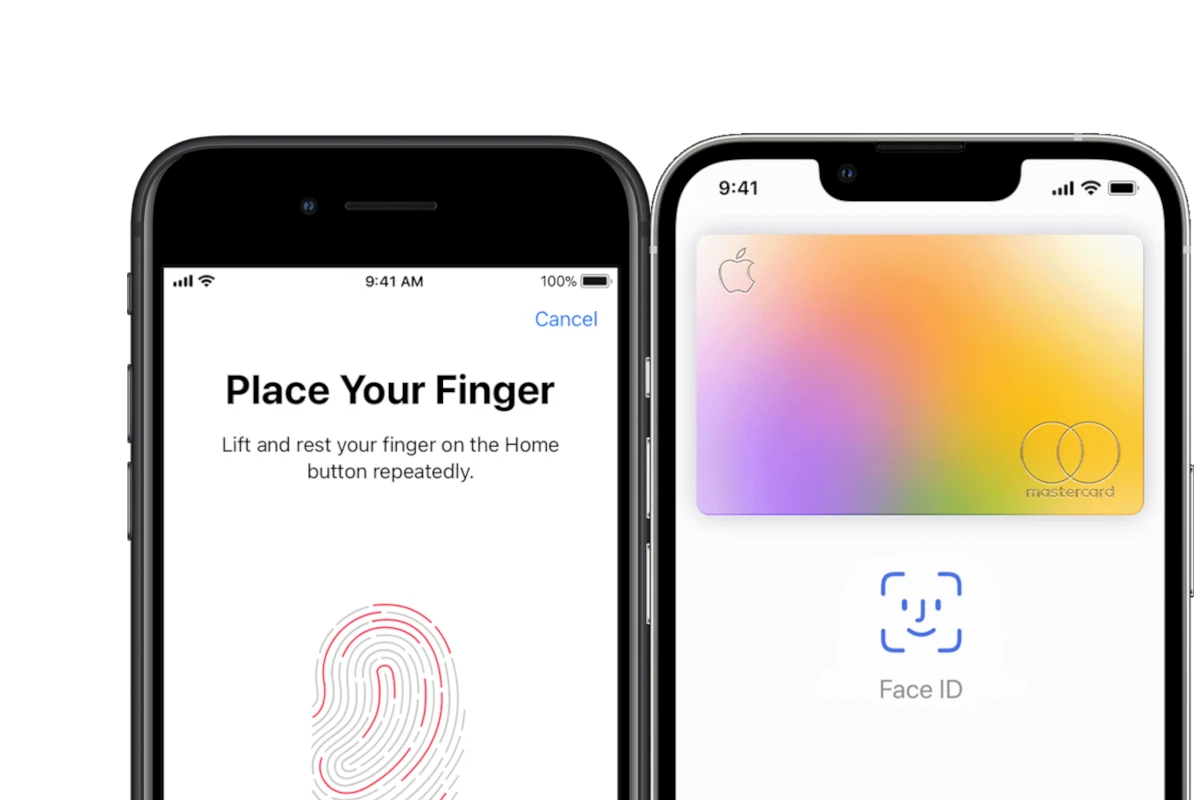
Setting up Touch ID on your iPhone or iPad makes unlocking your device quick and easy. Instead of typing a passcode each time, you can simply press your finger on the home button or top button. To set up Touch ID, go to Settings, tap Touch ID & Passcode, enter your passcode, and then tap Add a Fingerprint to follow the on-screen instructions. This simple process takes just a minute or two to complete.
Touch ID works on many iPhone and iPad models and can do more than just unlock your device. You can use it to make purchases in the App Store, authorize Apple Pay payments, and sign into apps without typing passwords. This saves time and adds an extra layer of security since fingerprints are unique to each person.
How to Set Up Touch ID
Touch ID is Apple’s fingerprint recognition feature that lets you unlock your iPhone or iPad, authorize purchases, and sign in to apps quickly and securely. Setting it up is simple and enhances both your device’s security and convenience. Here’s how to set up Touch ID on your iPhone or iPad in just a few easy steps.
Which Devices Support Touch ID?
Touch ID is available on iPhones with a Home button (like iPhone 8, SE 2020) and certain iPads such as iPad Air (3rd generation), iPad mini (5th generation), and iPad (8th generation). Newer models without a Home button use Face ID instead.
Step 1: Prepare Your Finger and Device
- Make sure your finger and the Touch ID sensor (Home button) are clean and dry.
- Remove any screen protectors or cases that might interfere with the sensor.
Step 2: Open Touch ID Settings
- Go to Settings on your iPhone or iPad.
- Scroll down and tap Touch ID & Passcode.
- Enter your device passcode when prompted.
Step 3: Add a Fingerprint
- Tap Add a Fingerprint.
- Place your finger lightly on the Home button without pressing it.
- Lift and rest your finger repeatedly, adjusting the position slightly each time, so the sensor can capture all parts of your fingerprint.
- Follow the on-screen instructions to complete the fingerprint scan, including adjusting your grip to capture the edges of your finger.
Step 4: Configure Touch ID Usage
Once your fingerprint is registered, you can choose what you want to use Touch ID for:
- iPhone Unlock: Unlock your device with your fingerprint.
- Apple Pay: Authorize payments with Touch ID.
- iTunes & App Store: Approve purchases and downloads.
- Password Autofill: Use Touch ID to autofill saved passwords.
Toggle these options on or off according to your preference.
Step 5: Test Touch ID
Lock your device and try unlocking it with your registered finger. If it doesn’t respond well, you can add more fingerprints (up to five total) or delete and re-add fingerprints for better accuracy.
Tips for Optimal Touch ID Performance
| Tip | Explanation |
|---|---|
| Keep your finger and sensor clean | Dirt or moisture can interfere with recognition. |
| Register multiple fingers | Add fingerprints from both hands for convenience. |
| Avoid pressing too hard | Lightly rest your finger on the sensor for best results. |
| Update iOS regularly | Software updates can improve Touch ID performance. |
Setting up Touch ID is a quick way to secure your iPhone or iPad while making everyday tasks faster and easier. Once configured, you’ll enjoy seamless access and secure authentication with just a touch.
For more details, see Apple’s official guide on using Touch ID on iPhone and iPad.
Key Takeaways
- Touch ID setup requires going to Settings, tapping Touch ID & Passcode, and following the simple fingerprint scanning process.
- Your fingerprint can be used to unlock your device, make purchases, and sign into apps without typing passwords.
- If Touch ID isn’t working properly, try adding multiple fingerprints or cleaning both your finger and the sensor.
Understanding Touch ID
Touch ID is Apple’s fingerprint recognition feature that allows users to quickly unlock their devices and authenticate purchases. This technology uses advanced fingerprint scanning to provide security while offering convenience.
History and Technology Behind Touch ID
Apple first introduced Touch ID on the iPhone 5S in 2013. This feature later came to iPads and MacBooks, changing how users interact with their devices.
Touch ID works through a capacitive sensor covered with sapphire crystal. This sensor takes a high-resolution image of your fingerprint. It doesn’t store actual pictures of your fingerprint but rather mathematical representations.
The sensor can read fingerprints at 360 degrees of orientation. This means it works no matter how you place your finger on the sensor.
Setting up Touch ID requires users to register their fingerprints by repeatedly placing their finger on the sensor. This creates a complete map of the fingerprint for better recognition.
Comparison With Face ID
Touch ID and Face ID represent different approaches to biometric authentication. While Touch ID uses fingerprint recognition, Face ID uses facial recognition technology.
Key differences:
- Speed: Touch ID often unlocks devices faster in certain situations
- Convenience: Face ID works without touching the device
- Compatibility: Touch ID works better with masks and gloves
- Device support: Newer iPhones use Face ID, while many iPads still offer Touch ID functionality
Many users prefer Touch ID for its reliability in various lighting conditions. Face ID can struggle in dark environments or bright sunlight.
Both systems offer similar security levels, with Apple’s Secure Enclave protecting biometric data. Neither system stores actual images of fingerprints or faces.
Checking Device Compatibility
Before setting up Touch ID, you need to make sure your device supports this feature. Not all Apple devices have Touch ID capabilities.
Compatible iPhone Models:
- iPhone 5s
- iPhone 6 and 6 Plus
- iPhone 6s and 6s Plus
- iPhone 7 and 7 Plus
- iPhone 8 and 8 Plus
- iPhone SE (all generations)
Compatible iPad Models:
- iPad Pro (except Face ID models)
- iPad Air 2 and later
- iPad (5th generation and later)
- iPad mini 3 and later
You can check if your device has a Touch ID sensor by looking for the Home button with a ring around it. This ring is the Touch ID sensor that reads your fingerprint.
No Touch ID? Your device might use Face ID instead, or it could be an older model that doesn’t support biometric authentication.
To confirm Touch ID support on your device, go to Settings. If you see a “Touch ID & Passcode” option, your device has Touch ID capability.
Some apps won’t recognize Touch ID unless you set up a passcode first. This security measure ensures your device remains protected.
If your iOS device has Touch ID but it’s not working, check that the sensor is clean and dry. Moisture, dirt, or damage can affect performance.
Preparation for Setup
Before setting up Touch ID on your iPhone or iPad, you need to make a few quick preparations. These steps ensure a smooth setup process and help your device recognize your fingerprint correctly.
Ensuring Latest iOS Version
First, check that your device has the most recent iOS update. Updates often improve Touch ID performance and security.
To check for updates:
- Connect your device to Wi-Fi
- Go to Settings
- Tap General
- Select Software Update
If you see “Your software is up to date,” you’re good to go. If not, tap “Download and Install” to get the newest version.
The update may take several minutes. Your device will show the Apple logo with a progress bar during installation. Don’t worry if it seems to take a while.
Make sure your battery is at least 50% charged or keep your device plugged in during updates.
Creating a Passcode
Touch ID requires a passcode as a backup method. This passcode protects your data if Touch ID fails to recognize your fingerprint.
To set up a passcode:
- Open Settings
- Tap Face ID & Passcode or Touch ID & Passcode
- Select Turn Passcode On if you don’t have one
- Enter a six-digit passcode
For better security, avoid simple codes like birth dates or repeated numbers (111111). Choose a code you can remember but others can’t easily guess.
You can also set up a custom alphanumeric passcode for stronger security by tapping “Passcode Options” when creating your code.
Setting Up Touch ID
Touch ID offers a convenient way to unlock your iPhone or iPad using your fingerprint. This secure feature saves time and adds an extra layer of protection for your device.
Step-by-Step Guide to Enabling Touch ID
To set up Touch ID on your iPhone or iPad, start by opening the Settings app on your device. Look for the “Touch ID & Passcode” option and tap on it. You’ll need to enter your current passcode to proceed.
Once you’ve entered your passcode, you’ll see several options. To begin setting up your fingerprint, tap on “Add a Fingerprint.” Your device will guide you through the process with on-screen instructions.
Place your finger on the Home button (or Touch ID sensor) and lift it repeatedly. The device will capture different parts of your fingerprint. Keep adjusting your finger position when prompted until the process is complete.
After finishing, you can turn on the Touch ID features you want to use by toggling the switches for:
- iPhone/iPad Unlock
- Apple Pay
- App Store purchases
- Password AutoFill
Adding Multiple Fingerprints
Touch ID allows you to store up to five different fingerprints. This is useful for adding multiple fingers or sharing access with trusted family members.
To add another fingerprint, go back to “Settings > Touch ID & Passcode” and tap “Add a Fingerprint” again. Follow the same process as before to register the new fingerprint.
You can name your fingerprints for easier management. Simply tap on a fingerprint in the list and enter a custom name like “Right Thumb” or “Left Index.”
If you need to remove a fingerprint, swipe left on it in the list and tap “Delete.” You can also tap on a fingerprint and select “Delete Fingerprint.”
For the best results, add the fingers you use most often to unlock your device. This typically includes your thumbs and index fingers.
Testing Touch ID Functionality
After setting up Touch ID on your iPhone or iPad, you should test it to make sure it works correctly. This helps prevent issues when you need to use it later.
First, lock your device by pressing the side button. Then try to unlock it using the finger you registered. The Touch ID sensor should quickly recognize your fingerprint and unlock your device.
Try testing with different finger positions. Place your finger at various angles on the sensor to see if it still recognizes you. This improves reliability for everyday use.
Test Touch ID with these common features:
- Device unlocking – Lock and unlock your device several times
- App Store purchases – Try downloading a free app
- Apple Pay – Set up a payment card and test at checkout
- Password autofill – Try logging into an app that supports Touch ID
If Touch ID isn’t working properly, try these quick fixes:
- Make sure your finger and the sensor are clean and dry
- Check if Touch ID is enabled for the function you’re using
- Try adding the same finger again for better recognition
Remember that Touch ID might not work when your finger is wet or if the sensor is dirty. Wipe both clean if you have trouble.
You can also go to Settings > Touch ID & Passcode to check which features have Touch ID enabled or to add more fingerprints for better convenience.
Troubleshooting Common Issues
Touch ID problems can be frustrating when they prevent you from using your device. Most issues have simple fixes that take just a few minutes to complete.
When Touch ID Fails to Recognize a Fingerprint
If your iPhone or iPad isn’t recognizing your fingerprint, start with the basics. Make sure your fingers and the Touch ID sensor are clean and dry. Oils, moisture, or dirt can block the scanner from reading your print correctly.
Check if you’re using the correct finger. This might seem obvious, but many people register multiple fingers and forget which ones work.
Try adding the same finger multiple times. This gives the system more data points for recognition and improves accuracy for fingers that might be harder to scan.
Your case or screen protector might be interfering with the sensor. Remove them temporarily to test if that solves the problem.
If problems continue, go to Settings → Touch ID & Passcode and delete your existing fingerprints. Then add them again with clean, dry fingers.
Steps to Take if Touch ID Is Unresponsive
When Touch ID completely stops responding, try a quick restart of your device. This fixes many temporary software glitches.
For more stubborn problems, try this reset method:
- Go to Settings → Touch ID & Passcode
- Turn off all Touch ID options
- Restart your device
- Re-enable Touch ID and add your fingerprints again
Software updates often contain fixes for Touch ID issues. Check if your device has the latest iOS or iPadOS version installed.
If your device shows an “Unable to activate Touch ID” message, your sensor might have a hardware problem. Try cleaning the sensor with a soft, lint-free cloth. If that doesn’t work, contact Apple Support as your device might need professional repair.
Advanced Solutions
When Touch ID doesn’t work properly, several advanced fixes can help restore functionality. These solutions range from simple resets to professional repair options.
Reset All Settings for Touch ID
If Touch ID isn’t working correctly, resetting your settings might fix the problem. This option keeps your data but clears system settings.
- Go to Settings on your iPhone or iPad
- Tap General
- Scroll down and tap Transfer or Reset iPhone/iPad
- Select Reset
- Tap Reset All Settings
- Enter your passcode when prompted
After your device restarts, you’ll need to set up Touch ID again. This process often fixes software glitches that prevent Touch ID from working properly.
Remember to keep the Touch ID sensor clean. Dirt, oil, or moisture can affect the scanner’s ability to read your fingerprint.
Restoring iPhone Using iTunes
When reset options don’t work, restoring your device through iTunes (or Finder on newer Macs) may solve deeper software issues.
Before starting:
- Back up your device to avoid losing data
- Make sure you have the latest version of iTunes
- Use the original cable if possible
Steps to restore:
- Connect your device to your computer
- Open iTunes (or Finder on macOS Catalina and newer)
- Select your device when it appears
- Click Restore iPhone/iPad
- Follow the onscreen instructions
Your device will enter recovery mode during this process. After restoration completes, you can set up your device as new or restore from a backup.
Seeking Professional Help
When software solutions don’t fix Touch ID problems, the issue might be hardware-related.
Common hardware issues include:
- Damaged Touch ID sensor
- Loose connections inside the device
- Water damage affecting internal components
Contact Apple Support through these options:
- Apple Support website
- Apple Support app
- Call Apple Support directly
- Visit an Apple Store with a Genius Bar
Third-party repair shops might offer cheaper fixes, but using non-Apple repair services could void your warranty. Always check if your device is still covered by AppleCare+ before seeking repairs.
If your iPhone or iPad is older, consider if repair costs justify fixing the device versus upgrading to a newer model with improved Touch ID or Face ID technology.
Security and Privacy Considerations
When using Touch ID on your iPhone or iPad, your fingerprint data is never stored directly on Apple’s servers. Instead, it stays securely on your device in a special chip called the Secure Enclave.
Your fingerprint information is converted into a mathematical representation that cannot be reverse-engineered back into an actual fingerprint image. This adds an important layer of protection.
Apps that use Touch ID cannot access your actual fingerprint data. When you authorize an app with Touch ID, the app only receives a “yes” or “no” confirmation that the authentication was successful.
Important Privacy Features:
- Fingerprint data never leaves your device
- Apps cannot access your fingerprint information
- Touch ID data is encrypted on your device
It’s still important to use a strong passcode as a backup. Your passcode is required after device restart or when Touch ID hasn’t been used for 48 hours.
Be careful about who you allow to register their fingerprints on your device. Anyone with a registered fingerprint can access your phone and any apps that use Touch ID for authentication.
You can review and delete stored fingerprints at any time by going to Settings > Touch ID & Passcode. This gives you full control over who can access your device.
Apple Support recommends regularly reviewing your Touch ID settings to ensure only your fingerprints remain registered, especially if you’ve previously shared your device with others.
Additional Support and Resources
If you need extra help with Touch ID on your iPhone or iPad, several options are available.
Apple Support offers direct assistance through their website or app. You can contact Apple Support to speak with a trained professional about any issues.
Apple Store locations have tech experts who can help in person. Make an appointment with an Apple technician for hands-on troubleshooting if your Touch ID isn’t working properly.
Online communities can help solve common problems:
- Apple Discussion Forums
- Reddit r/Apple
- YouTube tutorials
For quick solutions, check the Apple Support guide for iPad or watch setup videos on YouTube.
Services like JustAnswer connect you with verified experts who can solve specific Touch ID problems. Some services require a membership but offer unlimited tech support.
Common issues often have simple fixes. Try these quick steps if Touch ID stops working:
- Clean the sensor
- Remove and re-add fingerprints
- Restart your device
- Update iOS/iPadOS
Remember that Apple’s built-in guidance in Settings provides step-by-step help for most Touch ID setup questions.
Frequently Asked Questions
Touch ID helps you unlock your device and apps with just your fingerprint. Below are answers to common questions about setting up and using this feature on different iPhone and iPad models.
What are the steps to configure Touch ID on an iPhone 13?
To set up Touch ID on an iPhone 13, go to Settings and tap “Touch ID & Passcode.” You’ll need to enter your passcode first. Then tap “Add a Fingerprint” and follow the on-screen instructions.
Place your finger on the Home button when prompted. Lift and rest your finger repeatedly until the scan is complete.
You can add up to five fingerprints in total. This lets you unlock your phone with different fingers or even add fingerprints of trusted family members.
How can I enable Touch ID for applications on my iPad?
After setting up Touch ID, you can enable it for apps on your iPad. Go to Settings > Touch ID & Passcode and enter your passcode.
You’ll see a list of options under “Use Touch ID For.” Turn on the switches for App Store, Apple Pay, Password AutoFill, or other apps that support Touch ID.
Many third-party apps also support Touch ID. Look for this option in the security settings of each app.
What should I do if Touch ID is not functioning on my iPhone or iPad?
If Touch ID isn’t working, first make sure your finger and the Touch ID sensor are clean and dry. Moisture, dirt, or oil can affect performance.
Try adding your fingerprint again with clear scans in good lighting. Sometimes redoing the setup process solves recognition problems.
If problems continue, check for software updates in Settings. As a last resort, you might need to contact Apple Support for hardware-related issues.
Is there a way to set up Touch ID on the latest iPad Pro model?
The latest iPad Pro models don’t use Touch ID. They have switched to Face ID technology instead.
If you have an older iPad Pro with Touch ID, you can set it up through Settings > Touch ID & Passcode.
The Touch ID sensor on these models is located in the Home button or, on some models, in the top button.
How can I add my fingerprint to an iPhone 16 for Touch ID?
iPhone 16 doesn’t use Touch ID technology. Apple has replaced Touch ID with Face ID on newer iPhone models starting with iPhone X.
If you’re using an older iPhone model with Touch ID, the setup process involves going to Settings > Touch ID & Passcode and tapping “Add a Fingerprint.”
The system will guide you through placing your finger on the sensor multiple times to capture different parts of your fingerprint.
Where can I find Touch ID settings on my iPad Air?
On iPad Air, find Touch ID settings by opening the Settings app and tapping “Touch ID & Passcode.”
You’ll need to enter your passcode to access these settings. Here you can add fingerprints and choose what Touch ID can be used for.
If your iPad Air has a top button with Touch ID, the settings work the same way but you’ll place your finger on the top button instead of a Home button.