Keeping your Mac data safe doesn’t have to be complicated. With a few simple steps, you can create a backup on an external hard drive that protects your important files from loss. Backing up a Mac to an external hard drive is easiest with Time Machine, which automatically saves copies of your files, apps, and system settings to your connected drive.
Many Mac users put off making backups until it’s too late. But setting up a backup system takes just minutes and can save you from the heartbreak of losing photos, documents, and other irreplaceable data. You can use Time Machine by connecting an external drive, turning on the backup feature in System Settings, and letting your Mac do the work.
Regular backups give you peace of mind and a safety net for when accidents happen. Whether your computer crashes, gets stolen, or suffers damage, having an up-to-date backup means you can quickly restore your files to a new or repaired Mac without missing a beat.
Here are the steps to back up a Mac using an external hard drive:
How To Back Up a Mac on an External Hard Drive
Backing up your Mac ensures your files, photos, apps, and settings are safe in case something goes wrong. The easiest way to do this is by using Time Machine, Apple’s built-in backup tool.
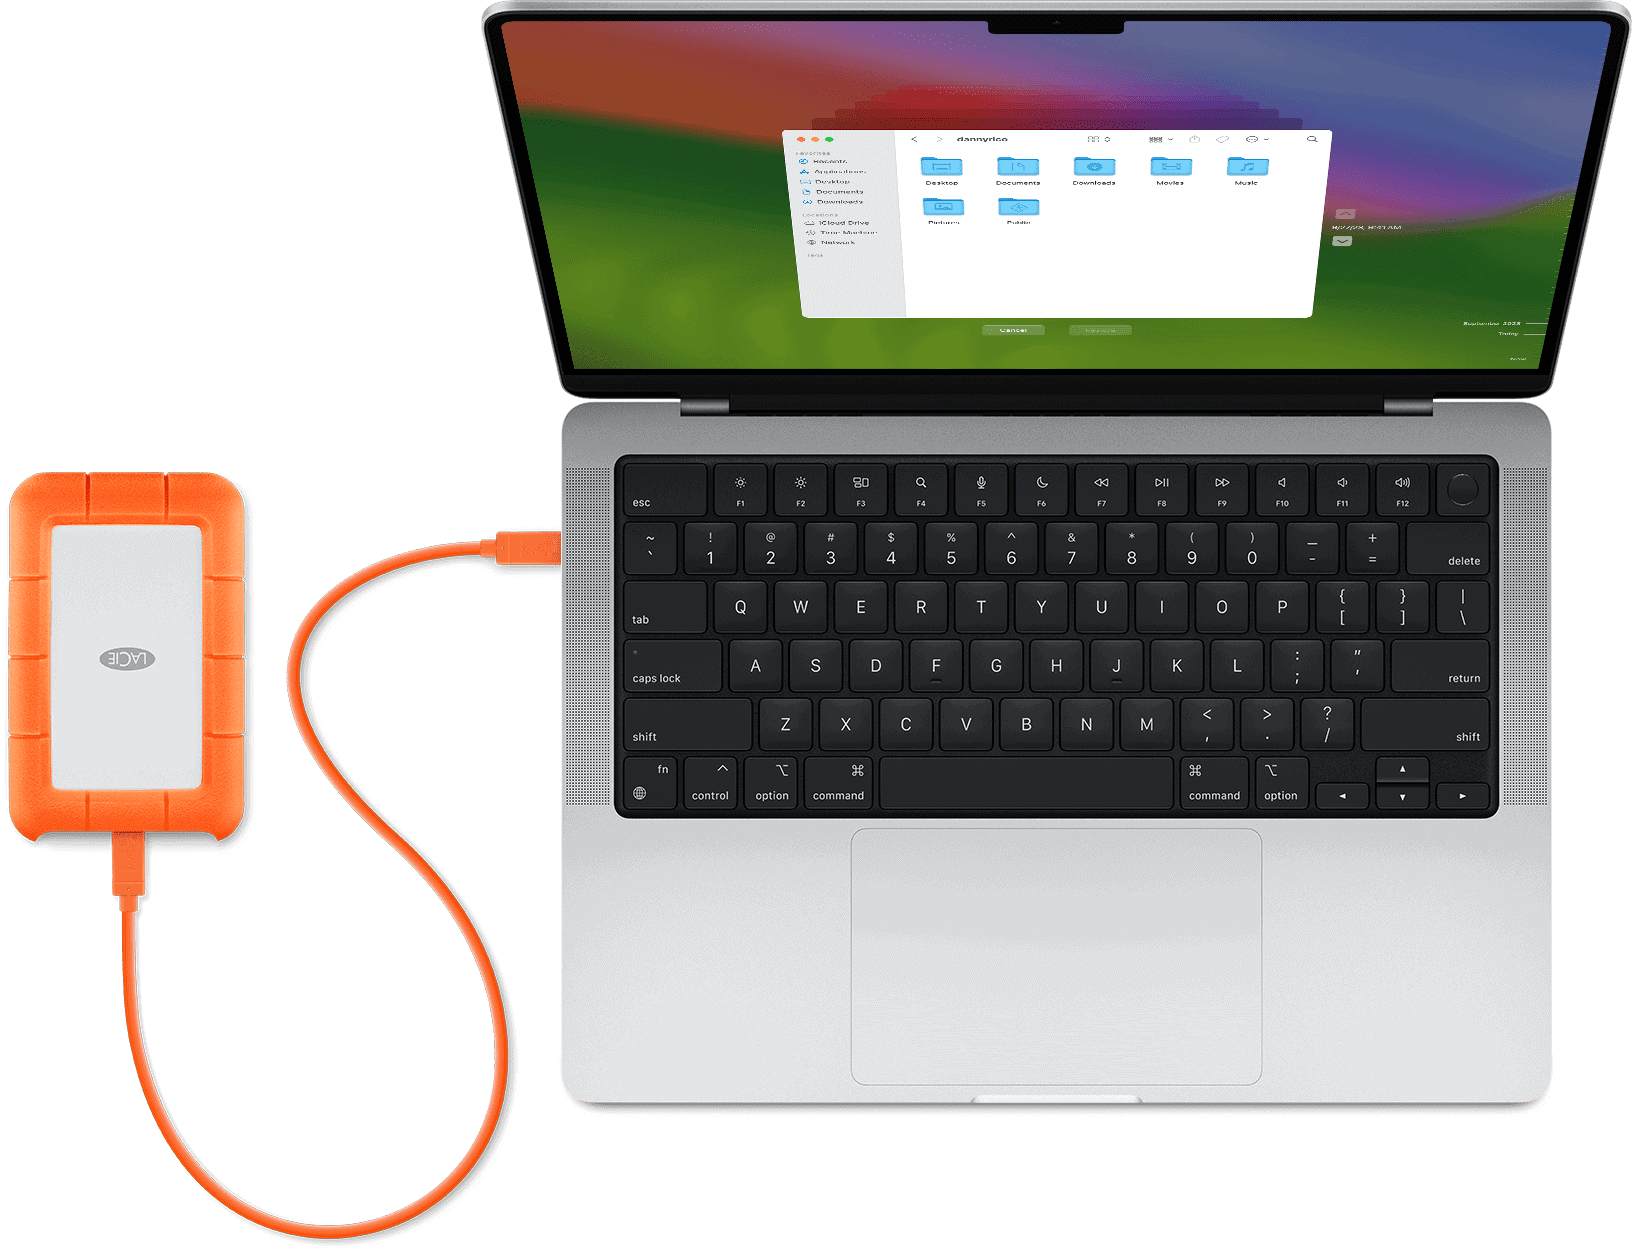
Step 1: Connect the External Hard Drive
- Plug your external hard drive into your Mac using USB, Thunderbolt, or USB-C (depending on the port).
- A prompt may appear asking if you want to use the drive for Time Machine. Click Use as Backup Disk if you see it.
Step 2: Format the Drive (If Needed)
- Open Disk Utility (Go to
Applications > Utilities > Disk Utility). - Select the external drive from the sidebar.
- Click Erase, choose:
- Format:
APFSorMac OS Extended (Journaled) - Scheme:
GUID Partition Map
- Format:
- Click Erase (⚠️ This will delete all data on the drive).
Step 3: Set Up Time Machine
- Open System Settings (macOS Ventura or later) or System Preferences (on older macOS).
- Go to General > Time Machine (Ventura) or just Time Machine.
- Click Add Backup Disk or Select Backup Disk.
- Choose your external hard drive and click Use Disk.
Step 4: Start the Backup
- Time Machine will begin the backup automatically after setup.
- The first backup may take a while depending on how much data you have.
- You can check progress by clicking the Time Machine icon in the menu bar.
Step 5: Enable Automatic Backups (Optional)
- In Time Machine settings, make sure Back Up Automatically is checked.
- Time Machine will back up your Mac hourly, daily, and weekly as long as the drive is connected.
Tips:
- Leave the drive connected regularly so Time Machine can perform ongoing backups.
- You can also manually back up by clicking the Time Machine menu and selecting Back Up Now.
- Want to exclude large files or folders? Click Options in Time Machine settings and add exclusions.
This method gives you a complete snapshot of your Mac and lets you restore everything if you ever need to.
Key Takeaways
- Time Machine creates automatic, incremental backups of your Mac when an external drive is connected.
- You can select your backup disk in System Settings under General > Time Machine.
- Regular backups protect against data loss from computer failures, theft, or accidental file deletion.
Understanding the Basics of Mac Backups
Backing up your Mac prevents data loss and keeps your important files safe. Apple provides built-in tools that make the process simple, but you need to understand some key concepts first.
The Importance of Regular Backups
Data loss can happen to anyone. Hard drives fail, laptops get stolen, and accidents occur. Without backups, your photos, documents, and other important files could disappear forever.
Regular backups create a safety net for your digital life. If something goes wrong with your Mac, you can restore your system to a previous state without losing important work.
Mac users who don’t back up regularly risk losing:
- Irreplaceable photos and videos
- Important documents and work files
- Music and media collections
- App data and settings
Many people only think about backups after a data loss disaster. By then, it’s too late. Setting up automatic backups with Time Machine takes just minutes but can save days of heartache.
Choosing the Right External Hard Drive
Not all external drives work equally well for Mac backups. Size, connection type, and reliability matter.
For storage capacity, a good rule is to get a drive at least twice the size of your Mac’s internal storage. This gives Time Machine room to store multiple versions of files as they change over time.
Connection options include:
- USB-C: Fast and modern, ideal for newer Macs
- USB-A: Works with older Macs but slower
- Thunderbolt: Extremely fast but more expensive
Portable drives offer convenience but desktop drives often provide more storage for less money. Some drives come pre-formatted for Macs, while others need reformatting before use.
SSD drives cost more but resist damage from drops and bumps better than traditional hard drives. This makes them ideal for backing up laptops.
Differences Between APFS and HFS+ File Systems
Your backup disk’s file system affects how Time Machine works. Macs use two main file systems: APFS (Apple File System) and HFS+ (Mac OS Extended).
APFS is newer and more efficient. It handles SSD storage better and includes built-in encryption. MacOS Mojave and newer versions use APFS by default.
HFS+ (Mac OS Extended) is older but still useful for some backups. Time Machine traditionally used HFS+ formatted drives, though newer macOS versions can use APFS for backups too.
Key differences include:
- APFS handles file snapshots more efficiently
- HFS+ has longer compatibility with older Mac systems
- APFS works better with SSDs
- HFS+ may perform better with traditional hard drives
When formatting a drive for Time Machine, your Mac will suggest the most compatible file system. For most users, accepting this recommendation works best.
Preparing Your Mac and External Hard Drive for Backup
Before starting the backup process, you need to prepare both your Mac and external drive properly. Getting these initial steps right ensures your backup will run smoothly and your data remains safe.
Formatting the External Hard Drive
External drives often come pre-formatted, but they may not use the optimal format for Macs. To format your drive:
- Connect your external drive to your Mac
- Open Disk Utility (found in Applications > Utilities)
- Select your external drive from the sidebar
- Click “Erase” at the top of the window
- Name your drive something recognizable like “Mac Backup”
- Choose “APFS” format for newer Macs or “Mac OS Extended (Journaled)” for older models
- Click “Erase” to format the drive
This process wipes all data on your drive, so back up any existing files first. The right format ensures your Mac works properly with the drive during backups.
Allocating Backup Space on the External Drive
You need enough space for your backups to work properly. Time Machine needs at least as much space as your Mac’s used storage.
For best results, choose a drive with 2-3 times the storage of your Mac’s internal drive. This gives Time Machine room to store multiple backup versions.
If your external drive will store other files too, you can create a partition:
- In Disk Utility, select your drive
- Click “Partition” in the toolbar
- Click “+” to add a partition
- Drag the divider to set sizes for backup and file storage
- Name each partition clearly
This setup lets you use one drive for both backups and extra file storage.
Ensuring Drive Compatibility
Not all external drives work perfectly with Macs. Before buying a new drive, check for Mac compatibility.
Most modern USB drives connect to Macs, but older Macs might need adapters for USB-C connections. MacOS Sequoia (and earlier versions) work with most common drive formats.
Check these compatibility points:
- Connection type: USB, Thunderbolt, USB-C
- Power source: Self-powered drives work better for laptops
- Speed: SSD drives backup faster than traditional hard drives
- Reliability: Look at reviews for backup disk reliability
For Time Machine specifically, any drive that can be formatted with APFS or Mac OS Extended will work as a backup solution. SSDs offer faster performance but usually cost more per gigabyte than traditional drives.
Using Time Machine for Backups
Time Machine is Apple’s built-in backup solution that makes protecting your Mac’s data simple and reliable. It creates complete backups of your system and keeps them updated automatically.
Setting Up Time Machine
To set up Time Machine, you’ll need an external hard drive with enough space for your backups. Your backup drive should be formatted in Mac OS Extended (Journaled) format, as Time Machine won’t work with other formats.
Connect your external drive to your Mac. Your Mac will likely ask if you want to use it for Time Machine. If not, open System Preferences (or System Settings in newer macOS versions) from the Apple menu.
Click on Time Machine, then click “Select Backup Disk.” Choose your external drive from the list. If you want extra security, check the “Encrypt backups” box to protect your data with a password.
Time Machine will automatically exclude some items from backup. To change what gets backed up, click the “Options” button and add or remove items from the exclusion list.
Running Your First Backup with Time Machine
After setup, Time Machine starts the first backup automatically. This initial backup may take several hours depending on how much data you have.
To start a backup manually:
- Click the Time Machine icon in the menu bar
- Select “Back Up Now”
- Wait for the process to complete
You can continue using your Mac during the backup process. Time Machine works in the background without slowing down your system significantly.
The first backup copies everything on your Mac. Your files, applications, system settings, and even the operating system itself are all saved. This creates a complete snapshot of your Mac that you can restore from if needed.
To check backup progress, look at the Time Machine menu bar icon or open the Time Machine preferences pane.
Scheduling Automatic Backups with Time Machine
Once the initial backup finishes, Time Machine handles future backups automatically. By default, it creates:
- Hourly backups for the past 24 hours
- Daily backups for the past month
- Weekly backups until your drive is full
You can adjust these settings in the Time Machine preference pane. Click the “Options” button to make changes to the backup schedule or to exclude certain files.
For Macs running macOS High Sierra or newer, Time Machine includes additional reliability features. These help ensure your backups stay consistent even if your Mac loses power during a backup.
If you need to keep backing up when away from your desk, Time Machine can create temporary local snapshots. These save to your internal drive until you reconnect your backup drive.
To verify backups are happening, look for the Time Machine icon in your menu bar. A rotating clock means a backup is in progress.
Creating a Bootable Clone of Your Mac
A bootable clone creates an exact copy of your Mac’s drive that can start up another Mac. This type of backup gives you immediate access to your files and lets you boot from the external drive if your main drive fails.
Benefits of a Bootable Clone Backup
A bootable clone backup offers several key advantages over standard backups. The biggest benefit is immediate recovery – if your Mac’s internal drive fails, you can boot directly from your external drive and continue working without delay.
Clones maintain a perfect copy of your entire system, including apps, settings, and files. This means you don’t need to reinstall macOS or reconfigure your settings after a crash.
For Mac Pro users and professionals who can’t afford downtime, bootable clones are essential. They allow for quick testing of software updates before applying them to your main system.
Unlike Time Machine backups, clones give you a ready-to-use system that works exactly like your original Mac. This makes them perfect for emergency situations or when traveling with limited internet access.
Steps to Create a Full Bootable Clone Backup
Prepare your external drive
- Connect your external hard drive or SSD to your Mac
- Open Disk Utility (found in Applications > Utilities)
- Select the external drive and click the Erase tab
- Format it as APFS for newer Macs or Mac OS Extended for older systems
- Name the drive something recognizable like “Mac Backup”
Choose cloning software
- Popular options include Carbon Copy Cloner, SuperDuper!, or Apple’s built-in Disk Utility
- For M1/M2 Macs, ensure your software is compatible with Apple Silicon
Create the clone
- In your chosen software, select your Mac’s startup disk as the source
- Select your external drive as the destination
- Start the cloning process (this may take several hours)
After completion, test your backup by restarting your Mac while holding the Option key, then select your external drive from the startup menu. Your Mac should boot from the clone with all your files and settings intact.
Restoring Your Mac from a Backup
When disaster strikes, having a backup is only half the battle. You need to know how to restore your files quickly and efficiently to get back up and running.
Using Time Machine to Restore Files
Time Machine makes file recovery simple and intuitive. To restore specific files, open Finder, then navigate to the folder where your files were located. Click the Time Machine icon in the menu bar and select “Enter Time Machine.”
The Time Machine interface shows snapshots of your Mac over time. Use the timeline on the right to go back to when your files existed. Select the files you want, then click “Restore.”
For a complete system restore, connect your Time Machine drive to your Mac. Then:
- Restart your Mac and hold Command+R to enter Recovery Mode
- Select “Restore from Time Machine Backup”
- Choose your backup drive
- Select the most recent backup
- Follow the on-screen instructions
Time Machine will restore your entire system, including apps, settings, and files.
Booting from a Bootable Clone
A bootable clone offers the fastest recovery option. To boot from your clone:
- Connect your external drive containing the clone
- Restart your Mac
- Hold the Option key during startup
- Select your clone drive from the boot menu
Your Mac will start up using the clone, with everything exactly as it was when the clone was made. This gives you an instant working system.
To restore from the clone to your internal drive, you can use disk utility or the cloning software you used to create the backup. Many users simply work directly from the external drive until they have time for a full restore.
Accessing macOS Recovery to Restore
MacOS Recovery provides powerful restore options. To access it:
- Restart your Mac
- Hold Command+R immediately after you hear the startup sound
- Wait for the Recovery screen to appear
From here, you can restore from:
- Time Machine backups
- Manual backups on external drives
- Internet recovery (reinstalling macOS)
For manual backups, select “Disk Utility” to first erase your internal drive. Then quit Disk Utility and use Finder to copy files from your external drive.
This method works even for backups not made with Time Machine, though you’ll need to manually restore your applications and settings.
Best Practices for Mac Backup Maintenance
Maintaining your Mac backups is just as important as creating them in the first place. Regular maintenance ensures your data remains safe and recoverable when you need it most.
Regularly Testing Backup Integrity
Testing your backups is crucial but often overlooked. Don’t wait until disaster strikes to discover your backup doesn’t work.
To test a Time Machine backup, click the Time Machine icon in the menu bar and enter the backup interface. Browse through your files to make sure they appear correctly. Try restoring a few test files to confirm the process works properly.
For non-Time Machine backups, open your backup files on a different device if possible. This verifies both your backup and the backup medium are functioning correctly.
Monthly Testing Schedule:
- Test small file restoration
- Check backup logs for errors
- Verify backup dates are current
Set a calendar reminder for these checks. Many users connect their external drive regularly but never confirm their backups are actually working.
Handling External Hard Drive Errors
External hard drives can develop problems over time. Watch for warning signs like unusual noises, slow performance, or connection issues.
If your Mac shows a “disk not ejected properly” message frequently, this may indicate a failing drive. Run First Aid through Disk Utility by:
- Opening Finder > Applications > Utilities > Disk Utility
- Selecting your backup disk
- Clicking the “First Aid” button
For more serious issues, consider using specialized disk repair software. Your backup is only as reliable as the drive it’s stored on.
If your external drive begins showing errors, don’t wait – transfer your backups to a new drive immediately. Having a failing backup disk is almost as bad as having no backup at all.
Planning for Long-Term Backup Strategy
A good long-term backup plan includes multiple types of storage and regular updates.
The 3-2-1 Backup Strategy:
- 3 copies of important data
- 2 different storage types
- 1 copy stored offsite
External hard drives work well for daily backups, but consider adding cloud storage for critical files. Services like iCloud, Dropbox, or specialized backup services provide protection against physical disasters.
Replace your backup drives every 3-5 years, even if they seem to be working fine. Hard drives have limited lifespans, and newer drives often offer better reliability and faster performance.
Time Machine can be set to back up automatically whenever your external drive is connected. This ensures consistent backups without manual intervention.
Troubleshooting Common Issues with Mac Backups
Even the most reliable backup systems can encounter problems. When your Mac backup fails, understanding how to diagnose and fix common issues can save you from data loss and frustration.
Dealing with Time Machine Errors
Time Machine is a powerful backup tool, but it sometimes encounters errors. If your backup shows “Backup Failed” messages, try these solutions:
First, check that your backup disk is connected correctly to your Mac. Sometimes a simple reconnection solves the problem.
Try restarting both your Mac and external drive. This often clears temporary glitches that prevent successful backups.
For persistent failures, check the Finder for in-progress backup files:
- Open Finder
- Navigate to your external drive
- Open the “Backups.backupdb” folder
- Move any “.inProgress” files to the Trash
Sometimes Time Machine needs a fresh start. Open Time Machine preferences, select “Select Disk,” and reselect your backup drive to reset the connection.
Solving Connectivity Problems with External Drives
External hard drives sometimes disconnect during backups or fail to be recognized by your Mac. This creates frustrating interruptions in your backup process.
Check your cable and connections first. Loose or damaged cables often cause connectivity issues. Try using a different cable or USB port on your Mac.
Power issues can also affect external drives. If your drive has a separate power supply, make sure it’s properly connected. For USB-powered drives, connect them directly to your Mac rather than through a hub.
Use Disk Utility to check your drive’s health:
- Open Disk Utility from Applications > Utilities
- Select your external drive
- Click “First Aid” and run the diagnostic tool
If your drive doesn’t appear in Finder but shows in Disk Utility, it may need formatting for macOS compatibility.
Recovering Lost Data from Faulty Backups
When a backup drive fails, recovering your data becomes critical. Don’t panic—many recovery options exist.
If Time Machine backups become corrupted, try using Time Machine’s built-in browser to access earlier backups. Sometimes only the most recent backup is damaged.
For seriously damaged drives, try these recovery steps:
- Run First Aid in Disk Utility to repair disk permissions
- Use Terminal’s “tmutil” commands for advanced Time Machine repair
- Try third-party data recovery software designed for Mac drives
Consider creating multiple backup methods. Using both Time Machine and cloud storage provides extra protection against data loss.
For badly corrupted backups, professional data recovery services may help, though they can be expensive. Always prepare a new backup solution before attempting extensive recovery efforts.
Frequently Asked Questions
Backing up your Mac to an external drive involves several methods and considerations. These answers cover the most common backup questions to help protect your valuable data.
What are the steps to manually backup a MacBook to an external hard drive?
To manually backup your MacBook, first connect your external drive to your Mac. Then you can simply drag and drop files from your Mac to the external drive.
For a more complete manual backup, you can copy your entire home folder. Open Finder, select your user folder, and copy it to the external drive.
You can also use the built-in Disk Utility app to create a disk image of your files. This creates a single file containing all your backed-up data.
What are the differences between a Time Machine backup and a clone created by software such as Carbon Copy Cloner?
Time Machine backups save multiple versions of your files over time. This lets you recover files from different points in the past if needed.
Clone software like Carbon Copy Cloner creates an exact duplicate of your drive. This means you can boot directly from the clone if your main drive fails.
Time Machine is better for recovering specific files, while clones are better for getting back up and running quickly after a complete system failure.
Can I backup multiple Macs to a single external hard drive, and how?
Yes, you can backup multiple Macs to one external drive. First, create separate folders on the drive for each Mac you want to backup.
When setting up Time Machine on each Mac, select the external drive and choose the option to use a specific folder for backups. Point each Mac to its own folder.
The drive needs enough space to handle backups from all your Macs. A good rule is to have at least 1.5 times the total storage of all Macs combined.
What files are not included in a Time Machine backup that I should consider backing up manually?
Time Machine doesn’t backup temporary files and cache data. These are usually safe to exclude from backups.
Some system files and application caches are also excluded. For most users, these exclusions aren’t a problem.
However, virtual machine files (like those from Parallels or VMware) may need manual backup. Time Machine may skip these large files or only backup parts of them.
How do I verify the integrity of a MacOS backup once it is on an external hard drive?
To check a Time Machine backup, click the Time Machine icon in the menu bar while holding the Option key. Select “Verify Backups” from the menu.
For manual backups, you can use the Disk Utility app to verify the integrity of your backup disk. Select the drive and click “First Aid” to scan for errors.
You should also regularly test your backups by restoring a few files. This confirms you can actually recover data when needed.
What is the procedure to successfully restore a Mac from a backup on an external hard drive?
To restore from Time Machine, first connect your backup drive. Then restart your Mac and hold Command+R during startup to enter Recovery Mode.
In the macOS Utilities window, select “Restore from Time Machine Backup” and follow the on-screen instructions.
For a clone backup, boot your Mac while holding the Option key. Select your clone drive from the startup disk options to boot directly from it.
After booting from your clone, you can use it as is or clone it back to your internal drive using the same software you used to create the backup.


