The ability to schedule emails can dramatically improve your productivity and communication strategy. With iOS 16 and later, Apple Mail introduces a built-in email scheduling feature that allows users to send messages exactly when they want—no third-party apps required.
How to Schedule Emails in Apple Mail on iOS
Apple Mail makes scheduling emails incredibly intuitive. Here’s how:
- Compose Your Email: Open the Mail app and draft your message as usual.
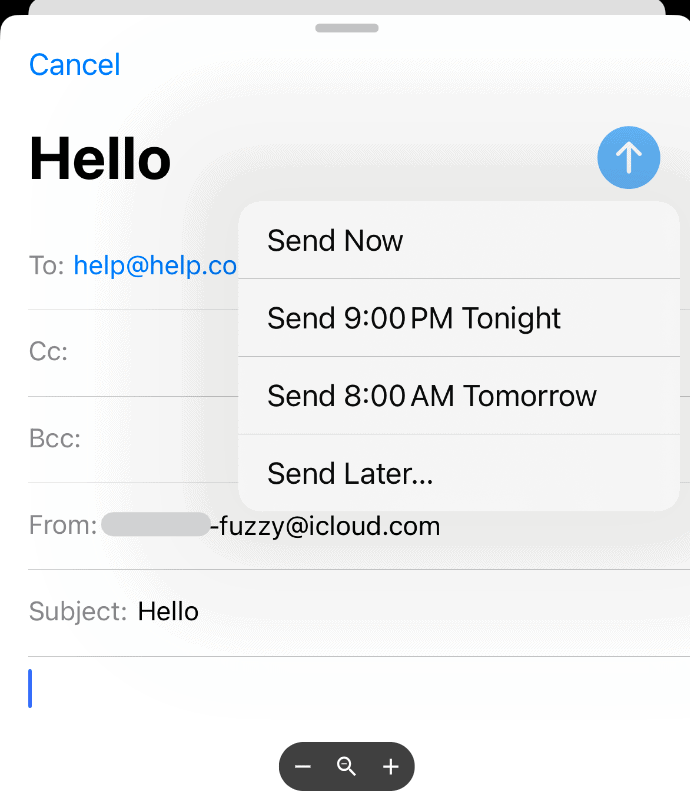
- Access Scheduling Options: Instead of tapping the standard send icon, press and hold the send button (the blue arrow).
- Choose Your Timing: A menu will appear with preset options like “Send Later Tonight” or “Send Tomorrow Morning.” For custom scheduling, tap “Send Later…” and select your exact date and time.
- Review and Manage Scheduled Emails: Scheduled messages are stored in the “Send Later” mailbox. From there, you can review, edit, or cancel any scheduled email before it’s sent.
Why Email Scheduling Is a Game-Changer
- Work Smarter Across Time Zones: No more worrying about waking up colleagues or clients in different parts of the world. Schedule emails to land in their inbox during peak hours, increasing the likelihood of a timely response.
- Perfect Your Timing for Maximum Impact: Studies show that emails sent mid-morning (around 10 AM) or mid-afternoon (around 2 PM) often see higher open rates. Scheduling allows you to target these windows—even if you’re not at your desk.
- Stay Ahead Without Working Late: Draft emails during your most productive hours and schedule them to send later. This helps maintain a healthy work-life balance while ensuring important communications go out on time.
- Maintain Consistency in Communication: Whether it’s a weekly newsletter or a project update, scheduling helps you send messages at regular intervals without having to remember each time.
Tips for Optimizing Your Scheduled Emails
- Use Scheduling with Focus Modes: If you use Apple’s Focus Mode to reduce distractions, combine it with email scheduling. Draft your emails during deep work sessions and schedule them to send when you’re back in “communication mode.”
- Double-Check Time Zones: While Apple Mail uses your device’s time zone, if you’re coordinating with international contacts, consider using the World Clock feature in the Clock app to avoid any mishaps.
- Craft Strong Subject Lines: Since you’re scheduling emails to go out when you’re not actively checking them, ensure your subject line is compelling enough to grab attention without follow-ups.
Beyond Apple Mail: Other Scheduling Tools to Consider
While Apple Mail’s scheduling feature is ideal for most users, some professionals may need more advanced options like read receipts, link tracking, or automated follow-ups. Third-party email clients such as Spark or Newton Mail offer additional productivity tools while still supporting iOS’s native features.
Key Takeaways
- Email scheduling in Mail app works across iPhone, iPad, and Mac devices
- Scheduled messages can be edited or canceled before their send time
- The built-in scheduler supports flexible timing from hours to months ahead
Scheduling Emails with the Mail App on iOS
Email scheduling in Apple Mail isn’t just a convenient feature—it’s a strategic tool that can help you communicate more effectively, respect your recipients’ time, and stay organized. By mastering this feature, you can streamline your workflow, improve engagement, and ensure your emails hit inboxes exactly when they should.
The Mail app on iOS devices now includes built-in email scheduling features, giving users control over when their messages are sent and improving their email management capabilities.
Understanding Email Scheduling
Email scheduling lets users write emails in advance and set specific delivery times. This feature became available with iOS 16, addressing a long-standing gap in Apple’s Mail functionality.
The scheduling option supports both preset times and custom scheduling. Users can pick from suggested times like “Send Tonight” or “Send Tomorrow Morning.”
Custom scheduling allows any future date and time selection. This helps users reach recipients during their working hours or optimal times.
Setting Up Scheduled Emails on iPhone and iPad
To schedule an email, open the Mail app and compose a new message. After writing the email, press and hold the blue send button.
A menu appears with preset scheduling options. Select “Send Later” to choose a custom time and date.
The scheduled email stays in a special “Send Later” mailbox until its delivery time. Users can find this mailbox in the Mail app’s folder list.
Managing Scheduled Emails
Users can view all scheduled emails in the Send Later mailbox. This central location makes it easy to track pending messages.
To modify a scheduled email, open it from the Send Later mailbox. Users can edit the content, change the delivery time, or cancel the scheduled send.
Canceled scheduled emails move back to the Drafts folder. This gives users flexibility to revise or delete them as needed.
Third-Party Mail Applications
Popular email apps like Gmail, Outlook, and Spark offer their own scheduling features. These apps often provide more scheduling options than Apple Mail.
Microsoft Outlook allows scheduling across different time zones. Gmail integrates scheduling with other Google services.
Spark adds features like follow-up reminders and team collaboration tools alongside email scheduling.
These apps work well for users who need advanced email management features beyond Apple Mail’s capabilities.
Frequently Asked Questions
Email scheduling features vary across different email applications, with specific steps and limitations for each platform.
How do you schedule an email to be sent at a later time in Apple Mail on iPhone?
Open the Mail app and compose a new email. Press and hold the send button until options appear. Select “Send Later” and pick a suggested time or set a custom date and time. The email stays in a dedicated “Send Later” folder until the scheduled time.
What steps are required to send an email at a specified time in the macOS Mail app?
Compose the email in Apple Mail on Mac. Click the arrow next to the send button. Choose “Send Later” from the menu. Select a preset time or customize the date and time. Click “Schedule” to confirm.
Is there a feature to automate sending emails within the Windows 10 Mail application?
The Windows 10 Mail app does not support native email scheduling. Users need to switch to Microsoft Outlook or use third-party email services with scheduling capabilities.
What is the process for scheduling emails in Outlook 365?
Create a new email in Outlook. Click “Options” in the ribbon menu. Select “Delay Delivery” under More Options. Set the delivery date and time in the Properties dialog box. Click “Close” and send the email.
The email stays in the Outbox until the scheduled time. Outlook must be running for delayed emails to send.
How can you schedule an email in Gmail using the desktop interface?
Click “Compose” to create a new email. Click the dropdown arrow next to the “Send” button. Select “Schedule send.” Choose a suggested time or pick a custom date and time. The email moves to a “Scheduled” folder.
Why might the ‘Send Later’ button be missing in Apple Mail, and how can it be resolved?
The Send Later feature requires iOS 16 or newer for iPhones and macOS Ventura or newer for Macs. Update the operating system to access this feature. Check that iCloud Mail is enabled in Settings.
Sign out and back into the iCloud account if the button remains missing after updates.