Taking a break from Facebook can be refreshing for your mental health. Whether you want to step away for a while or leave the platform completely, you have options. You can deactivate or delete your Facebook account directly from your iPhone or Android device in just a few simple steps.
Social media use takes up a lot of our time, and sometimes we need space from constant notifications and updates. Facebook makes it possible to either temporarily deactivate your account or permanently delete it. The choice depends on whether you plan to return to the platform later or want to remove your presence entirely.
Understanding the Difference Between Deactivation and Deletion
Before you make any moves, it’s important to understand what you’re choosing between:
- Deactivating your Facebook account is temporary. Your profile is hidden, but Facebook saves your data in case you decide to return. You can still use Messenger, and your messages may still be visible to friends.
- Deleting your Facebook account is permanent. Your profile, photos, posts, comments, and likes are erased. After deletion, you won’t be able to use Messenger, and recovery is nearly impossible after a 30-day grace period.
How to Deactivate Facebook on iPhone or Android
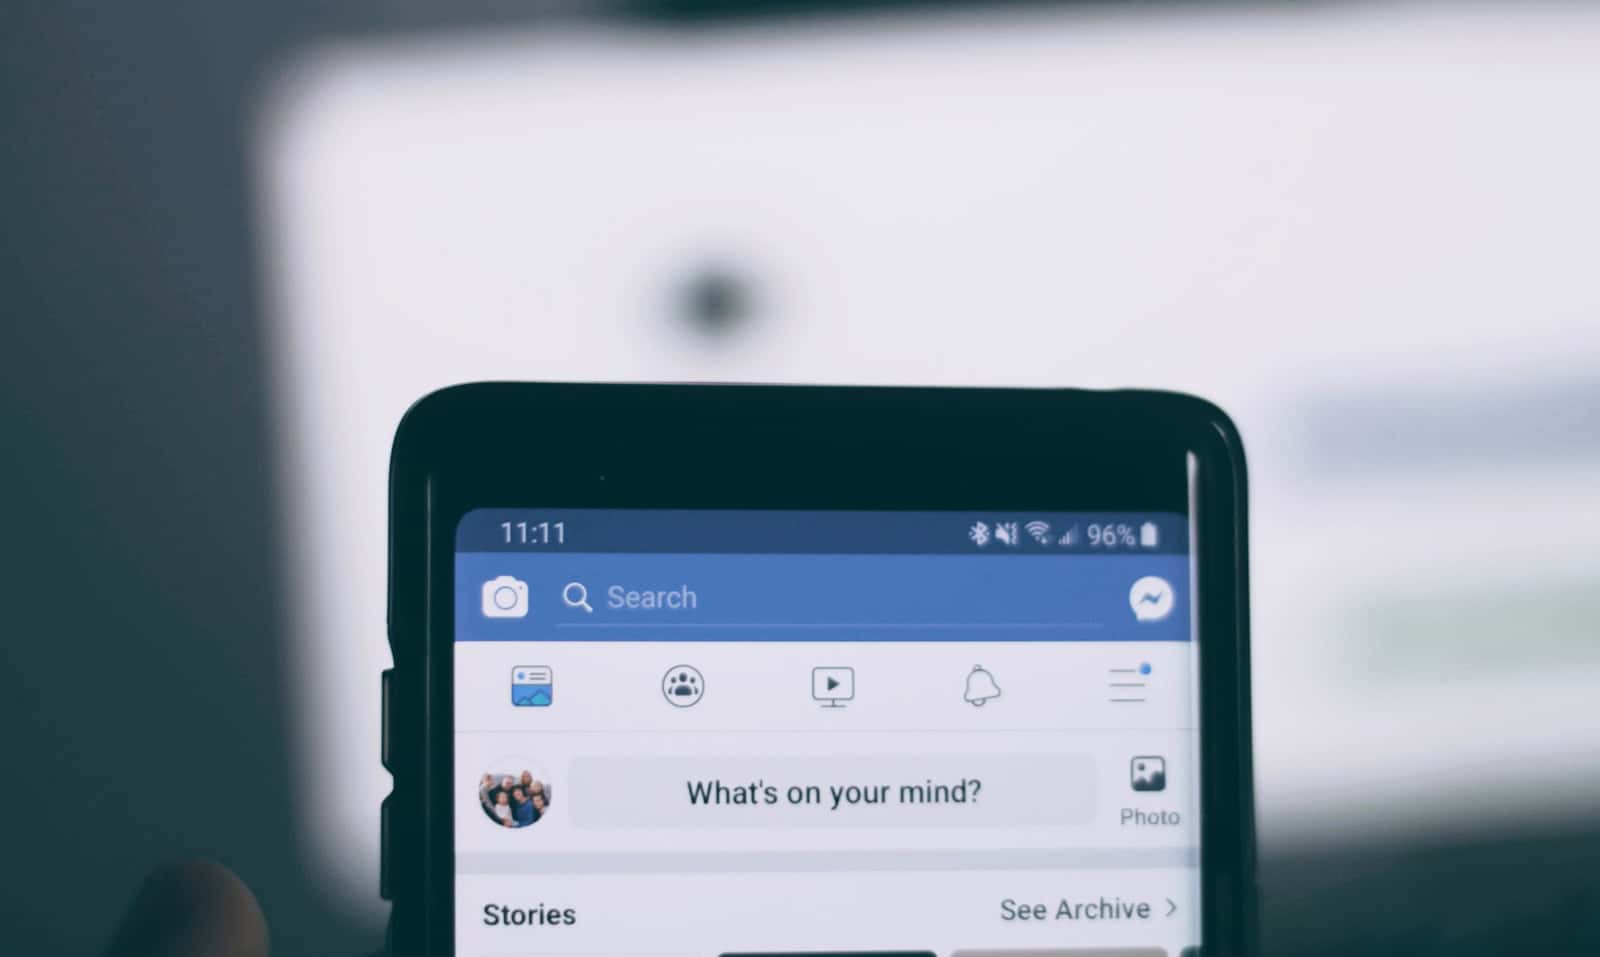
On iPhone:
- Open the Facebook app.
- Tap the Menu icon (three horizontal lines) in the bottom right.
- Scroll down and tap Settings & Privacy, then Settings.
- Under Account Center, tap Personal Details.
- Tap Account Ownership and Control.
- Select Deactivation or Deletion.
- Choose your Facebook profile if prompted.
- Tap Deactivate Account and then Continue.
- Follow the on-screen instructions to confirm.
Your profile will be hidden, but you can reactivate it at any time just by logging in again.
On Android:
- Launch the Facebook app.
- Tap the Menu (three lines) in the top right corner.
- Tap Settings & Privacy > Settings.
- Scroll to Account Center, then select Personal Details.
- Tap Account Ownership and Control.
- Choose Deactivation or Deletion.
- Tap Deactivate Account, then hit Continue.
- Confirm the action when prompted.
The process is nearly identical across both platforms, but menu layout can vary slightly depending on your Facebook app version.
How to Permanently Delete Facebook on iPhone or Android
If you’re ready to say goodbye to Facebook for good, follow these steps:
On iPhone or Android:
- Open the Facebook app.
- Tap the Menu icon (bottom right on iPhone, top right on Android).
- Navigate to Settings & Privacy > Settings.
- Go to Account Center > Personal Details.
- Tap Account Ownership and Control.
- Select Deactivation or Deletion.
- Choose your Facebook profile.
- Tap Delete Account, then Continue.
- Facebook will ask you to review your decision, warn about data loss, and offer alternatives like downloading your information.
- If you’re sure, tap Delete Account to confirm.
After deletion, Facebook offers a 30-day grace period. If you log back in during that window, the deletion is canceled. After 30 days, your account and all associated content are permanently erased.
What Happens to Messenger?
- If you deactivate, you can still use Messenger unless you choose to deactivate it as well.
- If you delete your account, Messenger is deleted too—along with all your messages and conversations unless someone else in the chat retains them.
To deactivate or delete Messenger separately, go to the Messenger app, tap your profile picture, then go to Account Settings > Account Ownership and Control, and follow similar steps.
How to Download Your Facebook Data Before Deletion
If you plan to delete your account, consider saving your photos, messages, and posts first:
- Go to Settings & Privacy > Settings in the Facebook app.
- Tap Your Facebook Information.
- Select Download Your Information.
- Choose the data you want (photos, posts, messages, etc.).
- Select the file format and date range.
- Tap Create File. You’ll be notified when your data is ready to download.
This ensures you keep a copy of your digital life before it disappears for good.
Alternatives to Deletion
If you’re not quite ready to pull the plug, consider:
- Taking a break: Use the “Take a Break” feature to limit interactions with specific people without fully leaving.
- Turning off notifications: Mute or customize app notifications to reduce distraction without deactivating.
- Uninstalling the app: Temporarily delete the app from your device while keeping your account active in case you return.
Final Notes
Whether you’re deactivating for a digital detox or deleting to reclaim your privacy, Facebook gives you multiple paths. Just make sure you’ve backed up your content and understand the long-term impact of your decision. Once you’ve confirmed deletion, there’s no going back after 30 days.
Key Takeaways
- Facebook offers both temporary deactivation and permanent deletion options accessible through the Settings menu on iOS and Android devices
- Before deleting your account, download your personal data as it cannot be recovered once the deletion process completes
- You have 30 days to change your mind after requesting deletion, after which all your content and information will be permanently removed
Understanding Account Ownership and Control
Facebook offers several ways to manage your account, whether you want to take a break or leave completely. Knowing how account ownership works helps you protect your information and make smart choices.
Facebook Account Basics
When you create a Facebook account, you’re setting up a profile that connects to the wider Meta ecosystem. Your account is tied to your email or phone number. This connection is important when you want to deactivate or delete your account.
Facebook gives you two main options for your account. You can temporarily deactivate it or permanently delete it. Each choice has different results.
Deactivation hides your profile from friends but keeps your data intact. You can come back anytime by logging in again. Your messages and friend connections stay in place.
Deletion is permanent. After a 30-day grace period, Facebook removes your profile and most of your data. Photos, posts, and messages get erased forever.
Privacy Settings and Personal Data
Facebook collects a lot of information about you. This includes your posts, likes, and even browsing habits. Taking control of this data is key before deleting your account.
You can access the Accounts Center to manage your privacy. Look for:
- Personal details: See what information Facebook stores
- Account ownership and control: Options for deactivation or deletion
- Data download: Get a copy of your information before deleting
Before deleting, consider downloading your data. This gives you a backup of photos and memories. Go to Settings & Privacy → Settings → Your Facebook Information → Download Your Information.
The deletion process works the same way on both iPhone and Android devices. First tap the menu (three lines), then go to Settings & Privacy → Settings, and find the Account Ownership section.
Pre-Deactivation Considerations
Before you pause or remove your Facebook account, it’s important to prepare properly. Taking a few steps now can save headaches later and ensure you don’t lose valuable content.
Backing Up Your Facebook Information
Before deactivating your account, make sure to download a copy of your Facebook data. This backup includes photos, posts, messages, and other content you’ve shared over time.
To save your information:
- Click on your profile picture in the top right corner
- Select Settings & Privacy, then Settings
- Look for Your Facebook Information in the left menu
- Choose Download Your Information
- Select the data range, format, and quality of media
- Click Create File
Facebook will notify you when your download is ready. This process may take hours or even days depending on how much content you have. The file contains your posts, photos, comments, and messages, making it a valuable record of your digital history.
Understanding the Impact on Messenger and Connected Apps
Deactivating Facebook affects more than just your profile. Your Facebook Messenger status will change based on your decision.
If you choose to deactivate your account, you can still use Messenger if you select that option during deactivation. However, deleting your account permanently will also remove access to Messenger.
Many apps use Facebook login credentials. Make sure to:
- Create new login methods for any apps connected to Facebook
- Check which devices have Facebook installed
- Review which third-party services use your Facebook login
Games, streaming services, and other electronics often connect to Facebook accounts. Breaking these connections without preparation might lock you out of these services.
Steps to Deactivate Your Facebook Account on iOS
Deactivating Facebook on your iPhone is a simple process that temporarily hides your profile. You’ll need to access your account settings and then choose the right deactivation options.
Accessing Account Settings on the Facebook App
To begin deactivating your Facebook account on iOS, open the Facebook app on your iPhone. Look for the Menu icon (three horizontal lines) in the bottom right corner of your screen and tap it. Scroll down until you see the Settings & Privacy option and tap it. From the dropdown menu, select Settings.
Next, scroll down to find See more in Accounts Center and tap on it. This will take you to the Accounts Center where you can manage your Facebook account settings. The Accounts Center handles all actions related to your account’s status.
If you can’t find these options, Facebook may have updated their interface. Try searching for “deactivate” in the Settings search bar.
Choosing Deactivation and Privacy Options
Once in the Accounts Center, look for Personal details or Account ownership and control. Tap on it and then select Deactivation and deletion from the options. You’ll be presented with two choices: temporarily deactivate your account or permanently delete it.
Select Deactivate account if you want to take a break from Facebook but return later. The app will ask why you’re leaving – choose a reason from the list provided.
Before confirming, Facebook may show some information about what happens when you deactivate. Your profile won’t be visible, but messages and some other data remain. You can still use Messenger even with a deactivated Facebook account.
Tap Continue and enter your password when prompted. Finally, tap Deactivate to confirm. Your Facebook account is now deactivated and will remain so until you log back in.
Steps to Deactivate Your Facebook Account on Android
Deactivating your Facebook account on Android gives you a break from social media without losing your data. The process involves a few simple steps through the Facebook app settings.
Navigating Android Facebook App Settings
To start deactivating your Facebook account on Android, open the Facebook app on your phone. Tap on your profile picture in the top right corner of the screen. This opens a menu with various options.
Next, scroll down and tap on “Settings & privacy” from the menu options. Then select “Settings” from the dropdown menu that appears.
In the Settings menu, you’ll need to find the account options. Scroll down to find the “Access and control” section. This area contains all the important account management tools.
The Facebook app layout may change slightly with updates, but these basic navigation steps usually stay the same. Look for terms like “Account” or “Your Account” if you don’t immediately see the options described.
Selecting Deactivation and Controlling Privacy
Once in the account settings, look for “Accounts Center” options. Tap on “Personal details” or a similar option, then find “Account ownership and control.”
From there, select “Deactivation and deletion” to see your options. The app will present two choices: temporarily deactivate or permanently delete your account.
Choose “Deactivate account” if you want to take a break. Facebook will ask why you’re leaving – select a reason from the list. You can also uncheck options for continuing to use Messenger if you wish.
Remember that deactivation is temporary. Your profile won’t be visible to others, but you can reactivate anytime by logging back in. Your friends, photos, and posts will be restored when you return.
The app will confirm your choice before completing the process. Enter your password when prompted to finish the deactivation.
Steps to Delete Your Facebook Account
Deleting a Facebook account permanently removes all your data and connections from the platform. The process varies slightly depending on what device you use, but all methods lead to the same result.
Account Deletion via iOS
To delete Facebook on your iPhone or iPad, start by opening the Facebook app. Tap the menu icon (three lines) in the bottom right corner. Scroll down and select Settings & Privacy, then tap Settings.
Next, scroll to the bottom and tap See more in Accounts Center. Select Personal details, then Account ownership and control. Choose Deactivation and deletion.
Select Delete account rather than deactivate. Facebook will ask you to enter your password for verification. They’ll also offer to let you download your information before deleting.
Remember that Facebook gives you 30 days to change your mind. If you log in during this period, your deletion request will be canceled.
Account Deletion via Android
On Android devices, open the Facebook app and tap the menu icon (three horizontal lines) in the top right corner. Scroll down to find Settings & Privacy, then tap Settings.
Scroll down and select See more in Accounts Center. Tap Personal details, then Account ownership and control. Choose Deactivation and deletion from the menu.
Select the option to permanently delete your account. Facebook will ask for your password to confirm your identity. You’ll have options to download your data before completing the deletion.
The deletion process takes 30 days to complete. During this time, your account will be hidden from other users but not fully deleted.
Using a Web Browser for Account Deletion
Using a computer might be the easiest way to delete your Facebook account. Go to Facebook.com and log in. Click on your profile picture in the top right corner, then select Settings & Privacy, followed by Settings.
In the left sidebar, click Your Facebook Information. Select Deactivation and Deletion. Choose the option to permanently delete your account and click Continue to Account Deletion.
Facebook will ask for your password and reason for leaving. After confirmation, your account enters the 30-day deletion period.
If you use other services with Facebook login, set up new login credentials for those services before deleting your Facebook account.
Reactivating or Recovering Your Facebook Account
If you’ve deactivated your Facebook account, you can get it back with just a few steps. The process is simple and keeps all your content and connections intact when you return.
Reactivating on iOS
To reactivate Facebook on your iPhone, simply log in with your old credentials. Open the Facebook app and enter your email or phone number and password. Your account will immediately become active again.
If you can’t remember your password, tap “Forgot Password” on the login screen. You’ll need to verify your identity through email or text message.
For accounts that have been deactivated for a long time, you might need extra verification. Facebook may ask you to identify friends in photos or answer security questions.
You can also reactivate through the mobile browser by visiting facebook.com and logging in with your credentials.
Reactivating on Android
Reactivating Facebook on Android works similarly to iOS. Open the Facebook app and sign in with your email/phone and password to instantly reactivate your account.
If you’ve forgotten your login info, tap “Forgot Password” and follow the recovery steps. Facebook will send a verification code to your email or phone.
For account ownership and control issues, you can tap Menu → Settings & privacy → See more in Accounts Center. Then select “Personal details” to manage your account recovery options.
Some Android users may need to clear the app cache if they experience login problems. Go to Settings → Apps → Facebook → Storage → Clear Cache.
Considerations Before Reactivating
Think about why you deactivated before coming back. Did you need a break, or were there privacy concerns? Make sure those issues are resolved.
Update your privacy settings immediately after reactivating. Go to Settings & privacy → Settings → Privacy to control who sees your posts and information.
Be aware that reactivating Facebook means friends will be able to see you again and you’ll appear in searches. You may receive a flood of notifications when you first return.
Some third-party apps previously connected to Facebook might need to be reauthorized. Check your App Settings to manage these connections.
Remember that repeatedly deactivating and reactivating can trigger Facebook’s security systems, potentially leading to temporary restrictions on your account.
Frequently Asked Questions
Managing your Facebook account can be tricky on mobile devices. Here are answers to common questions about deactivating or deleting Facebook on different platforms.
What steps are required to permanently delete a Facebook account from a mobile device?
To permanently delete Facebook from a mobile device, open the app and tap the menu icon (three lines). Go to “Settings & Privacy” and then “Settings.”
Next, tap “Account Ownership and Control” in the Accounts Center. Select “Deactivation or deletion” and choose “Delete Account.”
Facebook will ask you to confirm your decision. Remember that deletion is permanent after 30 days, and you’ll lose all content.
What is the procedure to temporarily deactivate a Facebook account on an iPhone?
Temporary deactivation on iPhone starts with opening the Facebook app. Tap the menu button at the bottom right corner.
Navigate to “Settings & Privacy,” then “Settings.” From there, go to “Accounts Center” and select “Account ownership and control.”
Choose “Deactivation” instead of deletion. Your profile will be hidden but can be restored by logging back in anytime.
How can one remove a Facebook profile from an Android phone?
Removing Facebook from Android follows similar steps as iPhone. Open the app and tap the three-line menu icon.
Go to “Settings & Privacy” > “Settings.” Tap “Account Ownership and Control” in Accounts Center.
Choose between deactivation (temporary) or deletion (permanent). Follow the prompts to complete your choice.
Is there a specific method to disable Facebook Messenger after deactivating a Facebook account?
Yes, Messenger stays active even after Facebook deactivation. To disable it, open the Messenger app separately.
Tap your profile picture, then go to “Legal & Policies” or “Account Settings.” Look for “Deactivate Messenger” option.
This step is important because many people don’t realize Messenger stays active even when their main Facebook account is deactivated.
Why might the option to deactivate a Facebook account be absent, and how can it be resolved?
Sometimes the deactivation option disappears due to app updates or account issues. First, try updating your Facebook app to the latest version.
If that doesn’t work, try accessing Facebook through a web browser instead of the app. The browser version often shows all account options.
Another solution is to clear the app’s cache or reinstall it completely. These steps often restore missing settings options.
How does one ensure the permanent deactivation of a Facebook account from an iPhone?
To ensure permanent deactivation, follow through with the deletion process completely. After selecting deletion in Account Center, don’t log back in during the 30-day grace period.
Delete the Facebook app from your iPhone after initiating account deletion. This removes the temptation to log back in accidentally.
Consider removing linked accounts like Instagram or WhatsApp that might trigger automatic Facebook logins. Download your data before deletion if you want to keep photos and posts.


