Apple just took another step toward a wallet-free future. At WWDC 2025, the company announced that iOS 26 introduces Digital Passport support in Apple Wallet, marking a major expansion of its digital identity platform. This upgrade builds on the existing support for driver’s licenses and state IDs, and it’s designed to make air travel faster, more secure, and less reliant on physical documents
1. Digital Passport Support Comes to Wallet
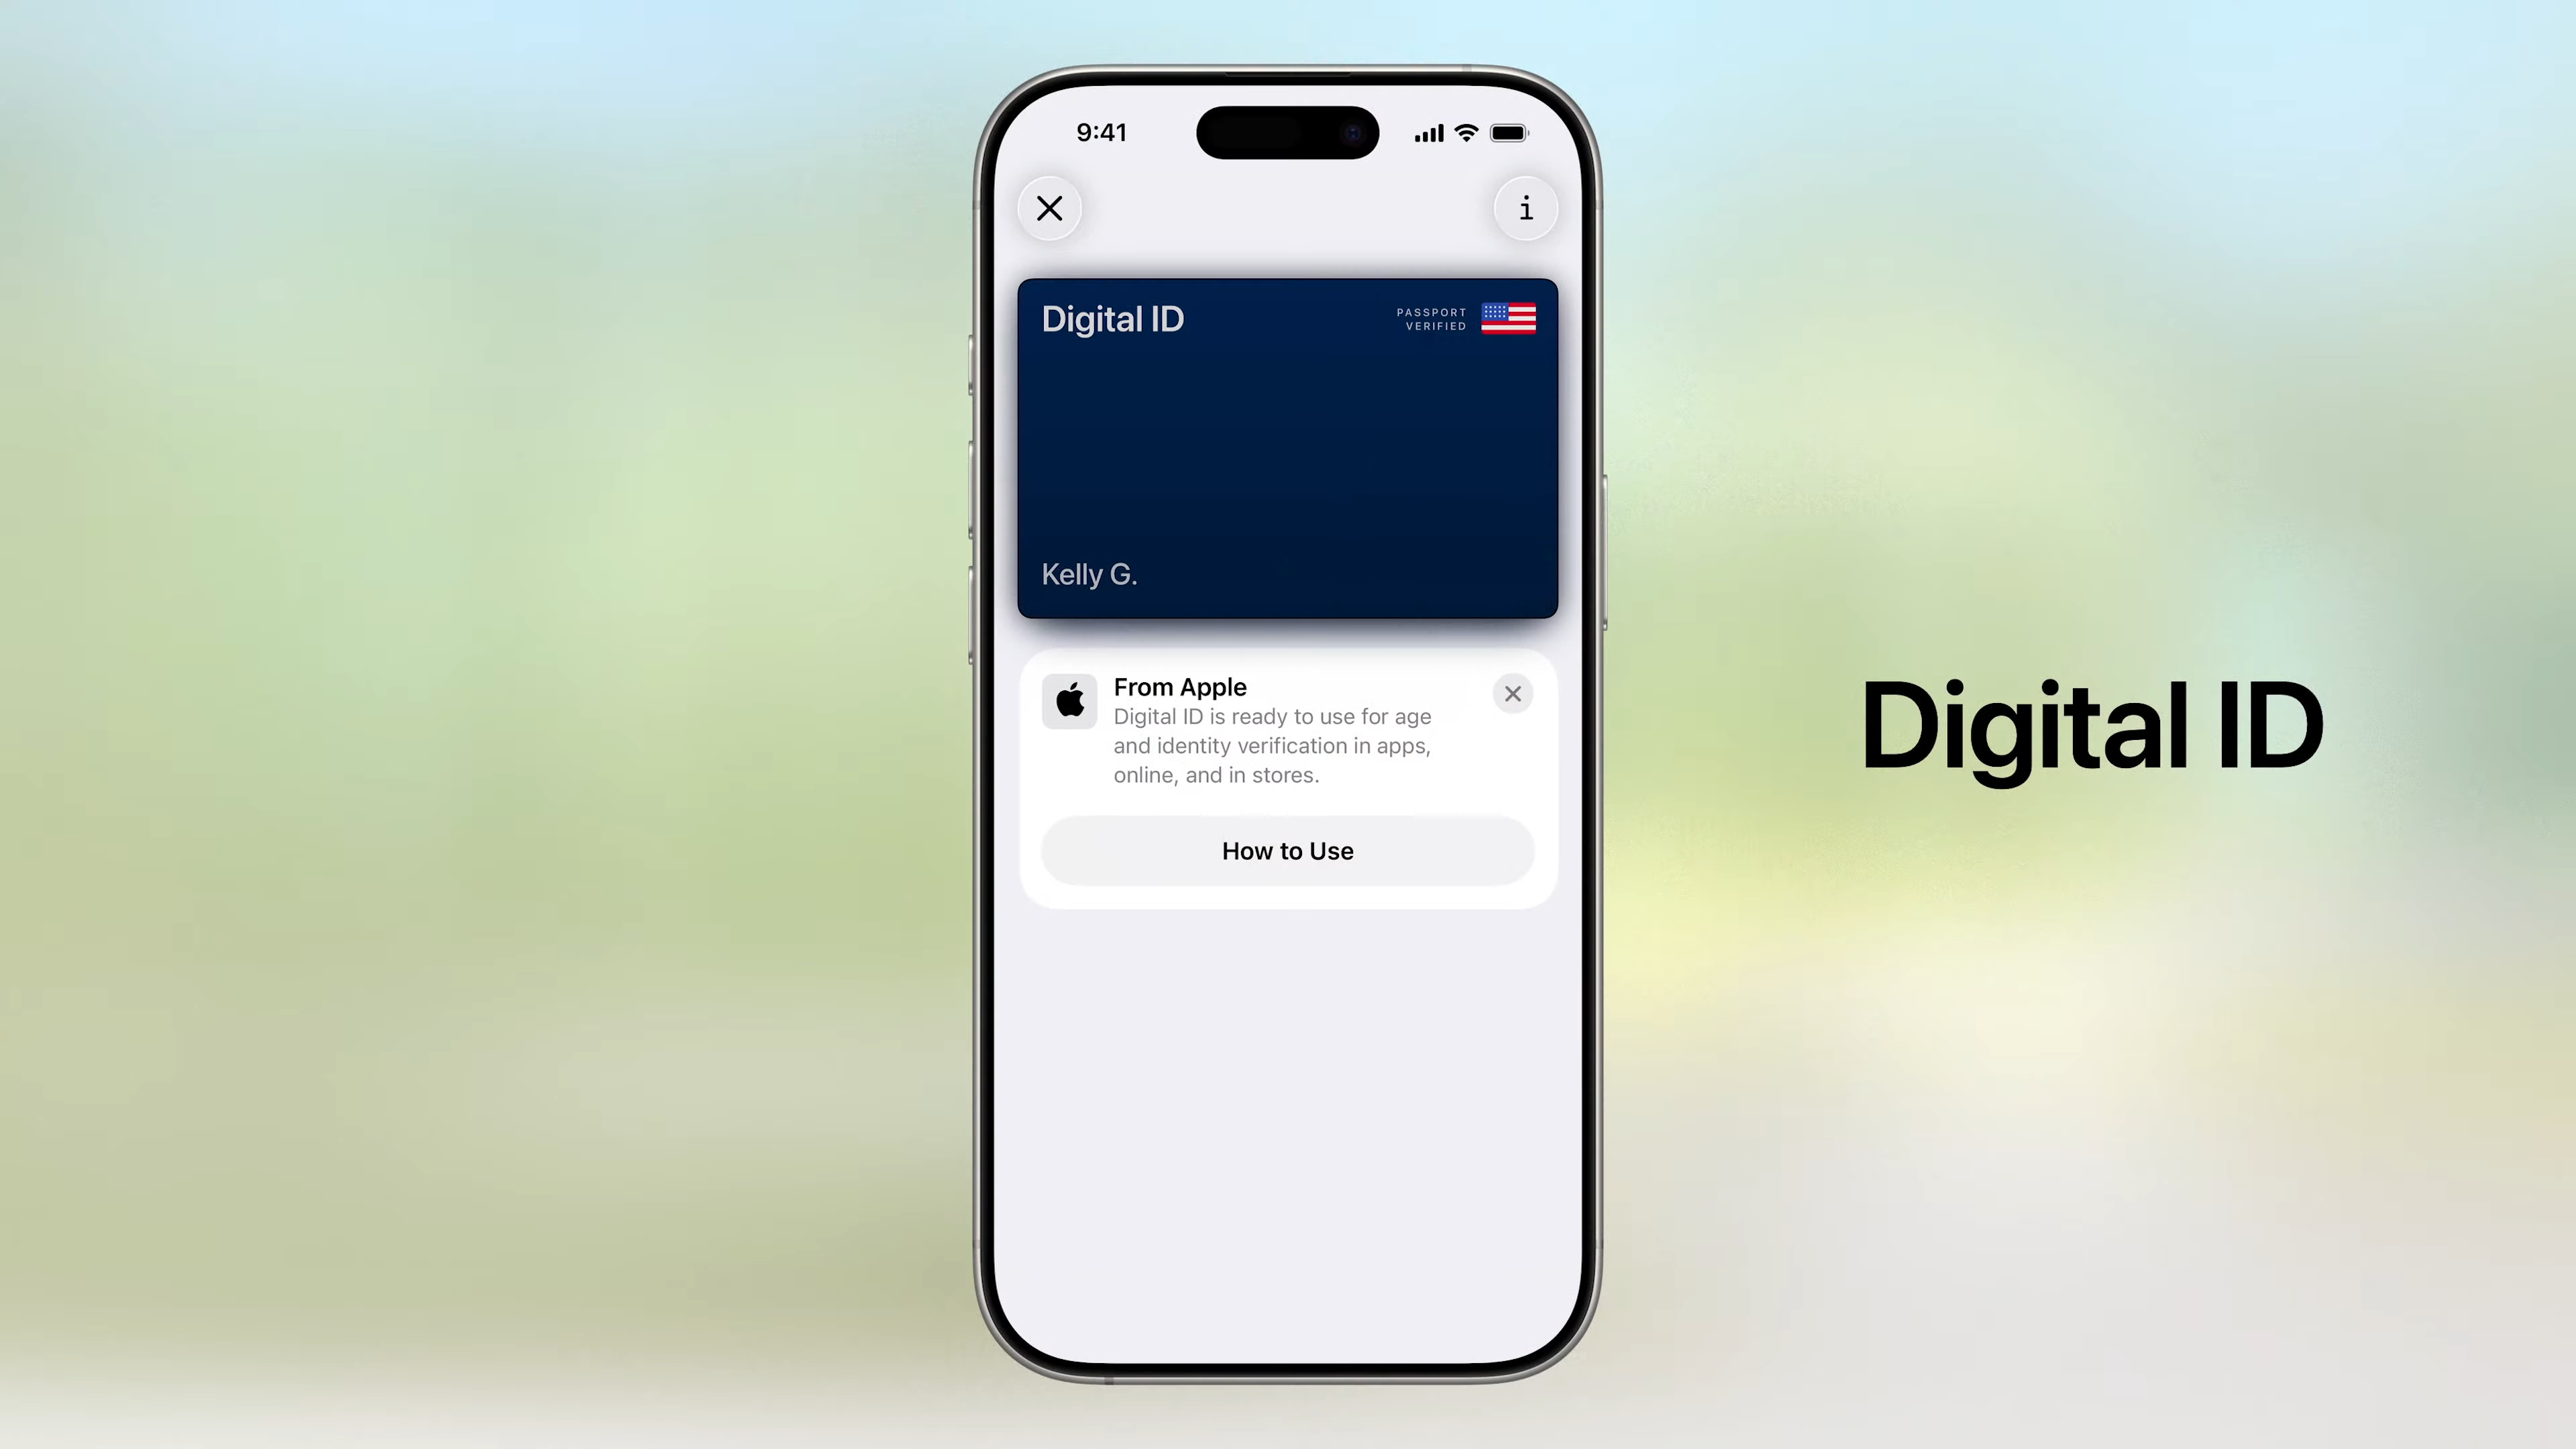
With iOS 26, iPhone users can digitize their physical passports by creating a Digital Passport card inside Apple Wallet. This digital ID is generated by scanning your physical passport using the iPhone’s camera and verifying it with biometric authentication (Face ID or Touch ID).
While the digital version doesn’t yet replace a physical passport for international border crossings, it can be used for identity verification in secure travel scenarios — particularly in airports, TSA checkpoints, and domestic travel hubs that are part of Apple’s secure ID network.
Apple confirmed it’s working with global travel and border security agencies to expand usage internationally in the future.

2. Expanding Airport and TSA Capabilities
Apple’s digital ID rollout began with driver’s licenses and state IDs in select U.S. states like Arizona, Maryland, and Georgia. These are now accepted at over 250 TSA checkpoints across the U.S., where passengers can tap their iPhone or Apple Watch at a reader to verify their ID.
iOS 26 expands this support to include Digital Passports, bringing even more government-issued identity documents into the Wallet experience. As long as the TSA site supports digital identity verification, your iPhone can now serve as your ID — no fumbling with physical documents required.
Notably, Apple said they’re working with international travel hubs, including those in Europe and Asia, to extend support for global digital identity validation over time.
3. Built-In Privacy & Security
As expected, Apple is putting security and privacy at the forefront:
- Data is encrypted end-to-end, and never leaves your device without your consent.
- Your passport data is stored in the Secure Enclave of your iPhone.
- Face ID or Touch ID is required each time you access or present the Digital Passport.
- Apple and issuing authorities cannot track where or when your ID is used, aligning with Apple’s stance on data minimization.
Apple says the process is built to exceed the privacy standards of many national ID systems.

4. Why This Is a Big Deal for Travelers
This feature reflects Apple’s ongoing push to replace the traditional wallet with a secure, all-in-one digital alternative. The ability to carry a passport digitally not only speeds up airport processing but also:
- Reduces the chance of losing or damaging your physical passport during travel.
- Allows for faster ID checks during security and boarding.
- Supports Apple’s broader effort to enable contactless, secure identification across more institutions.
As governments increasingly invest in digital credentials and mobile verification, Apple Wallet’s passport support could play a major role in future border control and travel processes.
TL;DR: Digital Passports in iOS 26
- ✅ You can now digitally store your passport in Apple Wallet with iOS 26.
- 🛂 It’s accepted at select TSA checkpoints and supported airports.
- 🔐 All info is encrypted and requires Face ID/Touch ID.
- 🌐 It doesn’t fully replace a passport yet but brings Apple closer to a fully digital travel experience.
Want to know how this compares to digital state IDs, or need a step-by-step guide to adding your passport to Wallet when iOS 26 launches this fall? Let me know — I can break it down for you.
How To Add A Credit Card to Apple Wallet
Adding a credit card to your Apple Wallet is quick and easy. You can use the Wallet app on your iPhone to store your cards digitally and make payments with just a tap. To add a credit card to Apple Wallet, open the Wallet app, tap the Add button (plus sign), select “Debit or Credit Card,” and then either scan your card with the camera or enter the details manually.
Apple Wallet makes shopping faster by letting you pay without reaching for your physical card. You can add a card by simply holding it near your iPhone to scan it with the camera, or enter the information by hand including your name, card number, expiration date, and CVV. After adding your card, you might need to verify it with your bank through a text message, phone call, or your banking app.
Once your card is set up in Apple Wallet, you can use Apple Pay at millions of stores, in apps, and on websites. Just look for the contactless payment symbol or Apple Pay logo at checkout. Your financial information stays safe because Apple Pay uses a device-specific number and unique transaction code instead of sharing your actual card details.
Key Takeaways
- Adding a card to Apple Wallet takes just seconds by tapping the plus button and scanning your card or typing the details.
- Your card information stays secure because Apple Pay never shares your actual card numbers with merchants during transactions.
- You can manage multiple cards in Apple Wallet and choose your default payment card for faster checkout.
Preparing Your Device for Apple Wallet
Before adding a credit card to Apple Wallet, you need to make sure your device is ready. This means having a compatible Apple device and running the latest iOS version.
Compatible Devices
Not all Apple products work with Apple Wallet. The good news is that most newer models support this feature. iPhones from the iPhone 6 and newer can use Apple Wallet and Apple Pay. The Apple Watch Series 1 and later versions also support these services.
iPad models with Touch ID or Face ID can use Apple Wallet. This includes iPad Pro, iPad Air 2 and newer, iPad mini 3 and newer, and 5th generation or newer iPad models.
Mac computers with Touch ID built in can use Apple Wallet. Other Mac models made in 2012 or later can work with Apple Pay when paired with an iPhone or Apple Watch.
Latest iOS Update
Your device needs the most recent software to work properly with Apple Wallet. For iPhones and iPads, you should run at least iOS 8.1, but the latest iOS version is always best for security and features.
To check for updates, open the Settings app, tap “General,” and select “Software Update.” If an update is available, tap “Download and Install.”
Keeping your iOS updated helps prevent issues when adding a credit card to Apple Wallet. Some banks may require specific iOS versions to support their cards in Apple Wallet.
The update process usually takes 15-30 minutes. Make sure your device is charged or plugged in during updates to avoid interruptions.
Understanding Apple Wallet
Apple Wallet is a digital tool that transforms how you store payment cards and more on your iPhone. It combines convenience with strong security features to make payments faster while keeping your information safe.
What Is Apple Wallet?
Apple Wallet is a digital wallet app that comes pre-installed on iPhones. It lets you store digital versions of credit cards, debit cards, and prepaid cards. You can also keep boarding passes, event tickets, store loyalty cards, and student IDs all in one place.
The app organizes everything neatly, making items easy to find when needed. Instead of digging through a physical wallet, you simply tap your phone to pay or show a ticket.
Apple Wallet works seamlessly with Apple Pay, allowing you to make contactless payments at stores and online. Adding cards is simple – you can scan them with your camera or enter details manually.
Benefits of Using Apple Wallet
Convenience tops the list of benefits. No more carrying multiple cards or forgetting important ones at home. Everything stays in your phone, which most people always have nearby.
Speed is another major advantage. Checkout is much faster with a quick tap of your phone rather than finding a card and signing receipts.
Apple Wallet also helps you stay organized. Your passes, tickets, and cards are all sorted in one app. The wallet automatically pulls up relevant cards based on time or location.
Eco-friendly benefits exist too. Digital receipts and tickets reduce paper waste, helping the environment while reducing clutter in your physical wallet.
Adding cards takes just seconds, and you can manage everything from one place.
Security Features
Apple Wallet uses several layers of protection to keep your information safe. When you add a card, the actual card number isn’t stored on your device or Apple’s servers. Instead, a unique Device Account Number is assigned and encrypted.
Face ID, Touch ID, or your passcode must be used to authorize each payment. This means even if someone has your phone, they can’t make purchases without your authentication.
Apple Wallet includes a technology called “tokenization” that replaces your real card details with random numbers during transactions.
If your iPhone is lost or stolen, you can use Find My iPhone to put it in Lost Mode or wipe it remotely. Your card details stay protected.
The security code of your physical card is never stored fully, adding another layer of protection against theft.
Adding a Credit Card to Apple Wallet
Adding a credit card to your Apple Wallet makes payments quick and easy. You can add cards using the Wallet app directly, enter card details manually, or use your bank’s mobile app.
Using the Wallet App
To add a credit card through the Wallet app, start by opening the app on your iPhone. Look for the Add Card button (plus symbol) in the top right corner of the screen and tap it.
Select “Debit or Credit Card” from the menu and tap Continue. Your iPhone camera will activate automatically.
Position your credit card in the frame so the card details are visible. The app will scan and fill in your card information.
Check that all details are correct. If the camera didn’t capture everything perfectly, you can edit the information manually before proceeding.
Tap “Next” after verifying the information. Your bank or card issuer may require extra steps to verify your identity.
Manual Entry
If scanning doesn’t work well, you can enter your card details by hand. Open the Wallet app and tap the plus button to add a card.
Choose “Debit or Credit Card” and tap “Continue.” Below the camera frame, look for the option to enter details manually.
You’ll need to fill in:
- Full name (as it appears on the card)
- Card number (16-digit number)
- Expiration date (month/year)
- Security code (CVV)
Double-check all information before submitting. Incorrect details may cause the card to be rejected.
After entering the information, tap “Next” and complete any verification steps required by your bank.
Using Your Bank’s Mobile App
Many banks offer a direct way to add cards to Apple Wallet through their own apps. First, download and log into your bank’s mobile app.
Look for a section related to digital wallets, card management, or Apple Pay. The location varies by bank but is often found in the card settings or account services menu.
Select the card you want to add and look for an “Add to Apple Wallet” or “Add to Apple Pay” option.
The app will guide you through the verification process. This method often requires fewer steps since you’re already logged into your bank account.
Once verification is complete, your card will appear in your Apple Wallet immediately, ready for use with Apple Pay for wireless payments at stores and online.
Verifying Your Credit Card
After adding your credit card to Apple Wallet, verification is required to ensure security. This step confirms you’re the rightful owner of the card and protects against fraud.
Verification Methods
When you add a card to your Apple Wallet, several verification methods may be used. The most common is the verification code method, where Apple sends data to your bank, which then sends a verification code to you. You’ll need to enter this code in the Wallet app.
Some banks may require a phone call for verification. This happens when Apple sends data to your bank’s server, and the bank requests verification by phone.
Another method is email verification. Your bank might send a verification link to your registered email address. Simply click the link to complete the process.
Banks may also use their own apps for verification. You might be directed to open your banking app to approve the card addition.
Troubleshooting Verification Issues
If you’re having trouble verifying your card, check if your card is eligible for Apple Pay. Not all banks or card issuers partner with Apple Pay.
Network issues can block verification. Make sure you have a stable internet connection and try again.
Some users find success without calling customer service. There are alternative verification methods that might work if phone verification fails.
If verification doesn’t work, try:
- Restarting your device
- Updating to the latest iOS version
- Checking if your card has restrictions
- Contacting your bank directly
For persistent problems, Apple provides troubleshooting steps on their support page. They can help identify whether the issue is with Apple or with your bank.
Using Apple Pay with Added Credit Cards
Once you’ve added your credit cards to Apple Wallet, you can use them with Apple Pay for quick, secure purchases. The process is simple and works at millions of stores, apps, and websites that accept contactless payments.
Making Contactless Payments
Making payments with your credit card through Apple Pay is fast and easy. When you’re at a store, look for the contactless payment symbol or Apple Pay logo at the checkout.
To pay, simply hold your device near the contactless reader. On iPhone with Face ID, double-click the side button, glance at your screen to authenticate, then hold near the reader. For iPhone with Touch ID, rest your finger on the Home button and hold near the reader.
You’ll feel a gentle tap and see “Done” with a checkmark on your screen when the payment goes through. This confirms your purchase is complete.
Many popular stores and restaurants accept Apple Pay. You can use your credit cards with Apple Pay almost anywhere that takes contactless payments.
Apple Pay on iPhone and Apple Watch
Your devices make using Apple Pay simple and convenient. On iPhone, open the Wallet app to see all your added credit cards and quickly select which one to use.
For Apple Watch, double-click the side button to bring up your cards. Swipe left or right to choose the card you want to use, then hold your watch near the contactless reader until you feel a tap.
Apple Pay works even without an internet connection, making it perfect for subway tickets or vending machines. Your device securely stores your card information.
Device compatibility:
- iPhone models with Face ID or Touch ID (except iPhone 5s)
- Apple Watch Series 1 and later
- iPad with Touch ID or Face ID
- Mac models with Touch ID or paired with Apple Watch
Selecting a Default Payment Card
You can choose which credit card Apple Pay uses automatically when you make purchases. This default card appears at the top of your Wallet.
To set your default payment card:
- Open the Wallet app on your iPhone
- Touch and hold the card you want to make default
- Drag it to the front of your cards
On Apple Watch, open the Watch app on your iPhone, tap “Wallet & Apple Pay,” then tap “Default Card” to select your preferred option.
You can always switch cards before paying by opening Wallet and selecting a different one. This is helpful when you want to use specific cards for certain purchases, like using a rewards card at your favorite store.
Your default payment card will be used automatically unless you choose another card.
Managing Credit Cards in Apple Wallet
Apple Wallet makes it easy to organize your payment cards. You can set a default card for quick payments, update your information when needed, and remove cards you no longer use.
Setting a Default Card
When you have multiple cards in Apple Wallet, you might want to choose which one you use most often. Setting a default card saves time during checkout.
To set your default card, open the Wallet app on your iPhone. Then touch and hold the payment card you want to make your default. Drag this card to the front of your other cards.
The card that appears at the top of your Wallet becomes your default payment method. Your iPhone will use this card automatically when you pay with Apple Pay.
This simple process helps you use your preferred card without having to select it each time you make a purchase.
Updating Payment Information
Sometimes your credit card details change. You might get a new expiration date or security code. Apple Wallet lets you update this information easily.
To update a card, open the Wallet app on your iPhone. Tap the card you need to change. Look for the information button (the small “i” in a circle) and tap it.
You can update your card number, expiration date, and CVV as needed. For some cards, you might need to contact your bank to make certain changes.
If your physical card was replaced, you may need to remove the old card and add the new one instead of just updating information.
Removing a Credit Card
If you no longer use a card or got a replacement, you can remove it from Apple Wallet. This keeps your payment methods organized and secure.
To remove a card, first open the Wallet app. Find the card you want to delete. Tap the information button (the “i” icon) for that card.
Scroll down and tap “Remove Card” at the bottom of the screen. Confirm your choice when prompted.
Removing unused cards is a good security practice. It ensures only your active payment methods are available for use with Apple Pay.
If you change your mind later, you can always add the card back using the plus symbol in the Wallet app.
Ensuring Compatibility and Security
When adding a credit card to Apple Wallet, compatibility and security are essential factors to consider. Both aspects work together to create a safe and reliable payment experience while protecting your sensitive financial information.
Checking Terminal Compatibility
Before adding your credit card to Apple Wallet, it’s important to check if your device is compatible. Your iPhone must run the latest version of iOS to avoid software-related issues. Older iPhone models (5 and earlier) don’t support Apple Pay.
Look for the contactless payment symbol at stores and restaurants. This symbol looks like a sideways Wi-Fi icon and shows the terminal can accept Apple Pay transactions. Most modern payment terminals support contactless payments, but some smaller businesses might not have updated their equipment.
If you have trouble adding a card, try these steps:
- Restart your iPhone
- Check your internet connection
- Make sure your bank supports Apple Pay
- Contact your card issuer if problems continue
Maintaining Security and Privacy
Apple Wallet offers strong security features to protect your card information. When adding a card, you’ll need to enter your card number, expiration date, and security code (CVV). This verification process helps confirm you’re the legitimate cardholder.
Apple Pay uses a system called tokenization. This means your actual card number isn’t stored on your device or shared with merchants. Instead, a unique device number is created and encrypted.
For extra protection, Apple Pay requires:
- Face ID, Touch ID, or passcode for each transaction
- Your physical presence at the contactless reader
- Your device to be within range of the terminal
These security measures make Apple Pay transactions safer than using physical cards. Even if your phone is lost, others can’t access your payment information without your biometric data or passcode.
Frequently Asked Questions
Apple Wallet makes adding and managing credit cards simple, but users often have questions about the process. Here are answers to common questions about adding credit cards to Apple Wallet.
How do I add a new credit card to my Apple Wallet?
Adding a credit card to Apple Wallet is quick and easy. Open the Wallet app on your iPhone and tap the Add button (plus sign) in the upper right corner.
Tap “Continue” and follow the prompts. You can add your card by positioning your iPhone to scan the card or by entering the details manually.
Once your card information is entered, follow any verification steps from your bank. The card will appear in your wallet when approved.
What should I do if I receive an error while trying to add a credit card to my Apple Wallet?
If you get an error when adding a card, first check your internet connection. A stable connection is needed for the verification process.
Make sure your card is eligible for Apple Pay. Not all banks or credit card types support this feature.
You can also try closing and reopening the Wallet app. If problems continue, contact your bank to check if there are restrictions on your account.
Are there specific requirements for credit cards to be compatible with Apple Wallet?
Yes, not all credit cards work with Apple Wallet. Your bank or card issuer must support Apple Pay integration.
Most major credit card companies like Visa, Mastercard, American Express, and Discover are compatible. Regional banks may have limited support.
The card must also be active and in good standing. Expired or suspended cards won’t work with Apple Wallet.
Is it possible to add a credit card to Apple Wallet without the physical card?
Yes, you can add a card without having it physically present. Instead of scanning, choose the manual entry option.
You’ll need to enter your card details including the card number, expiration date, and security code. Some banking apps also let you add cards directly to Apple Wallet.
This feature is helpful when you’re waiting for a replacement card or want to set up a new card before it arrives.
How can I verify my credit card once it’s added to Apple Wallet?
After adding your card, your bank will verify it. This might happen instantly or take a few days.
Verification methods vary by bank. You might receive a text message with a code, need to call your bank, or verify through your banking app.
Some banks may ask you to complete additional steps like answering security questions or confirming recent transactions.
What steps should I take if my credit card is not showing up in Apple Pay after adding it to Apple Wallet?
If your card is missing from Apple Pay, first check if it appears in the Wallet app. Sometimes cards are added to Wallet but not automatically enabled for Apple Pay.
Go to Settings > Wallet & Apple Pay to see if your card is listed. If it is, make sure it’s toggled on for Apple Pay.
If you don’t see the card, try adding it again. You might also need to contact your bank to ensure there are no restrictions on your account.


