Apple Pay makes your shopping faster and safer, both in stores and online. It allows you to keep your cards in your iPhone’s Wallet app. To set up Apple Pay, open the Wallet app on your iPhone, tap the plus sign, and follow the steps to add a credit, debit, or prepaid card. Once set up, you can use it at checkout by placing your phone near a payment terminal.
Setting up Apple Pay takes just a few minutes. You can add multiple cards to your Wallet to use with Apple Pay. When you want to pay for something, your phone uses a secure token instead of your real card number, keeping your information private. Apple Pay works on iPhones, Apple Watches, and other Apple devices.
Apple Pay is accepted at millions of stores worldwide. You can also use it in apps and on websites. No more typing card numbers or shipping details—Apple Pay fills that in. It’s a simple way to pay that saves time and adds security to your purchases.
How to Set Up Apple Pay (Step‑by‑Step)
1. Open the Wallet App
- On your iPhone, find and open the Wallet app (it comes pre‑installed).
2. Add a Card
- Tap the “+” button in the top right corner.
- Choose Debit or Credit Card.
3. Scan or Enter Card Details
- You can scan your card with the camera or enter the details manually.
- Follow the prompts to add your card information.
4. Verify Your Card
- Your bank or card issuer may require a verification step (e.g., text message, email, app confirmation, or phone call).
- Complete the verification to activate your card.
5. Set Default Payment Card (Optional)
- In Settings > Wallet & Apple Pay, you can choose which card you want as your default payment method.
6. Start Using Apple Pay
- In stores: Hold your iPhone near a contactless reader and authenticate with Face ID, Touch ID, or passcode.
- In apps or online: Select Apple Pay at checkout and confirm with Face ID, Touch ID, or passcode.
✅ That’s it! Once your card is verified, you can use Apple Pay for secure, contactless payments in stores, apps, and online (source: Apple Support, CNBC).
Key Takeaways
- Setting up Apple Pay requires adding your cards to the Wallet app on your compatible Apple device.
- Apple Pay protects your card information by using secure tokens instead of sharing your actual card numbers.
- You can use Apple Pay in stores, apps, and websites wherever contactless payments are accepted.
Understanding Apple Pay
Apple Pay offers a secure and convenient way to make payments using Apple devices. This digital wallet system transforms how we pay for items both in stores and online.
What Is Apple Pay?
Apple Pay is a digital wallet service created by Apple that lets users make payments using their iPhone, Apple Watch, iPad, or Mac. It works as a contactless payment system in physical stores through NFC technology.
Users can store their credit cards, debit cards, and prepaid cards in the Wallet app. When making a purchase, Apple Pay uses a device-specific number and unique transaction code instead of sharing actual card details.
The system works at millions of stores worldwide and within apps or websites that accept Apple Pay. It eliminates the need to carry physical cards or enter payment information repeatedly.
For person-to-person payments, Apple Pay allows sending money through Messages or asking Siri to pay someone.
Benefits of Using Apple Pay
Security Features:
- Face ID, Touch ID, or passcode authentication
- No storage of actual card numbers on devices
- Private transactions that Apple cannot track
Convenience:
- Quick payments with a simple device tap
- No need to search for cards in wallets
- Works with existing Apple devices you already own
Apple Pay speeds up online checkout processes by automatically filling payment and shipping details. This saves time when shopping on websites and in apps.
The service is widely accepted at major retailers, restaurants, and transit systems. Users can even make purchases through apps or on the web using Safari.
For businesses, implementing Apple Pay can reduce checkout times and increase customer satisfaction.
Compatibility and Requirements
Before setting up Apple Pay, you need to check if your device supports this payment method. Different Apple devices have different requirements for using Apple Pay successfully.
Supported Apple Devices
Apple Pay works with many Apple devices. The service is available on iPhone models starting with iPhone 6 and newer. All models must have the latest iOS version.
For iPad users, Apple Pay works with iPad Pro, iPad Air 2, and iPad Mini 3 or newer models. These can be used for in-app and web purchases, but not in stores.
Apple Watch owners can use Apple Pay for in-store payments. All Apple Watch models support this feature when paired with a compatible iPhone.
Mac computers with Touch ID can use Apple Pay directly. Other Mac models can complete purchases when paired with an Apple Watch or iPhone.
iOS Version and Region Availability
Your device needs to run iOS 8.1 or later to use Apple Pay. The most recent iOS version offers the best security features and user experience.
Apple Pay is not available in all countries. The service works in the United States, United Kingdom, Canada, Australia, and many European and Asian countries. Some features may differ based on your location.
Your bank must also support Apple Pay. Most major banks and credit card companies now work with the service, but some regional banks may not yet offer compatibility.
To check if your region supports Apple Pay, visit the Apple website or contact your bank directly. They can tell you if your cards will work with the service.
Setting Up Apple Pay
Apple Pay lets you make secure payments using your Apple devices. The setup process is quick and only needs to be done once per card.
Adding a Credit or Debit Card
To start using Apple Pay, you need to add your payment cards to the Wallet app. Here’s how:
- Open the Wallet app on your iPhone
- Tap the “+” sign in the top right corner
- Select “Credit or Debit Card”
- Tap “Continue”
You can add a card by scanning it with your camera. Just position your card in the frame until it’s detected. The app will automatically fill in the card details.
You can also enter your card information manually. Tap “Enter Card Details Manually” and fill in your card number, expiration date, and security code.
Apple Pay works with most major credit and debit cards from top banks and card issuers. Some older cards might not be compatible.
Verifying Your Card With the Issuer
After adding your card, you need to verify it before you can use Apple Pay. This security step confirms you’re the rightful owner.
Your bank or card issuer will verify your information in one of several ways:
- Text message with a one-time passcode
- Email verification
- Phone call verification
- Verification through your banking app
Enter the verification code when prompted. Some banks might require you to call them directly to complete verification.
Once verified, your card appears in the Wallet app with a “Verified” status. Now you can use it for purchases in stores, apps, and websites that accept Apple Pay.
Some banks might limit the number of devices where you can use your card with Apple Pay.
Using Apple Pay
Apple Pay offers a simple and secure way to make payments using your Apple devices. Once set up, you can use it for in-store purchases, online shopping, and even on your Mac computer.
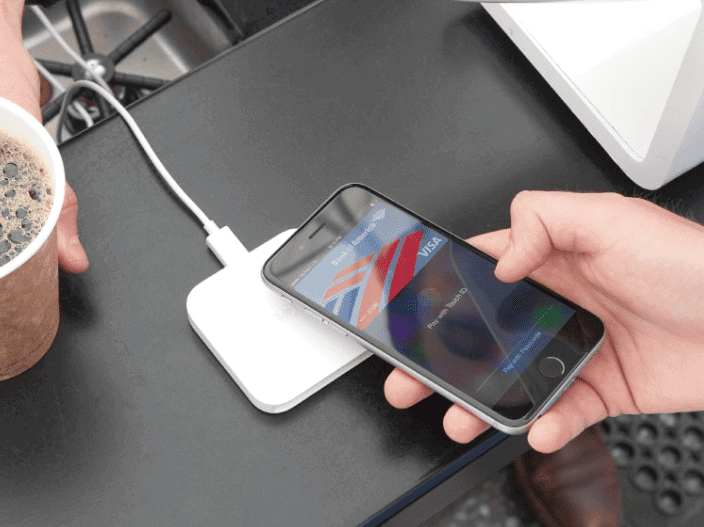
Making In-Store Purchases
Using Apple Pay at physical stores is quick and easy. To pay, simply hold your iPhone near the contactless reader while keeping your finger on Touch ID or looking at your device for Face ID. Your default card will appear on screen, but you can tap to change cards if needed.
A gentle vibration and beep confirms your payment went through. No need to open any app – double-clicking the side button brings up Apple Pay instantly.
For Apple Watch users, double-click the side button and hold your watch near the reader. The watch will vibrate slightly when payment is complete.
Most stores with contactless payment symbols accept Apple Pay. Look for these symbols at checkout:
- Apple Pay logo
- Contactless payment symbol
- NFC symbol
Using Apple Pay Online and in Apps
Shopping online with Apple Pay saves time by eliminating the need to enter payment and shipping details. When checking out on websites or in apps, look for the Apple Pay button.
Tap the Apple Pay button and check your payment information. You can change your card, shipping address, or contact details if needed. Confirm payment with Face ID, Touch ID, or your passcode.
Many popular apps support Apple Pay, including food delivery services, transportation apps, and shopping platforms. In the App Store, you can use Apple Pay to buy apps, make in-app purchases, and pay for subscriptions.
Apple Cash lets you send and receive money through Messages. The funds go to your Apple Cash card in the Wallet app.
Transacting With Apple Pay on Mac
Apple Pay works on Mac computers too, making online shopping easier and safer. On Macs with Touch ID (like MacBook Pro or MacBook Air with Touch ID), you can complete purchases by placing your finger on the Touch ID sensor.
For other Mac models, you’ll need an iPhone or Apple Watch to confirm payments. When shopping online, click the Apple Pay button at checkout. Your iPhone or Apple Watch will prompt you to confirm the payment.
Safari browser fully supports Apple Pay. Look for the Apple Pay button when checking out on compatible websites. Your shipping and billing information is automatically filled in from your Apple Pay settings.
You can also use Apple Pay for App Store purchases, Apple services like iCloud+, and Apple Music subscriptions directly from your Mac.
Apple Pay on the Apple Watch
Apple Watch makes paying for things quick and easy with Apple Pay. You can set up your cards and make purchases without needing your iPhone nearby.
Pairing and Set Up for Apple Watch
To use Apple Pay on your Apple Watch, you first need to pair it with your iPhone. Once paired, open the Apple Watch app on your iPhone and tap on the “My Watch” tab.
Scroll down and select “Wallet & Apple Pay” to begin setup. You can add cards in two ways:
- Add a card already in your iPhone’s Wallet
- Add a new card by tapping “Add Card”
When adding a new card, you’ll need to:
- Enter card details manually or scan with your camera
- Verify your information
- Accept your bank’s terms and conditions
You can choose a default card for quick access when making payments. Your bank might send a verification code by text or email during setup.
Making Payments with Apple Watch
Using Apple Pay on your Apple Watch is simple. When you’re ready to pay, just double-click the side button to bring up your default card.
If you want to use a different card, you can scroll with the Digital Crown to select it. Hold your watch close to the payment terminal (within a few centimeters) with the display facing the reader.
A gentle tap and beep confirm your payment went through. No need to unlock your watch—as long as you’re wearing it and it’s unlocked, Apple Pay works instantly.
Apple Pay works at millions of stores that accept contactless payments. You can use it for groceries, coffee, transit tickets, and more. It’s secure because your actual card numbers aren’t stored on the device or shared when you pay.
Security and Privacy
Apple Pay uses strong protection features to keep your money and personal info safe. It balances top-notch security with steps that respect your privacy at every point.
Secure Authentication Methods
Apple Pay works with several security checks to make sure only you can use your cards. When you make a payment, you’ll need to verify your identity with Face ID, Touch ID, or a passcode. These methods are much safer than typing in card numbers for online purchases.
Every transaction needs your permission. You can’t accidentally make payments because Apple Pay requires your fingerprint or face scan. This two-step process helps prevent fraud.
For Apple Watch users, the device must be unlocked and stay on your wrist. If you take off your watch, Apple Pay automatically locks until you enter your passcode again.
Setting up security codes is an important part of the process. These unique codes verify each transaction without sharing your actual card number.
Privacy of Transactions
Apple designed Apple Pay with privacy as a core principle. When you pay with Apple Pay, your actual card numbers are never stored on your device or Apple’s servers.
Instead, Apple Pay creates a unique code for each transaction. Merchants never see your real card details. This system, called tokenization, keeps your information private.
Apple doesn’t collect or store information about what you buy. Your purchase history stays between you and your bank, not Apple.
You can boost privacy even more by turning off location services for Wallet. On Mac, go to System Settings > Privacy & Security > Privacy > Location Services, then turn off Wallet access.
Your iCloud account helps sync your cards across devices but uses end-to-end encryption to protect this information.
Managing Your Cards in Wallet
The Wallet app makes it easy to organize your payment methods and keep track of your cards. You can rearrange, update, or remove cards with just a few taps.
How to Manage My Card
After adding your cards to Apple Wallet, you can organize them in any order you prefer. To change the position of cards:
- Open the Wallet app on your iPhone
- Touch and hold the card you want to move
- Drag it to a new position in your stack
This simple process helps you arrange cards in any order that works best for you. Many users place their most-used cards at the front for quick access.
Setting a default payment card is also important. The card at the front of your stack becomes your default for Apple Pay. To change your default card, just drag it to the front position of your other cards.
Your iPhone lets you manage both credit cards and debit cards this way. Having them organized saves time during checkout.
Updating or Removing Cards
Cards sometimes need updates or removal from your Wallet. This might happen when:
- Your physical card expires
- You close an account
- You get a replacement card
- Your card information changes
To update card information:
- Open the Wallet app
- Tap the card you need to update
- Look for the “…” or “More” option
- Select “Card Details” or similar option
- Choose “Remove Card” or update information as needed
When you remove a card from Apple Pay, it doesn’t affect your actual account with the bank. You can always add it back later if needed.
If your bank issues a new card, you might need to remove the old one and add the new card details. Some banks automatically update card information, but it’s good to check if you receive a replacement.
Troubleshooting Apple Pay Issues
Setting up Apple Pay sometimes comes with challenges that can prevent you from using this convenient payment method. When issues arise, there are several effective solutions you can try before contacting support.
Common Setup and Payment Errors
If you’re having trouble setting up Apple Pay, first make sure your device is compatible and running the latest iOS version. Many problems can be fixed by simply restarting your device.
When Apple Pay displays an error message during setup, check that you’re signed into iCloud on all your devices. Your iOS device must have Face ID, Touch ID, or a passcode properly configured.
If Apple Pay still isn’t working, try these quick fixes:
- Sign out of your Apple ID and sign back in
- Check that your Apple ID region settings are correct
- Verify your device has an internet connection
- Make sure your card issuer supports Apple Pay
Sometimes the problem is with your payment card. In the Settings app, tap Wallet & Apple Pay, then select the card that isn’t working properly to verify its information.
Resolving Verification Problems
Card verification issues are among the most common Apple Pay problems. If your card won’t verify, contact your bank directly as they handle the verification process. Some banks require additional security steps through their mobile banking app.
Check if you need to:
- Complete verification through your bank’s app
- Respond to a verification text message
- Call your bank’s verification hotline
- Update your contact information with your bank
Regional settings can also affect verification. Make sure your device region matches the region where your bank account was opened. You can check this in your device settings.
If you get stuck in a verification loop, try removing the card completely from Apple Pay, then adding it again from scratch. This often resolves persistent verification problems.
For stubborn issues, your bank might need to reset your card’s digital setup on their end before you try adding it to Apple Pay again.
Apple Pay Alternatives
While Apple Pay offers convenience for iPhone users, several other mobile payment options exist. These alternatives work on different devices and may offer unique features depending on your needs.
When to Use Other Payment Methods
Not everyone has an iPhone, and some stores don’t accept Apple Pay. In these cases, you need alternatives.
Google Wallet works on hundreds of Android phones with NFC capability. This makes it more accessible if you don’t use Apple devices.
Some people prefer using a physical card as backup when technology fails. Battery dead? Card still works!
For those who own wearable tech like Fitbit or Garmin watches, these devices offer their own payment systems. You can pay with a tap of your wrist.
Some merchants have their own payment apps with special rewards or discounts. These store-specific options might save you money on frequent purchases.
Comparing Apple Pay to Google Pay
Setup Process:
- Apple Pay: Open the Wallet app and tap the plus symbol
- Google Pay: Download app, add payment method
Device Compatibility:
- Apple Pay: iPhone, Apple Watch, Mac
- Google Pay: Most Android devices, some wearables
Google Pay works at most places that accept Apple Pay. Both use NFC technology for secure transactions.
Privacy features differ slightly. Apple Pay creates unique codes for each transaction, while Google stores more data about purchases.
Google Pay sometimes offers more promotions and cashback deals. Users might find more savings opportunities with Google’s system.
Both options provide security through tokenization, meaning your actual card number isn’t shared during purchases.
Frequently Asked Questions
Apple Pay setup involves a few key steps that make digital payments easy and secure. Users need their Apple devices and valid payment cards to get started.
What are the steps to activate Apple Pay on an iPhone?
To activate Apple Pay on an iPhone, first open the Wallet app and tap the plus symbol. This begins the card addition process.
Next, follow the on-screen instructions to verify your card information. Your bank may require additional verification steps like a text message code.
Once verified, your card will be ready to use with Apple Pay. You can set your default card in the Wallet settings if you add multiple cards.
How can I configure Apple Pay to receive monetary transactions?
To receive money through Apple Pay, you need to set up Apple Cash in your Wallet app. This creates a digital card for receiving funds.
You must verify your identity to receive transactions. This may include providing personal information for verification purposes.
After setup, friends and family can send money to you through Messages or by using your phone number or email linked to your Apple ID.
What is the process for adding a credit or debit card to Apple Wallet for use with Apple Pay?
To add a card to Apple Wallet, open the Wallet app and tap the plus symbol at the top right corner of the screen.
You can scan your card with your iPhone camera or enter the details manually. The app will guide you through verifying your card information.
Your bank may have additional security steps to complete the process. Once verified, your card will appear in your Wallet ready for use with Apple Pay.
How does one utilize Apple Pay for making purchases in-store or online?
For in-store purchases, hold your iPhone near the payment terminal while keeping your finger on Touch ID or using Face ID to confirm the payment.
When shopping online, look for the Apple Pay button at checkout. Select it and confirm your payment with Face ID, Touch ID, or your passcode.
For app purchases, tap the Apple Pay button and complete authentication when prompted. The transaction processes securely without sharing your card details.
Can you explain how to set up Apple Cash within the Wallet app?
To set up Apple Cash, go to the Wallet app on your iPhone. Tap on Apple Cash card or find it in your card list.
Tap “Get Started” and follow the on-screen instructions. You’ll need to agree to terms and conditions and verify your identity.
After verification, Apple Cash will be active in your Wallet. You can now receive money from friends and family or transfer funds between your bank account and Apple Cash.
What procedures are involved in creating an Apple Pay account?
Creating an Apple Pay account requires an Apple ID and a compatible device. Make sure you’re signed in to iCloud with your Apple ID.
Open the Wallet app and add your first payment card by following the prompts. This establishes your Apple Pay account.
Set up your security preferences for transactions, including Face ID, Touch ID, or passcode authentication. These security features protect your payments and account information.


