With digital services at our fingertips, managing subscriptions on an iPhone or iPad has become a commonplace task for many users. App subscriptions offer access to content, services, or premium features on a recurring basis, charging a fee periodically. Users may choose to unsubscribe for various reasons including the end of a free trial, a decision to cut costs, or simply because the app is no longer in use. The process to manage these subscriptions is straightforward and can be done directly from the device without the need for desktop computers or calling customer support.
The settings within an iPhone or iPad allow users to take control of their app subscriptions. One can easily view all active and inactive subscriptions, cancel unwanted ones, or adjust renewal options as needed. The built-in features of the device provide a user-friendly interface that leads to a more transparent experience, ensuring users have the necessary tools to handle their subscriptions effectively.
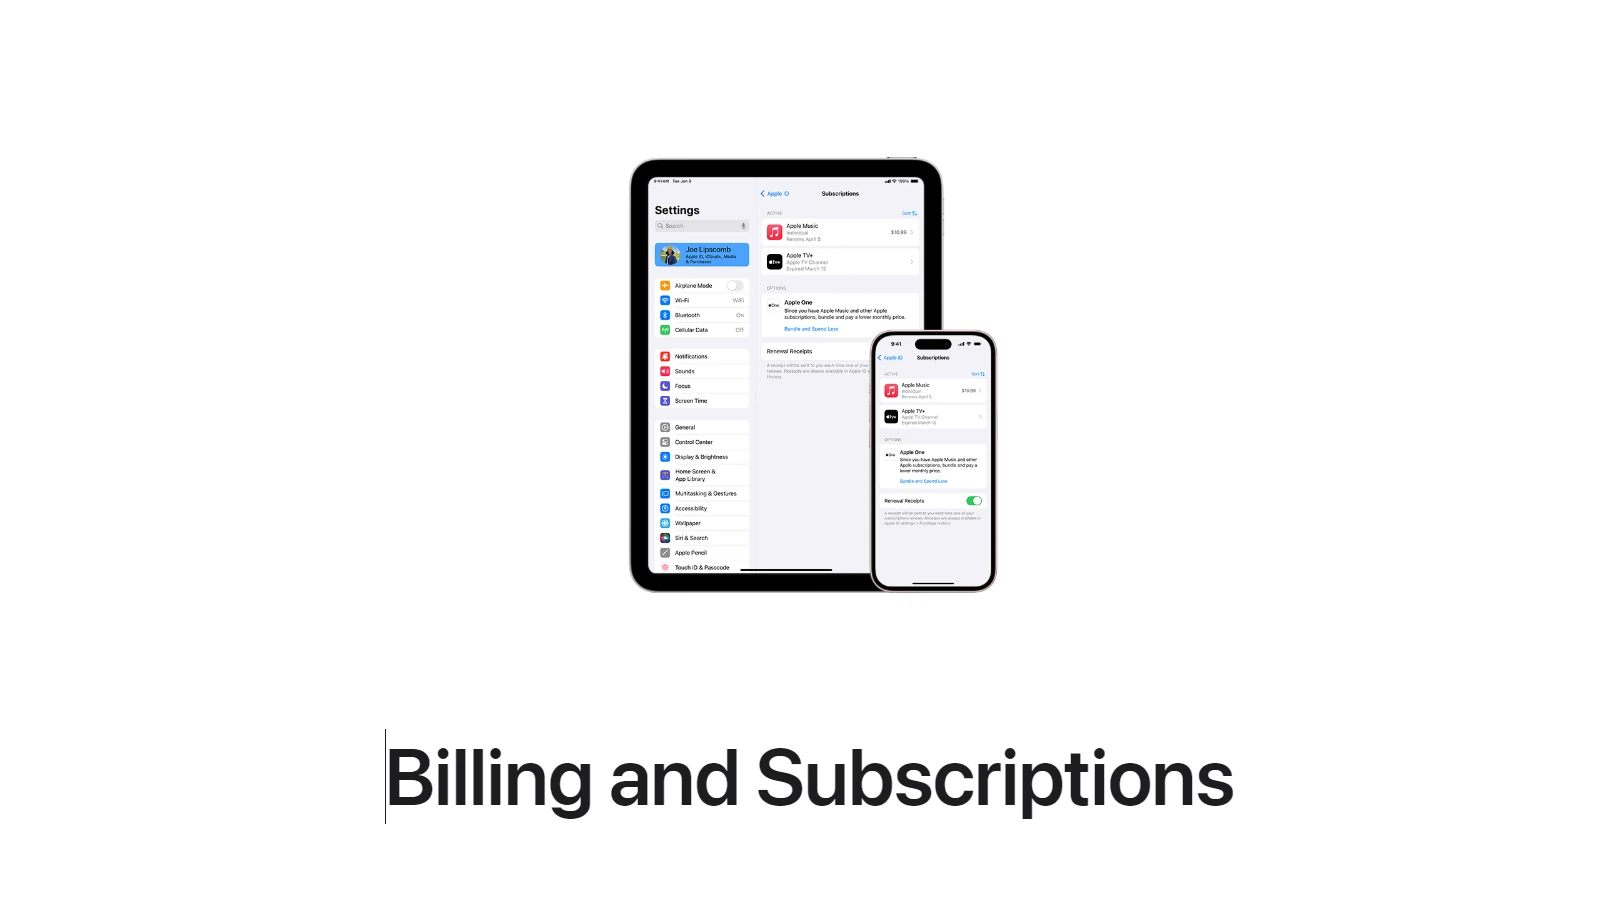
How to Unsubscribe from Apps on iPhone
Method 1: Through the Settings App
- Open the Settings app.
- Tap your Apple ID name at the top of the screen.
- Select Subscriptions.
- You’ll see a list of all active and expired subscriptions linked to your Apple ID.
- Tap the subscription you want to cancel.
- Tap Cancel Subscription (or Cancel Free Trial).
- Confirm the cancellation.
👉 Once canceled, your subscription will remain active until the end of the current billing cycle.
Method 2: Through the App Store
- Open the App Store.
- Tap your profile icon (top right corner).
- Select Subscriptions.
- Choose the subscription you want to manage.
- Tap Cancel Subscription and confirm.
Method 3: Using Apple Support Website
If you don’t see the subscription in your iPhone settings, it may be billed directly by the app developer (not Apple). In that case:
- Visit the developer’s website or app.
- Log in with your account.
- Look for a billing or subscription section to cancel.
🔍 Things to Keep in Mind
- Refunds: Apple generally doesn’t provide refunds for unused portions of subscriptions, but you can request one via Apple’s refund page.
- Family Sharing: If you’re on Family Sharing, only the organizer can manage shared subscriptions.
- Expired Subscriptions: These remain visible in your list for record‑keeping but won’t be billed again.
✅ That’s it! You’ve successfully unsubscribed from an app on your iPhone.
Key Takeaways
- Subscriptions can be managed directly on an iPhone or iPad.
- Users can cancel or adjust app subscriptions via the device settings.
- Transparent subscription management enhances user control.
Understanding Subscriptions on iPhone and iPad
Managing subscriptions on an Apple device is straightforward. The process involves your Apple ID, which keeps track of active subscriptions through the Settings or App Store app.
Types of Subscriptions
Apple offers two main types of subscriptions:
- Regular Subscriptions: These are ongoing services you pay for monthly or yearly.
- Trial Subscriptions: Some apps provide free or discounted trials before charging.
Subscriptions auto-renew until you choose to cancel them.
Locating Your Subscriptions in iOS Settings
To view or manage your subscriptions on an iPhone or iPad, follow these steps:
- Open the Settings app.
- Tap on your name.
- Select Subscriptions.
Here you can see all active and expired subscriptions linked to your Apple ID.
The Role of Apple ID in Managing Subscriptions
Your Apple ID is key to managing subscriptions. It ensures all subscriptions are in one place, regardless of the device you are using. When you want to cancel a subscription, you do so under the Apple ID with which you signed up for the service. Remember, changes made to your subscriptions are applied across all devices signed in to that Apple ID.
How to Cancel, Manage, or Renew Subscriptions
Managing subscriptions on your iPhone ensures you only pay for the services you use. This section guides you on how to cancel, manage, or renew app subscriptions with ease.
Steps to Cancel or Unsubscribe From Apps
To cancel subscriptions, begin by opening the Settings app. Tap your name at the top, then select “Subscriptions.” Here, find the app you wish to unsubscribe from and select it. Confirm your choice to cancel by tapping “Cancel Subscription” or “Cancel Free Trial.” Do this at least 24 hours before the billing period ends to avoid unwanted charges.
Managing Active and Expired Subscriptions
Active and expired subscriptions appear in the same location. Go to your account settings in the Settings app and tap “Subscriptions.” This screen will list both active and expired subscriptions. Tap any subscription to edit or manage its settings. Here you can change options or update payment information.
Restarting a Subscription After Cancellation
If you change your mind after canceling, you can resubscribe. Pick the desired app from the expired subscriptions list and select the subscription option you want. After confirming your choice, the subscription will restart at the end of the current billing cycle. Keep in mind that refunds are not typically available for time unused.


