When an iPhone encounters issues like persistent unresponsiveness, errors during use, or forgotten passcodes, restoring the device’s factory settings can often provide a solution. Apple’s official support page, support.apple.com/iphone/restore, offers comprehensive guidance on how to erase and reinstall the latest iOS software. This can be accomplished with or without the aid of a computer, ensuring that all users have a method that works for their situation. The process not only refreshes the operating system but also removes all personal data, making it a critical step prior to selling or giving away an iPhone.
For those instances when an iPhone displays the Restore screen, users are instructed to connect their device to a computer to complete the recovery process. This involves reinstalling the iOS or iPadOS to resolve the underlying issues. The steps are clearly detailed on Apple’s support pages, tailored to help users effectively troubleshoot their devices. Furthermore, tips for backing up and erasing content ensure that users can retain their valuable data while still returning their devices to their default settings.
Understanding the restore functions and how to use them properly provides iPhone owners with a valuable skill set for maintaining their devices. By following Apple’s structured guidelines, users can bring their phones back to a state resembling their original condition, offering a fresh start whether the purpose is troubleshooting, performance enhancement, or preparation for a new owner.
What Does support.apple.com/iphone/restore Mean?
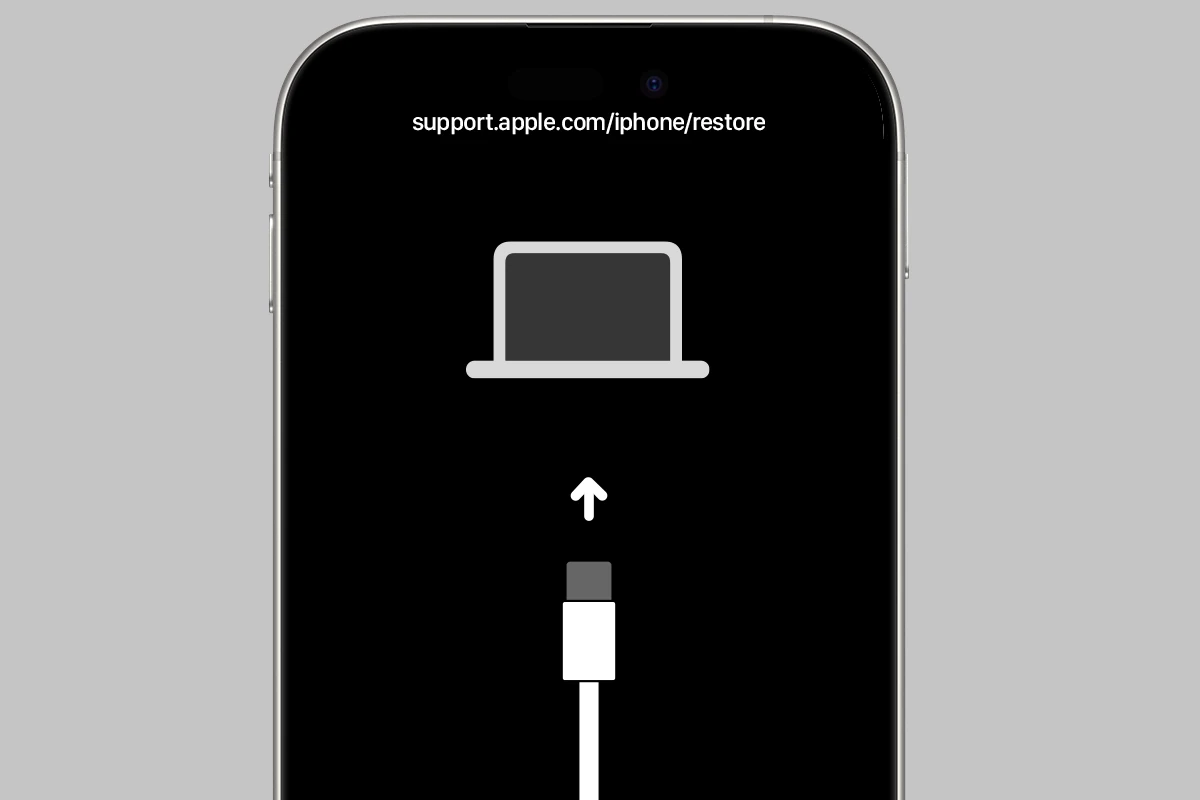
If your iPhone screen suddenly shows the message “support.apple.com/iphone/restore,” it’s Apple’s way of telling you that your device has entered recovery mode. This typically happens when an update or restore process fails, or if the operating system detects a critical issue that prevents your iPhone from starting up normally. While the screen itself doesn’t offer much detail, it’s actually guiding you to a solution—using a Mac or PC to either update or restore your iPhone’s software.
Why Did Your iPhone Enter Recovery Mode?
Recovery mode can be triggered by several scenarios, including:
- A failed iOS update (common during beta installations or interrupted downloads)
- Corrupted system files or malfunctioning apps that affect the boot process
- Jailbreak attempts or incompatible software changes
- Hardware issues that prevent the OS from loading correctly
Regardless of the reason, Apple has provided multiple ways to get your iPhone working again—and in many cases, you can do it yourself at home.
How to Fix Your iPhone When You See the Restore Screen
1. Try a Force Restart First
Before connecting your iPhone to a computer, try forcing a restart. This is often all that’s needed if your device entered recovery mode by mistake.
Instructions by Model:
- iPhone 8 and later: Quickly press and release the Volume Up button, then the Volume Down button, then press and hold the Side button until the Apple logo appears.
- iPhone 7 and 7 Plus: Press and hold both the Side and Volume Down buttons until the Apple logo appears.
- iPhone 6s and earlier: Press and hold both the Home and Top (or Side) buttons until the Apple logo appears.
If your phone restarts normally, you’re in the clear. If not, move on to the next step.
2. Connect Your iPhone to a Computer
If the force restart doesn’t work, you’ll need to connect your iPhone to a Mac or PC using a Lightning cable.
For macOS Catalina or later:
- Open Finder
- Locate your iPhone in the sidebar
- When prompted, choose Update to reinstall iOS without erasing your data
For macOS Mojave or earlier, or a Windows PC:
- Open iTunes
- Select your iPhone when it appears
- Choose Update when given the choice between Update and Restore
If the Update option fails or your iPhone continues showing the same screen after the reinstall, you’ll need to use the Restore option. This will erase your iPhone and install a clean version of iOS.
3. Restore to Factory Settings (If Necessary)
If you’re forced to restore the device, make sure you have a backup. Restoring will erase everything—including apps, settings, and personal data—so having a recent backup in iCloud or on your computer is crucial.
Once you click Restore, your computer will download the latest version of iOS and reinstall it. Afterward, you can choose to set up your iPhone as new or restore it from a backup.
New iOS 18 Wireless Restore Option (iPhone 16 Only)
For users of the iPhone 16 series, there’s a completely new way to deal with recovery mode. Apple has introduced a wireless restore feature in iOS 18 that allows another nearby iPhone or iPad to help revive your device. If your iPhone 16 enters recovery mode, simply place it next to a second device running iOS 18. The second device will automatically detect the problem and offer the option to download the firmware and push it wirelessly to the unresponsive phone.
This is a game-changer for people who don’t have immediate access to a computer. While limited to iPhone 16 models for now, it hints at a future where recovery doesn’t require cables at all.
When to Contact Apple Support
If none of these steps solve the issue—if the device won’t show up in Finder or iTunes, or if it refuses to exit recovery mode—it might be time to contact Apple Support or visit an Apple Store. A deeper hardware problem could be to blame, such as a failed NAND chip, motherboard issue, or even battery/power damage.
Tips to Avoid the Restore Screen in the Future
- Always update your iPhone with a stable internet connection and plenty of battery life (or keep it plugged in).
- Avoid installing beta versions unless you’re okay with the risk of instability.
- Regularly back up your iPhone using iCloud or iTunes/Finder.
- Don’t interrupt iOS installations—if your phone is updating, leave it alone until it’s finished.
While seeing “support.apple.com/iphone/restore” can be alarming, it’s not the end of the world. With the right steps—and in some cases, just a few minutes—you can often bring your iPhone back to life without losing anything important.
Key Takeaways
- Restoring an iPhone can fix various issues and is essential prior to selling.
- Support from Apple is available to guide the restoration process step by step.
- Mastery of restore functions is beneficial for optimal iPhone management.
Understanding iPhone Restore and Recovery
When an iPhone has issues like software glitches or data loss, restoring and recovery are the key methods to solve these problems.
The Basics of iPhone Restore
iPhone restore means reinstating the device to its factory settings by erasing all data and reinstalling iOS. This process is often done through iTunes on older macOS versions or Finder on macOS Catalina and later. Restoring can fix errors and remove personal information when preparing the device for a new owner. Before restoring, it is crucial to back up to avoid losing personal data. Users should also turn off Find My iPhone.
What Is Recovery Mode?
Recovery Mode is a specific state for troubleshooting an iPhone, iPad, or iPod touch. If an update or standard restore does not fix a problem, this mode can help. To enter it, you need to perform a force restart which differs with each device model. Once in Recovery Mode, users can choose to update or restore their device. An update reinstalls the software without erasing data; a restore resets the device to factory settings.
Differences Between Standard Restore and DFU Mode
Standard restore and DFU (Device Firmware Update) Mode are distinct processes for reinstalling iOS. Standard restore uses iTunes or Finder and automatically installs the latest iOS. DFU Mode, on the other hand, allows deeper access to the iPad or iPhone’s hardware to install a particular iOS version or repair intricate software issues. DFU Mode bypasses the bootloader which standard restore does not, allowing for potentially more comprehensive troubleshooting solutions.
Practical Guide to Using Restore Functions
Restoring an iPhone brings it back to its initial settings and can fix a host of issues. This important process involves iTunes or Finder, a computer, and the iPhone you wish to restore.
How to Restore Your iPhone Using iTunes/Finder
If you need to restore your iPhone, you can use iTunes on a PC or Finder on a Mac running macOS Catalina or later. First, connect your iPhone to the computer using a USB cable. If you’re on a Mac with macOS Mojave or earlier, or on a Windows PC, open iTunes. On a newer Mac, open Finder.
For iTunes:
- Click on the iPhone icon in the upper-left corner.
- Click ‘Summary’, then ‘Restore iPhone’.
For Finder:
- Select your iPhone from the left sidebar.
- Click ‘General’, then ‘Restore iPhone’.
Follow the on-screen instructions. If asked, choose to ‘Update’ to try to reinstall the iOS without erasing data, or ‘Restore’ to erase all data and install a new copy of the iOS.
Resolving Common Restore Errors
Sometimes during the restore process, you might encounter an error message. Here are common fixes:
- Check for Updates: Ensure iTunes or macOS is up to date.
- USB Cable and Port: Use a different USB cable or port.
- Restart Your Device: Try a force restart on your iPhone (different methods depending on the model).
- Trust This Computer: If asked, tap ‘Trust’ on your iPhone screen.
- Enter Recovery Mode: With the iPhone connected to the computer, perform a sequence of button presses to enter Recovery Mode.
For button sequences, vary by device model:
- iPhone 8 or later: Press volume up, then volume down, then hold the side button.
- iPhone 7, iPhone 7 Plus: Hold the volume down and side buttons.
- iPhone 6s or earlier: Hold the home and top (or side) buttons.
Restoration Without a Computer: Is It Possible?
Restoring an iPhone to factory settings without a computer is possible if Find My iPhone is enabled:
- Settings: Go to ‘Settings’, tap ‘General’, then ‘Reset’.
- Erase All Content and Settings: Select ‘Erase All Content and Settings’. This returns the iPhone to factory settings.
Keep in mind, this method requires your passcode and may not resolve issues that a computer-based restore would fix. If you’re facing problems that persist after this, you may need to connect to a computer and use iTunes or Finder as described earlier.