Restoring an iPhone can remedy various issues, from sluggish performance to persistent software glitches. It returns the phone to its original factory settings, which can also be useful when preparing to sell or give away the device.
Before starting the restoration process, it’s crucial to back up data to avoid losing photos, messages, and other important information. This can be done through iCloud or a computer. After ensuring all data is secure, one can proceed to reset the iPhone, using either the settings menu or a computer if the phone is unresponsive.
Executing the restore process clears all data from the iPhone and reinstalls the latest iOS. This usually resolves software problems and wipes personal data, offering a clean slate to the new user or a fresh start for current users. Remember to sign out of all accounts and disable ‘Find My iPhone’ to ensure the process goes smoothly.
Restoring your iPhone means erasing all data and reinstalling iOS. This can help fix software glitches, crashes, or update errors. You can restore your iPhone using Settings, Finder/iTunes, or an IPSW file (for advanced users).
⚠️ Important: Restoring your iPhone deletes all your data — make sure you back up your device first.
☁️ Step 1: Back Up Your iPhone
Before restoring, create a backup so you can recover your data later.
✅ Option 1: Back Up to iCloud
- Connect to Wi-Fi.
- Go to Settings → [Your Name] → iCloud → iCloud Backup.
- Tap Back Up Now.
- Wait for the process to finish.
💻 Option 2: Back Up to a Computer
- Mac (macOS Catalina or later):
- Connect your iPhone via USB.
- Open Finder → select your iPhone under “Locations.”
- Click Back Up Now.
- Windows or macOS Mojave and earlier:
- Open iTunes.
- Click the iPhone icon → Summary → Back Up Now.
(source: Apple Support)
🔄 Step 2: Choose How You Want to Restore
You can restore your iPhone in three main ways:
🧩 Option 1: Restore Using iPhone Settings (Factory Reset)
If your iPhone is still working and you just want to erase it:
- Go to Settings → General → Transfer or Reset iPhone.
- Tap Erase All Content and Settings.
- Enter your passcode or Apple ID password if prompted.
- Confirm and wait for the process to complete.
Your iPhone will restart as brand new.
(source: Apple Support)
💻 Option 2: Restore Using Finder or iTunes
If your iPhone is frozen, stuck on the Apple logo, or you want to reinstall iOS:
- Connect your iPhone to your Mac or PC using a USB cable.
- Open Finder (Mac) or iTunes (Windows).
- Select your iPhone when it appears.
- Click Restore iPhone.
- Confirm and wait while your computer downloads and installs the latest iOS version.
💡 Tip: This method reinstalls iOS and erases your data in one step.
(source: Apple Support – iTunes Restore Guide)
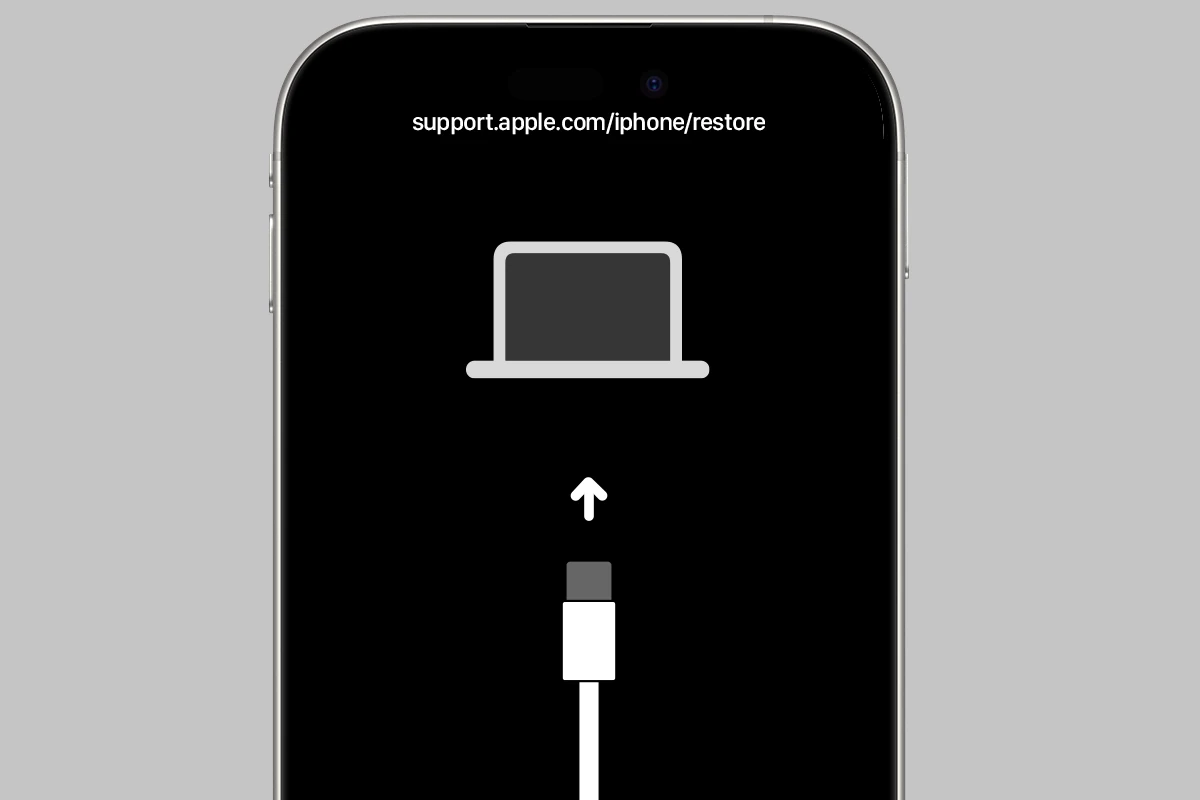
🧠 Option 3: Restore Using DFU or Recovery Mode (Advanced)
If your iPhone won’t start or Finder/iTunes doesn’t recognize it, use Recovery Mode or DFU Mode.
🔁 Recovery Mode
- Connect your iPhone to your computer.
- Force restart your iPhone:
- iPhone 8 or later: Press and release Volume Up, then Volume Down, then hold Side button until the recovery screen appears.
- In Finder/iTunes, click Restore when prompted.
⚙️ DFU Mode (Device Firmware Update)
DFU mode allows a deeper restore that bypasses the OS bootloader — useful for serious software issues.
- Connect your iPhone to your computer.
- Press and hold Volume Down + Side for 10 seconds, then release Side while holding Volume Down for 5 more seconds.
- The screen stays black — this means you’re in DFU mode.
- In Finder/iTunes, click Restore iPhone.
(source: DrBuho DFU vs Recovery Guide)
🔋 Step 3: Set Up Your iPhone After Restore
Once the restore process finishes:
- Turn on your iPhone.
- Follow the on-screen setup steps.
- Choose Restore from iCloud Backup or Restore from Mac/PC if you created a backup earlier.
🧩 Optional: Restore Using an IPSW File (Manual iOS Installation)
If you want to install a specific iOS version manually:
- Download the correct IPSW file for your device from ipsw.io.
- Connect your iPhone to your computer.
- In Finder/iTunes, hold Shift (Windows) or Option (Mac) and click Restore iPhone.
- Select the IPSW file and confirm.
(source: IPSW.io Guide)
🧠 Troubleshooting Tips
| Problem | Solution |
|---|---|
| iTunes/Finder doesn’t detect iPhone | Try a different cable or USB port, or update iTunes |
| Restore stuck or failed | Restart your computer and retry in DFU mode |
| iPhone stuck on Apple logo | Use Recovery Mode restore |
| Can’t restore from backup | Make sure backup isn’t corrupted or try iCloud restore |
✅ Summary
| Method | When to Use | Erases Data |
|---|---|---|
| Settings Reset | Normal factory reset | ✅ |
| Finder/iTunes Restore | Fix software issues | ✅ |
| Recovery/DFU Mode | iPhone won’t boot | ✅ |
| IPSW Restore | Manual iOS install | ✅ |
🔒 Pro Tip:
After restoring, always sign in with your Apple ID to disable Activation Lock and enable iCloud sync again.
Key Takeaways
- Restoring an iPhone can solve a range of issues and is also essential when selling it.
- Always back up important data before starting the restore process to prevent data loss.
- Completing the restore process erases all content and reinstalls the latest iOS.
Preparing to Restore Your iPhone
When planning to restore an iPhone, it’s vital to ensure device compatibility and secure your valuable data first. These steps prevent issues during restoration.
Checking Device Compatibility and Requirements
Before starting the restore process, confirm that your device supports the latest iOS version. Make sure your Mac is running the current macOS or that your PC has the latest update if you’re using iTunes or Finder. For the actual restoration, have a USB cable ready and, if required, update iTunes or Finder to the latest version. Connect your phone to your computer and choose ‘Trust This Computer’ if prompted.
Backing Up Essential Data
Protect your photos, contacts, and app data before resetting. Back up to iCloud or your computer via iTunes or Finder. For iCloud, go to Settings > [Your Name] > iCloud > iCloud Backup on your device and select “Back Up Now.” Using iTunes or Finder, connect your device to your computer, open iTunes or Finder, select your device, and click “Back Up Now.” If you’re using an eSIM, save its information. Once you back up the data, you can effectively restore it later without losing your important content.
Executing the Restore Process
Restoring an iPhone to its original factory settings can be critical before selling it or troubleshooting. This process erases all data and configurations, returning your device to its new state.
Using Finder or iTunes for Restoration
For those with macOS Catalina or later, open Finder to start the restore process. Those with an older macOS, or using a PC, will need the latest version of iTunes. First, connect the iPhone to the computer and locate the device within Finder or iTunes. If prompted, enter your Apple ID password to turn off Find My iPhone and proceed. Click Restore iPhone to erase all content and install the latest iOS version. The iPhone will reboot with a progress bar appearing as the new software installs.
Factory Reset via iPhone Settings
To reset your iPhone without a computer, go to Settings. Tap on General and then select Transfer or Reset iPhone. Choose Erase All Content and Settings. This will remove all your videos, photos, and apps. If you have an iPhone 13, iPhone 13 mini, iPhone 13 Pro, or iPhone 13 Pro Max, confirm your Face ID, Touch ID, or passcode and tap erase. It is important to disconnect from Find My iPhone and sign out of your Apple ID before you start the reset. Once confirmed, your iPhone will restart and display a progress bar until the factory reset completes.


