Accidental water exposure can spell trouble for an iPhone, but quick action can help mitigate the potential damage. When an iPhone comes into contact with water, it’s critical to remove the liquid as soon as possible. Modern iPhones do have some degree of water resistance, yet it’s not a guarantee against water damage. Users should power off their device immediately following water exposure. This reduces the risk of short circuits that can cause permanent damage.
After turning the device off, gently tap the iPhone with the ports facing down to clear out excess water. Resist the temptation to use heat or forced air, as this can worsen the issue. Instead, users should leave the phone in a dry environment to air out. Some users may opt for a specialized feature in certain apps or shortcuts, like Water Eject, which use sound frequencies to help eject water from the speakers.
Overview
If your iPhone has been dropped in water or exposed to liquid, quick and careful action can make the difference between saving it or needing expensive repairs.
Most modern iPhones (iPhone 7 and later) are water-resistant, not waterproof. They can handle small splashes or brief submersion, but prolonged exposure or salt/chlorine water can still cause damage.
⚠️ Important: Do not try to charge, shake, or heat your iPhone after it gets wet — this can cause short circuits.
🆘 Step 1: Turn It Off Immediately
- Power down your iPhone right away.
- Press and hold the Side button + Volume Down (or just the Side button on older models).
- Slide to power off.
- If the screen is unresponsive, let the battery drain naturally — don’t force it.
This prevents electrical current from flowing through wet components.
🔌 Step 2: Disconnect Accessories and Remove SIM
- Unplug all cables, headphones, and cases.
- Remove your SIM card tray using a SIM ejector tool or paperclip.
- This helps moisture escape from inside the phone.
🧻 Step 3: Wipe and Drain Visible Water
- Gently wipe the exterior with a lint-free cloth (microfiber preferred).
- Do NOT use a hair dryer, oven, or compressed air — heat and pressure can push water deeper inside.
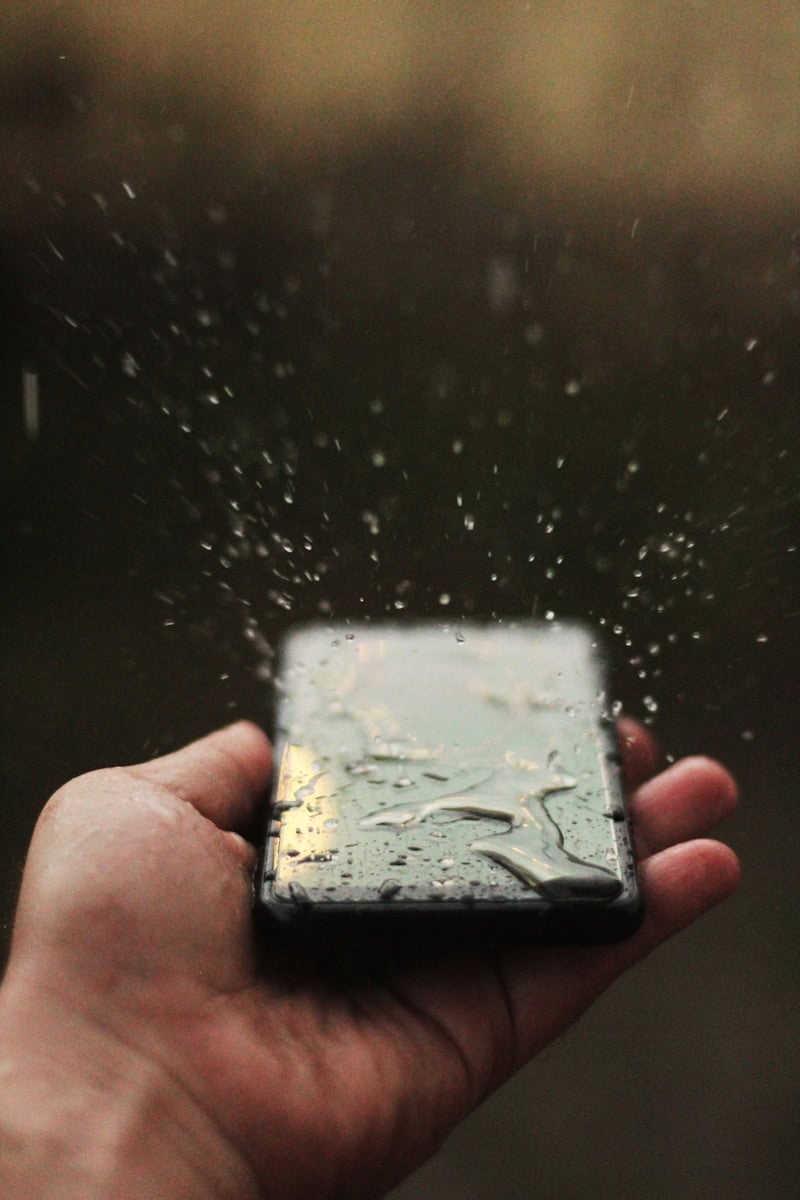
- Hold your iPhone upright and gently tap it against your palm to help drain water from the speaker or Lightning port.
🌬️ Step 4: Let It Air Dry Naturally
- Place your iPhone in a dry, ventilated area at room temperature.
- Position it upright (charging port facing down).
- Leave it for at least 24 to 48 hours to fully dry.
💡 Avoid using rice. Despite being popular advice, uncooked rice can leave dust or starch inside your phone and doesn’t dry moisture as effectively as air or desiccants.
(source: Macworld)
🧂 Step 5: Use Silica Gel Packets (Optional)
If available, place your iPhone in a sealed bag or container with silica gel packets (the kind found in shoe boxes or electronics packaging).
- Leave it sealed for 24–36 hours.
- Silica gel absorbs moisture more efficiently than rice.
(source: WikiHow – Repair an iPhone from Water Damage)
🔈 Step 6: Remove Water from the Speaker (Optional)
If your iPhone’s speaker sounds muffled after drying:
- Open Safari and visit a “water eject” sound tool (e.g., FixMySpeakers.com).
- Play the tone — it vibrates the speaker to help expel trapped water droplets.
- Repeat a few times until the sound clears up.
(source: YouTube – How to Get Water Out of iPhone)
⚡ Step 7: Check the Charging Port
Before plugging in your charger:
- Wait at least 24 hours.
- If you see a “Liquid Detected in Lightning Connector” message, do not charge.
- Instead, keep the phone upright and let it air dry longer.
🧠 Step 8: Test and Monitor
Once completely dry:
- Power it on.
- Check for normal screen brightness, speaker clarity, and camera function.
- If you notice glitches (e.g., ghost touches, dim screen, or random shutdowns), water may still be inside.
🧩 Step 9: If Problems Persist
If your iPhone doesn’t turn on or behaves erratically:
- Contact Apple Support or visit an Apple Store or authorized repair center.
- Do not try to open the phone yourself — this can void your warranty or worsen corrosion.
(source: Apeaksoft – Fix Water-Damaged iPhone)
🚫 What Not to Do
| ❌ Don’t | Why |
|---|---|
| Charge your iPhone too soon | Risk of short-circuit |
| Use a blow dryer, oven, or microwave | Heat can warp components |
| Shake or blow into ports | Pushes liquid deeper inside |
| Use rice | Ineffective and messy |
| Ignore corrosion signs | Can cause permanent damage later |
✅ Summary: Quick Action Checklist
| Step | Action |
|---|---|
| 1 | Turn off iPhone immediately |
| 2 | Remove SIM and accessories |
| 3 | Wipe and gently drain water |
| 4 | Air dry 24–48 hours |
| 5 | Use silica gel if available |
| 6 | Use water eject sound for speakers |
| 7 | Wait before charging |
| 8 | Test functionality |
| 9 | Contact Apple if issues persist |
💡 Pro Tip:
If you live near an Apple Store, don’t hesitate to bring your phone in early. Apple technicians can open the device and clean corrosion before it spreads — often saving the logic board.
Key Takeaways
- Quick and careful action can limit water damage to an iPhone.
- Power off the iPhone and remove excess water by tapping it gently.
- Avoid heat and let the phone air dry or use sound frequencies to expel water.
Immediate Steps to Take After iPhone Water Exposure
When an iPhone meets water, quick action is crucial to minimize damage. The following steps guide you in handling your wet phone with care and urgency.
Turning Off the Device
Do not wait. Turn off your iPhone immediately to prevent short circuits. Holding down the Power button will shut it off. Press until you see the power off slider appear then swipe it to the right. This stops electric currents that can cause further damage when they meet water.
Removing Excess Liquid
After powering down, dry your phone carefully. Wipe the exterior with a soft, absorbent cloth. Ensure you remove the SIM card and pat down the slot as well. Check for liquid in the Lightning connector. If you spot any, gently tap the phone against your hand with the Lightning port facing down to help the liquid escape.
Avoiding Heat Sources
Keep your iPhone away from external heat sources. This includes radiators, hairdryers, or direct sunlight. Heat can warp iPhone components and seal in the moisture. Natural air drying is the best way to handle a wet iPhone as it ensures no additional damage from heat.
Long-Term iPhone Care Following Liquid Contact
Maintaining an iPhone after it has come into contact with liquids involves particular steps to preserve its functionality. This section outlines essential measures to dry internal components, monitor for potential damage, and seek professional repair services if needed.
Drying Internal Components
Once an iPhone is wet, turning it off and removing any headphones or accessories is critical. Use materials like uncooked rice or silica gel to absorb moisture. They work by pulling water from the internal components of the phone. Avoid using heat sources or compressed air as they can cause further damage.
Monitoring for Damage
After drying the iPhone, it’s essential to keep an eye on its performance. Watch for unusual behavior like unexpected restarts, battery issues, or unresponsive screens. These signs can indicate internal damage. The Liquid Contact Indicator (LCI) can also show if water has compromised the device, which is particularly useful to check before turning it back on.
Seeking Professional Repair Services
If an iPhone shows ongoing issues after coming into contact with liquid, consulting Apple Support is a wise move. While Apple’s warranty may not cover liquid damage, they provide services to repair or replace affected devices. Using low-frequency sounds to expel water, a feature available on some iPhones, can be helpful, but if problems persist, professional help ensures the phone is properly and safely restored.


