Apple keeps adding pro-grade tricks to the iPhone camera, but many of them stay buried behind icons and menus. This guide surfaces every major shooting mode and setting available on current models—from the iPhone 12 to the brand-new iPhone 16 series running iOS 18—so you can squeeze studio-level results out of your pocket companion.
A Quick Look at 2025-Era Hardware
- 48 MP stacked sensors & Tetraprism zoom (iPhone 16 Pro/Pro Max) deliver cleaner detail and a lossless 5× optical reach that rivals dedicated mirrorless glass.
- LiDAR depth mapping now feeds Portrait, Night, and even third-party AR apps, slicing subject outlines with near-instant accuracy.
- Spatial microphones record spatial audio that pairs perfectly with the new Spatial Video mode for Vision Pro playback.
Choosing the Right Shooting Mode
| Mode | What It Does | When to Use It | Pro Tip |
|---|---|---|---|
| Photo | Standard still with Smart HDR 5 tone mapping | Everyday captures | Long-press shutter for QuickTake video burst |
| Portrait | Simulated wide-aperture blur, adjustable f/-stop & lighting presets | People, pets, product shots | Swipe aperture wheel afterward to fine-tune depth |
| Night | Multi-frame stacking in low light | Cityscapes, astrophotography | Rest phone on a stable surface to unlock 30-sec captures |
| Action | High-speed shutter + advanced gyro crop | Sports, toddlers, dogs | Pair with Enhanced Stabilization for gimbal-like smoothness (toggle in Settings ▶ Camera ▶ Record Video) |
| Macro | Auto-switches to ultrawide lens at 2 cm | Flowers, textures, circuitry | Shoot in 48 MP RAW for poster-size close-ups |
| Cinematic | 4K / 24 fps shallow-depth video with rack focus | Vlogs, short films | Tap any face mid-record to pull focus |
| ProRes Log (Pro models) | 10-bit 4:4:4 footage for color-grading | Commercial work | Record directly to USB-C SSD to avoid storage crunch |
| Spatial Photo/Video | Captures dual-lens 3D media for Vision Pro | Birthdays, vacations | Must hold phone in landscape; playback pops in a 3D canvas |
| Time-Lapse / Slow-Mo | Interval or high-fps video | Sunsets, DIY how-tos | Lock exposure with a long press before recording |
| Pano | Up to 63 MP stitched sweep | Vistas, architecture | Reverse direction by tapping arrow once |
Dial In the Perfect Look
- Resolution & Frame Rate
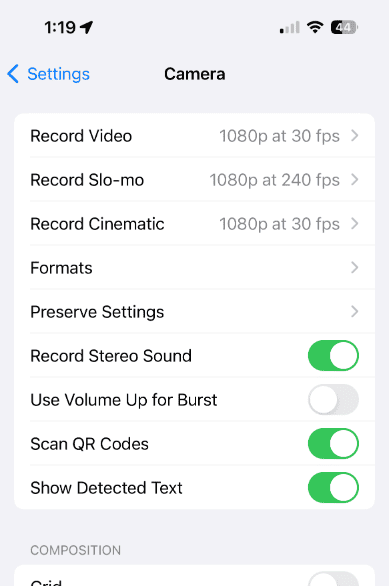
Head to Settings ▶ Camera ▶ Record Video to flip between 4K 60, 4K 24 for filmic motion, or battery-friendly 1080p. Toggle “Enhanced Stabilization” here when you need maximum smoothness. - Photographic Styles
Want warmer skin or a punchier street vibe? Create a custom style (Settings ▶ Camera ▶ Photographic Styles) and it bakes your tone curve into every shot—no preset filters needed. - RAW + HEIF Dual Capture
On Pro models, turn on “ProRAW + HEIF” to keep an editable 48 MP DNG and a lightweight share-ready file with one tap. - Grid, Level & Focus Peaking
Enable these in Settings ▶ Camera ▶ Composition. The new level keeps horizons straight; focus peaking paints edges green when they’re tack-sharp.
Power-User Shortcuts
- Action Button Shortcut (15 Pro & up)
Map the Action button to Camera or even to a specific mode like Selfie for zero-lag launches. - Back Tap Burst
In Accessibility ▶ Touch, assign Back Tap → Double Tap to Burst Mode for candid street shots. - Volume-Down Burst, Volume-Up QuickTake
Hold volume-down for continuous stills; press volume-up to start/stop video without moving your grip. - Third-Party Manual Apps
Halide and Filmic Pro unlock manual ISO, shutter, and focus-peaking overlays that Apple still hides from its stock UI.
Editing & Sharing in iOS 18
- Spatial Re-Lighting lets you relight portrait photos after capture, using AI depth maps for realistic shadows.
- Clean Up removes photobombers with a single scribble, borrowing tech from macOS Sequoia’s Retouch tool.
- Auto-Caption generates alt-text for accessibility and boosts SEO when posting to social apps.
With these tools and tactics in hand, your iPhone can graduate from casual snapshot buddy to a surprisingly sophisticated creative studio—ready for anything from cinematic vacation reels to spatial keepsakes destined for Apple Vision Pro.
The Best iPhone Camera Settings for Photography
If you want to consistently take great photos with your iPhone, tweaking a few key settings can make a huge difference. While Apple’s default auto settings are solid, manual control over aspects like focus, exposure, and file format gives you more creative power and better results. Here’s how to optimize your iPhone camera settings for next-level photography:
1. Enable Grid Lines (Settings ▶ Camera ▶ Grid)
Grid lines help apply the rule of thirds, a foundational photography technique that improves composition. Use them to align subjects along horizontal or vertical thirds instead of always centering them. This instantly gives your shots a more professional look.
2. Turn on Lens Correction (Settings ▶ Camera ▶ Lens Correction)
For users of ultra-wide shots, enabling lens correction helps reduce edge distortion, especially when shooting landscapes or architectural scenes. It ensures your wide-angle shots look natural instead of warped.
3. Use ProRAW (Settings ▶ Camera ▶ Formats ▶ Apple ProRAW)
If you have a Pro model (iPhone 12 Pro or newer), enabling Apple ProRAW unlocks uncompressed image data with greater flexibility for editing exposure, white balance, and shadows later in apps like Lightroom. ProRAW is ideal for landscapes, low-light, and high-contrast scenes.
4. Set Default Exposure Compensation (Tap the chevron ↑ in the Camera app)
Tapping the arrow at the top of the Camera app opens manual controls. Use Exposure Compensation (EV) to brighten or darken your scene slightly without tapping and holding for AE/AF lock. This helps avoid blown-out highlights or muddy shadows.
5. Lock Focus and Exposure (Tap and Hold on Screen)
For scenes with tricky lighting or motion, tap and hold on your subject to enable AE/AF Lock. This locks your exposure and focus in place, so changes in lighting or movement won’t mess up the shot. Great for action, street, or sunset photography.
6. Photographic Styles (Settings ▶ Camera ▶ Photographic Styles)
Photographic Styles let you set a preferred tone and warmth to your images while preserving skin tones. If you want punchier color, switch to the Vibrant style. For moody black-and-white street shots, go with Rich Contrast. These aren’t filters—they’re real-time tone maps baked into the photo.
7. Use Volume Buttons or Remote Shutter
Instead of tapping the screen (which can shake your shot), use the volume up button to snap a photo. You can also connect Apple’s EarPods or AirPods and use the volume button as a remote shutter—perfect for tripod setups or low-light shots where stability matters.
8. Enable ‘Mirror Front Camera’ (Settings ▶ Camera ▶ Mirror Front Camera)
For selfie photography, enabling this setting ensures that what you see in the viewfinder is exactly what gets saved—no flipped or reversed images. It’s useful for selfies with text, backgrounds, or any composition-sensitive elements.
9. Set HDR to Auto or Smart HDR
The latest iPhones come with Smart HDR 5, which blends multiple exposures for optimal detail across highlights and shadows. Leave HDR on Auto to ensure well-balanced lighting in scenes with a mix of bright skies and dark subjects.
10. Adjust Live Photo Settings
Live Photos are on by default but can eat up storage and complicate editing. Turn them off unless you plan to use motion effects or choose the best frame from the animation. If you keep them on, go to Photos > Edit > Live and pick the best frame to use as the key photo.
By fine-tuning these settings, you’ll take more consistent, professional-quality photos no matter the subject. Whether you’re framing an epic landscape or capturing quiet street moments, mastering your iPhone camera’s settings gives you full creative control—without needing a DSLR.
Key Takeaways
- iPhone camera modes enhance photo and video capture experience.
- Selection of the right mode and settings can improve the image quality.
- Advanced features offer customization for creative photography.
Understanding iPhone Camera Modes and Settings
The iPhone camera offers diverse modes and settings for capturing images and videos. Each setting provides control over the image outcome, making it possible to shoot in various scenarios with ease.
Exploring Photo and Video Modes
Photo mode is the default camera setting upon opening the iPhone’s Camera app. Users can capture still photos and Live Photos, which record a short snippet of movement and sound. Video mode allows for recording videos. This includes standard video, slow-motion, and time-lapse formats, which can capture fast-paced scenes or extended periods. The Camera app enables quick switching between these modes with just a swipe.
Utilizing Focus and Exposure
Focus and exposure are crucial for iPhone photography. Tapping the screen sets the focus on a particular object or area. Dragging up or down after tapping adjusts the exposure, controlling the amount of light in the photo. This helps in managing how dark or light the photo appears, ensuring that the subject is properly highlighted.
Advantages of Portrait and Night Modes
Portrait mode employs depth effect to keep the subject sharp while creating a blurred background. This mode enhances photos by simulating the depth of field found in DSLR photography. Night mode comes into play in low-light settings. It automatically activates to brighten photos while reducing noise. Both modes are designed to elevate iPhone photography by rendering professional-looking images in specific conditions.
Advanced Features and Customization
The iPhone camera offers a range of advanced settings allowing for high-quality photo and video capture. Newer models introduce more features that users can customize to suit their preferences.
Maximizing Camera Capabilities across iPhone Models
The iPhone camera app houses various capabilities across models, each allowing users to capture images in multiple resolutions and frame rates. The iPhone 12 and onwards support 4K video recording, with options to film at 24, 30, or 60 fps (frames per second). Users can choose HD for smaller file sizes. For still photos, settings can be adjusted to select between high-efficiency formats or more compatible options, which saves storage on the device while retaining image quality.
Exploring Photographic Styles and ProRAW
Photographic Styles and ProRAW are features that enable personalization and high-fidelity imaging. Styles allow users to select preset or customized looks that apply to all photos, influencing the tone and warmth. Devices from the iPhone 12 onwards support Apple ProRAW, giving photographers the power to capture images with more data, offering greater flexibility during editing. ProRAW combines RAW’s information richness with iPhone’s computational photography features.
Tips for iPhone Camera Usage and Troubleshooting
To get the most out of the iPhone camera, users should ensure they are running the latest iOS, such as iOS 17, to access new features and improvements. When issues arise, restarting the camera app or the device often resolves common problems. Keeping the lenses clean and being aware of the battery’s capacity during extended shoots will help maintain the camera’s performance. Users with Pro and Pro Max models will benefit from advanced settings like depth-of-field effects and choosing different lenses, from wide to telephoto, based on the scene’s requirements.


