Breaking your iPhone’s back glass can be frustrating and worrying. Those spider web cracks not only look bad but can also get worse over time, potentially causing cuts on your fingers or letting moisture into your phone. Repairing cracked iPhone back glass costs anywhere from $399 at Apple for older models like the iPhone XR to less for newer models that are designed differently.
You have several options when facing this common problem. For newer iPhones like the iPhone 14, you might be able to fix it yourself with a repair kit. For iPhone 12 and 13 models, back glass replacement requires a trained expert to open the device and replace components. If you’re looking for a quick temporary fix, some users report that clear nail polish can help seal tiny cracks and hold the glass together until you can get a proper repair.
How to Repair Cracked Back Glass on an iPhone
Cracked back glass on an iPhone isn’t just a cosmetic issue—it can affect wireless charging, compromise water resistance, and worsen over time. Depending on your model and comfort level with repairs, there are several ways to fix it. Here’s a breakdown of your options.
Option 1: Apple or Authorized Service Provider
Best For: Preserving warranty, guaranteed quality, maintaining waterproof seal.
If your iPhone is under AppleCare+ or still within warranty (and you’re willing to pay the deductible), Apple offers professional replacement services:
- AppleCare+ fee: Typically $29 for back glass repair.
- Out-of-warranty cost: Can range from $199 to $599 depending on the model.
- Models supported: iPhone 12 and newer (these use a modular back glass replacement design).
You can book a Genius Bar appointment or use Apple’s mail-in service.
Option 2: Third-Party Repair Shops
Best For: Lower cost, local convenience, out-of-warranty devices.
Many independent repair shops offer back glass replacement for less than Apple’s out-of-pocket fees. However:
- Pros: Often cheaper, fast turnaround.
- Cons: May void remaining warranty, quality varies by technician.
- Average cost: $80 to $200 depending on your location and iPhone model.
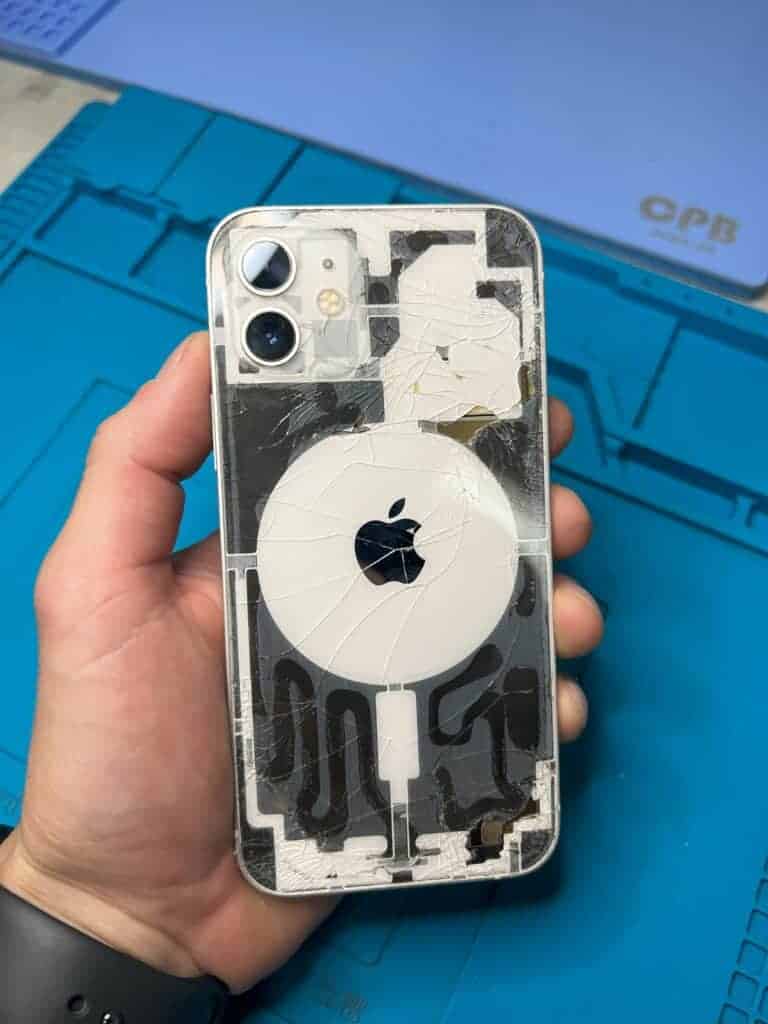
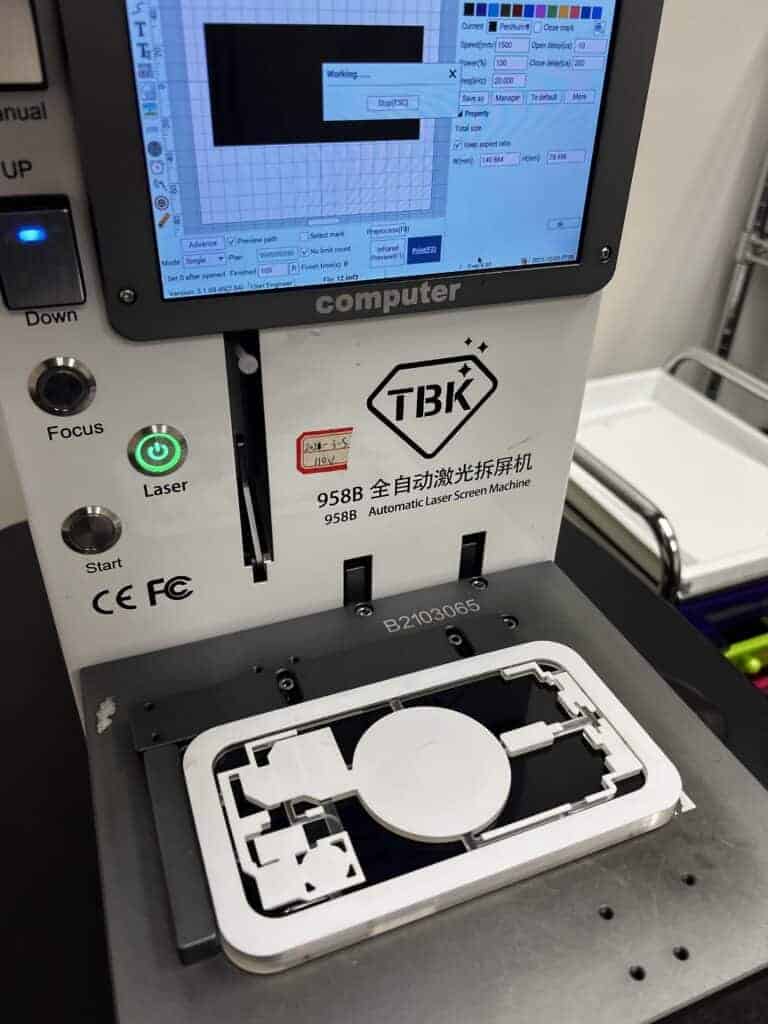
Look for shops that use laser separation machines—they safely remove the broken glass without damaging the internal components.
Option 3: DIY Repair (Advanced Users Only)
Best For: Experienced tech users, saving money, out-of-warranty phones.
Warning: Replacing the back glass yourself is difficult and can be dangerous without the right tools. The iPhone’s back glass is fused with strong adhesive and requires:
Required Tools:
- Laser machine (to loosen adhesive – optional but ideal)
- Heat gun or iOpener (for softening adhesive)
- Razor blade / precision scraper
- Protective goggles and gloves
- Adhesive remover (like isopropyl alcohol)
- Replacement back glass with adhesive pre-applied
Steps Overview:
- Turn off the phone and remove the SIM card.
- Use heat to soften the adhesive along the back edges.
- If using a laser separator, carefully outline and remove the adhesive layer.
- Use a razor or scraper to lift and peel off the cracked glass (be extremely cautious).
- Clean the surface thoroughly.
- Apply new adhesive or use a back glass with adhesive pre-installed.
- Press and cure the back panel using clamps or weights for several hours.
Note: Models from iPhone X to iPhone 11 have glass fused to the frame, making DIY repair very hard without professional equipment.
Alternative: Use a Case Instead
If the crack is minor and cosmetic, you may choose to protect the phone with a durable case instead of repairing it immediately. This won’t fix the damage, but it will help prevent cuts and further damage.
Final Tip
Always back up your data before any repair attempt, and verify if your iPhone is still under warranty or AppleCare+ coverage before choosing a repair method. If in doubt, professional repair is safer than DIY.
Key Takeaways
- Back glass repairs cost different amounts based on your iPhone model and who does the repair.
- Apple stores can usually fix iPhone back glass in a single day but DIY options exist for newer models.
- Screen damage isn’t covered by the standard Apple warranty but might be covered if you have AppleCare+ for accidental damage.
Understanding iPhone Back Glass Damage
iPhone back glass damage is common and can happen in various ways. The glass panel not only affects the look of your phone but also its function and safety.
Types of Cracks and Breaks
Back glass damage on iPhones typically falls into several categories. Hairline cracks are thin, often barely visible lines that may spread over time. These usually happen from minor drops or pressure in pockets.
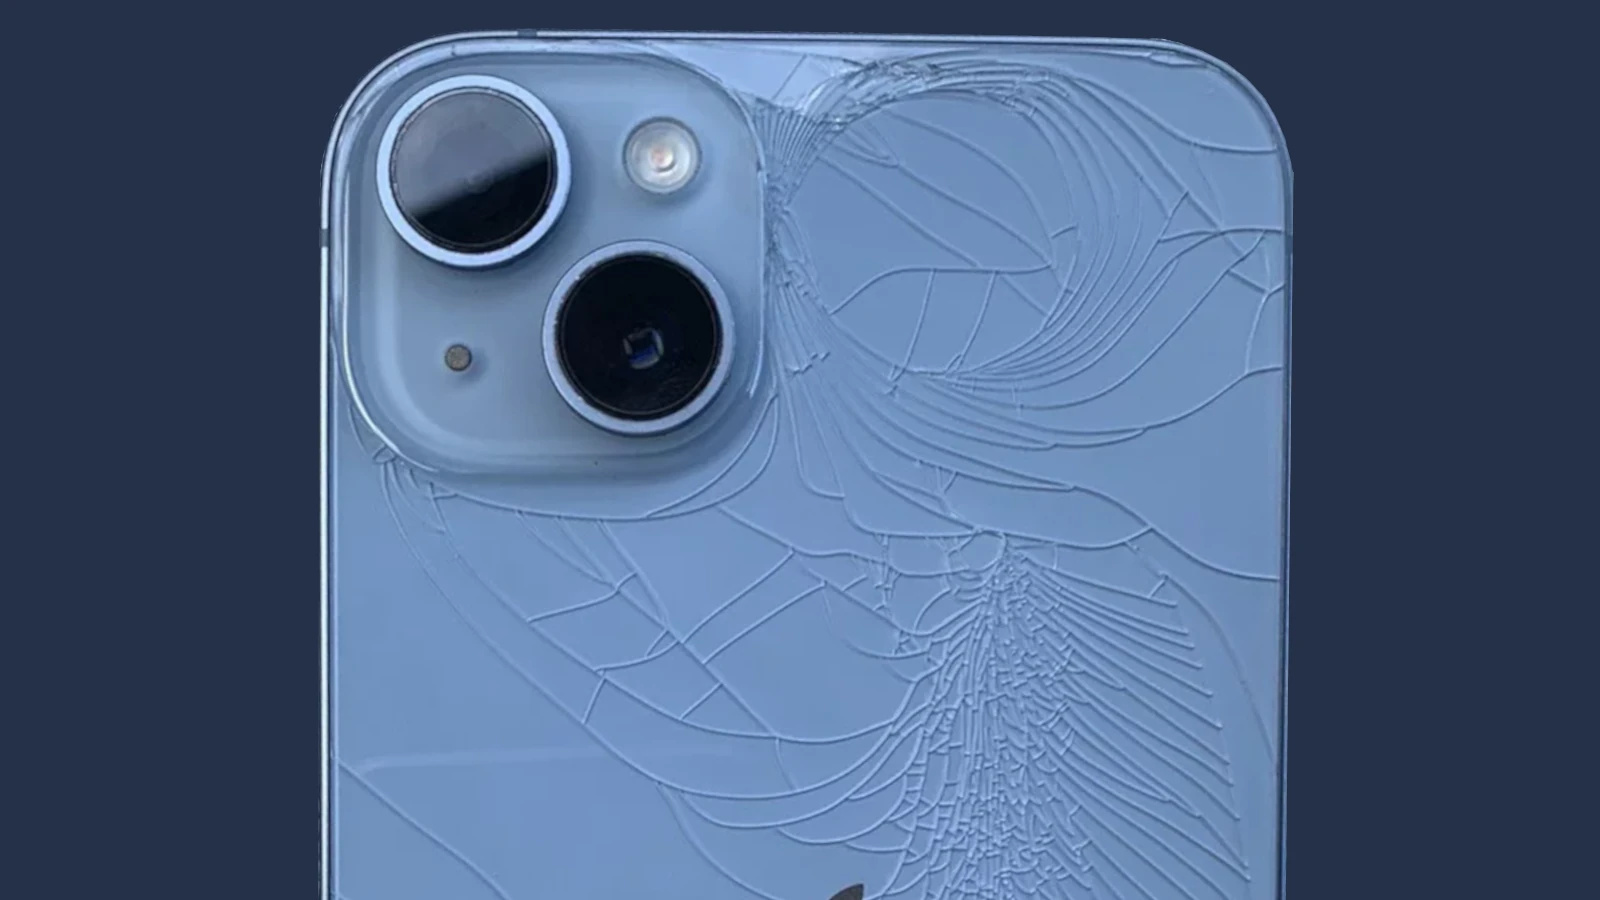
Spider-web cracks form when the impact point creates multiple lines spreading outward. These are more serious and often result from dropping your phone from higher distances.
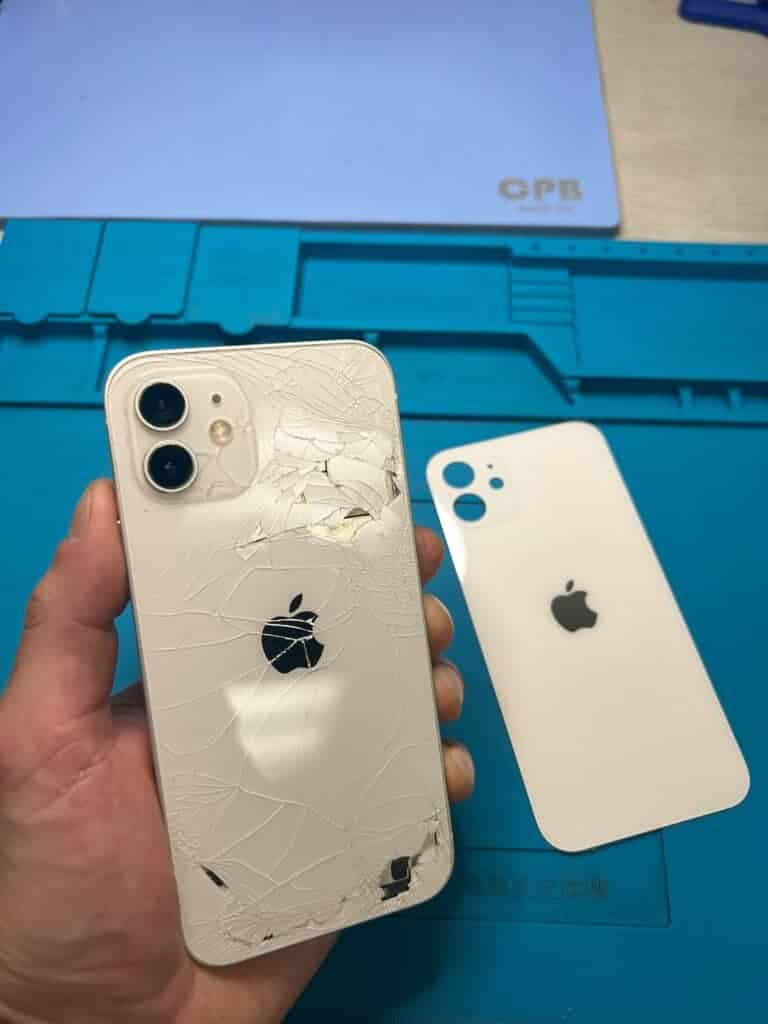
Shattered glass occurs when the back is severely damaged with pieces potentially coming loose. This is the most serious type and poses safety risks from sharp edges and glass fragments.
On newer models like the iPhone 12 and iPhone 13, the back glass is fused to the case, making repairs more complex than on older versions.
Risk Factors and Prevention
Several factors increase the chance of back glass damage:
- No case or thin cases offer minimal protection
- Hard surfaces like concrete or tile
- Pocket placement with keys or coins
- Temperature changes can weaken glass
Prevention is simpler than repair. Using a quality protective case with raised edges can absorb impact. Screen protectors designed for the back glass add an extra layer of defense.
Some cases offer military-grade drop protection, which is especially important for the iPhone 14 Pro and iPhone 14 Plus with their larger glass surface areas.
Always place your phone screen-up on surfaces, and avoid extreme temperature changes which can weaken the glass structure.
Comparison With Android Devices
iPhone back glass repairs are generally more expensive than similar repairs on Android devices. This is because Apple uses a fused design where the glass is attached to the case, while many Android manufacturers use simpler attachment methods.
The Samsung Galaxy series uses similar glass backs but often costs less to repair. Other Android brands like Google Pixel and OnePlus typically have more repair-friendly designs.
Android phones also offer more variety in materials. Some use plastic or metal backs that don’t break like glass. The Motorola and budget Nokia phones often use these more durable materials.
However, iPhones generally maintain higher resale value even with back damage compared to Android devices with similar damage.
Assessing Repair Options
When faced with cracked back glass on your iPhone, you have several paths to fix the problem. Each option comes with different costs, risks, and benefits based on your specific situation.
DIY Repair Considerations
Fixing iPhone back glass yourself can save money but comes with significant risks. The process requires special tools and careful handling to avoid further damage. Most DIY methods involve using heat and pry tools to loosen the adhesive holding the glass.
Be aware that opening your iPhone will void any remaining warranty. The back glass is firmly attached with strong adhesive, making removal challenging even for experienced people.
Required tools for DIY repairs:
- Heat gun or hairdryer
- Suction cups
- Pry tools
- Replacement adhesive
- Protective gear
Many repair sharks sell DIY kits online, but these rarely include proper instructions. Success rates for first-time fixers are low, and mistakes can damage other components.
Professional Services Overview
Professional repair shops offer more reliable solutions for back glass damage. Independent repair services typically charge between $99 and $399, depending on your iPhone model and the extent of damage.
Apple’s official repair costs vary by model. Newer iPhones with their glass fusion technology are more expensive to fix than older models.
Benefits of professional repairs:
- Trained technicians
- Quality replacement parts
- Work guarantees
- Proper equipment
Many repair shops use specialized laser machines that precisely remove broken glass without damaging internal components. This technology produces cleaner results than DIY methods.
Local electronics shops may offer same-day service, while Apple often requires appointments and longer waiting periods.
Understanding AppleCare+ and Insurance Policies
AppleCare+ provides significant savings for back glass repairs. With this coverage, Apple charges much less for accident damage repairs compared to standard out-of-warranty costs.
Most AppleCare+ plans cover two accidental damage incidents per year. The service fee for back glass repair with AppleCare+ is typically lower than screen repair costs.
Standard carrier insurance may also cover back glass damage, but often comes with higher deductibles. Check your policy details before filing a claim.
Coverage comparison:
| Plan Type | Typical Deductible | Claim Limits | Repair Location |
|---|---|---|---|
| AppleCare+ | $29-$99 | 2 per year | Apple Store |
| Carrier Insurance | $100-$250 | Varies | Authorized shops |
| Third-Party Insurance | $50-$200 | Varies | Multiple options |
Always verify if filing an insurance claim will increase your monthly premiums before proceeding with repairs through insurance.
Preparation for Repair
Before attempting to fix a cracked iPhone back glass, proper preparation is essential. The right tools and workspace setup will help ensure a successful repair and prevent further damage to your device.
Gathering Necessary Tools and Materials
To repair cracked iPhone back glass, you’ll need several specific items. Start with protective gear including rubber gloves and safety glasses to protect yourself from glass fragments.
For the actual repair, gather these essential tools:
- Heat gun or hairdryer (to loosen adhesive)
- Plastic pry tools or guitar picks
- Suction cup
- Microfiber cloth
- Isopropyl alcohol (90%+)
- Strong epoxy adhesive for minor cracks
- Replacement back glass (if doing a full replacement)
- Small screwdriver set (Phillips #00 and Pentalobe)
- Tweezers for handling small parts
If you plan to attempt a full replacement, you might need a laser machine for professional results, though this is typically for repair shops.
Ensuring a Safe Working Environment
Set up your workspace in a clean, well-lit area with minimal dust. A desk lamp provides focused lighting to see tiny screws and components clearly.
Place a soft mat or towel on your work surface to prevent scratches and provide cushioning if parts fall. Keep your workspace organized with small containers labeled for different screws and components.
Before starting, prepare your iPhone by powering it off completely and backing up all data. Remove any case or screen protector from the device.
Keep liquids away from your work area to avoid electrical damage. Work in a static-free environment by using an anti-static wrist strap if available.
Children and pets should be kept away from your repair area to prevent accidents with small parts or tools.
Step-By-Step Back Glass Replacement Guide
Fixing a cracked iPhone back glass at home is possible with the right tools and careful attention to detail. The process involves removing broken glass, preparing the surface properly, and installing a new glass panel.
Removing the Broken Glass
Start by powering off your iPhone and putting on safety glasses and gloves to protect yourself from glass shards. Place your phone on a soft work surface to prevent screen damage.
For iPhone 14 models, including the iPhone 14 Pro and iPhone 14 Plus, removing the back glass is easier than previous models due to their design. You’ll need:
- Heat gun or hair dryer
- Suction cup
- Plastic pry tools
- Small screwdriver set
Apply heat in circular motions around the edges for 2-3 minutes to soften the adhesive. Attach a suction cup near the bottom edge and gently pull to create a gap.
Insert a plastic pry tool into the gap and carefully work around the perimeter. Move slowly to avoid damaging internal components or breaking the glass further.
Preparing the Surface for the New Glass
Once the broken glass is removed, you must clean the frame thoroughly. This step is critical for proper adhesion of the new back glass.
Use isopropyl alcohol (90% or higher) and a microfiber cloth to:
- Remove all adhesive residue
- Clean dust and fingerprints
- Disinfect the surface
Check for any remaining glass fragments using bright light. Small fragments can prevent the new glass from sitting flush or cause damage later.
For iPhone 14 Plus and Pro models, pay special attention to the camera area and wireless charging coil. These areas must be completely clean for proper function after repair.
Let the frame dry completely for 5-10 minutes before applying new adhesive. Some replacement kits include pre-cut adhesive, while others require you to apply liquid adhesive.
Installing the New Glass
Before installation, test-fit your new back glass to ensure proper alignment. Most DIY repair kits include a replacement glass panel specific to your iPhone model.
For adhesive application:
- If using pre-cut adhesive: carefully place it on the frame, removing backing as you go
- If using liquid adhesive: apply a thin, even layer around the edges and critical contact points
Carefully align the new glass starting with the top edge near the camera. Look for alignment markers to ensure proper positioning for iPhone 14 Pro and Plus models.
Press firmly around all edges to secure the glass. Apply even pressure from the center outward to remove any air bubbles. Use a roller tool if available.
Leave your iPhone undisturbed for 24-48 hours to allow the adhesive to cure completely. Avoid wireless charging during this time as it generates heat that can affect adhesion.
Troubleshooting After Repair
After repairing your iPhone’s back glass, you might face some unexpected issues. Knowing how to spot and fix these problems can save you time and money.
Handling Common Issues
If you notice touch sensitivity issues after a back glass repair, try restarting your phone. This often resolves minor software glitches that can occur after repairs.
Seeing moisture under the glass? This usually means the repair wasn’t properly sealed. Place your phone in a dry, warm area (not hot) for several hours. Never use rice as it can damage your phone further.
Wireless charging problems are common after back glass repairs. Try these quick fixes:
- Remove any case or metal objects near the charging pad
- Clean the charging coil area with a microfiber cloth
- Reset your phone’s network settings
Loose glass edges might appear days after repair. Apply gentle pressure to help the adhesive bond, but don’t use clear nail polish or other DIY fixes that could void any warranty.
Camera lens fogging indicates a poor seal. Let your phone rest in a dry environment for 24 hours.
When to Seek Further Professional Help
Return to your repair shop if your iPhone battery drains unusually fast after repair. This might indicate damage to the wireless charging coil or battery during the repair process.
Contact professional help if you see error messages about “non-genuine” parts. This happens when replacement parts aren’t properly calibrated with Apple’s software.
Apple’s warranty service should be your next step if you experience persistent issues after a repair, especially if you have AppleCare+.
Seek immediate professional help if your phone:
- Overheats during normal use
- Shows lines or dark spots on the screen
- Has intermittent signal or connection issues
- Makes clicking or buzzing sounds
Water damage symptoms appearing after repair need professional attention right away. Signs include condensation under the screen or corrosion near charging ports.
Maintaining Your iPhone Post-Repair
Once you’ve fixed the cracked back glass on your iPhone, proper maintenance becomes crucial to prevent future damage. Taking care of your repaired device helps extend its lifespan and maintains its resale value.
Protective Measures for Longevity
Invest in a high-quality protective case for your iPhone 14 Pro or iPhone 14 Plus. Look for cases with raised edges that prevent the back glass from touching surfaces when placed down.
Recommended case features:
- Shock-absorbing materials (like silicone or TPU)
- Reinforced corners
- Military-grade drop protection
Apply a back glass screen protector as an extra layer of defense. These thin films can prevent scratches and absorb minor impacts.
Consider using a pop socket or phone grip. These accessories not only make your phone easier to hold but also reduce the chances of accidental drops.
When not using your iPhone, store it in a safe place away from edges of tables or counters. Keep it away from extreme temperatures that can weaken the adhesive holding the glass.
Regular Inspection and Care Tips
Clean your iPhone back glass weekly using a microfiber cloth. For stubborn smudges, use a slightly damp cloth with no soap or chemicals that might damage the glass.
Cleaning do’s and don’ts:
- ✅ Use microfiber cloths
- ✅ Isopropyl alcohol (70%) for disinfecting
- ❌ Harsh chemicals or abrasives
- ❌ Excess moisture near ports
Check for early signs of damage like small cracks that might spread. Small cracks can be sealed with clear nail polish as a temporary solution until proper repair.
Remove your iPhone from its case monthly to clean out dust and debris that can scratch the back glass. Pay special attention to the camera module area where particles often collect.
For iPhone 14 models, inspect the adhesive seal around the edges periodically. Any signs of peeling might indicate a need for resealing to maintain water resistance.
Alternatives to Repairs
Sometimes fixing a cracked iPhone back glass isn’t the best option. You might find other solutions that work better for your situation or budget.
Using Protective Cases and Accessories
A quality protective case can hide existing cracks and prevent further damage. Clear cases with a solid backing can cover damage while still showing the phone’s design. Strong adhesive skins are another option that can both hide cracks and hold the glass together.
Tempered glass protectors designed for the back of iPhones provide an extra layer of protection. These are much cheaper than repairs and can be found on shopping platforms like AliExpress.
Grip cases with reinforced corners offer excellent protection against future drops. Look for cases with military-grade drop protection if you’re prone to accidents.
Waterproof cases serve two purposes – they hide cracks and prevent moisture from getting into damaged areas. This is especially important since cracks can compromise your phone’s water resistance.
Considering Upgrade or Exchange Options
Trading in your damaged iPhone might be worth considering if the repair costs are high. Many carriers offer trade-in programs even for phones with back glass damage, though at reduced value.
Apple’s iPhone Upgrade Program lets you get a new phone yearly, solving your cracked glass problem while upgrading. Check if you qualify for this option.
Some third-party electronics shops may buy damaged phones for parts. This can offset the cost of a new device if the damage is extensive.
Selling your cracked iPhone on marketplace platforms can sometimes net more money than trade-in programs. Be sure to clearly describe the damage in your listing.
Insurance claims are worth checking if you have AppleCare+ or carrier insurance. Many plans cover back glass damage with a reasonable deductible.
Frequently Asked Questions
iPhone back glass repair has many options and costs to consider. Here’s what you need to know about fixing that cracked glass on your phone.
What are the steps for DIY repair of an iPhone’s cracked back glass?
DIY iPhone back glass repair is challenging but possible. First, power off your iPhone and remove the SIM card.
Purchase a back glass replacement kit, which typically includes the glass panel, adhesive, and necessary tools. Some kits come with heating pads to soften the adhesive.
You’ll need to carefully heat the back of the phone to loosen the glue. This can be done with a heat gun on low setting or a hair dryer.
Use tools like a suction cup and plastic pry tools to gently lift the cracked glass. Work slowly around the edges to avoid damaging internal components.
For minor cracks, some users apply clear nail polish as a temporary fix to seal small cracks and prevent them from spreading.
Is it cost-effective to repair an iPhone’s back glass at home?
DIY back glass repair kits cost between $20-$50 depending on your iPhone model. This is much cheaper than professional repair.
However, the risk of damaging your phone during a DIY repair is high. You might break internal components or the wireless charging coil.
If you have AppleCare+, using professional repair is often more cost-effective. With AppleCare+, back glass repair costs only $29 for many models.
Without proper tools and experience, DIY repairs can lead to more costly damage. Consider your skill level and the value of your device before attempting repairs yourself.
What is the estimated professional repair cost for a cracked back glass on an iPhone 14?
Professional repair for iPhone 14 back glass varies based on service provider. Apple charges around $349-$399 without AppleCare+.
With AppleCare+, the cost drops dramatically to $99 for back glass repair on newer models like the iPhone 14.
Third-party repair shops may offer lower prices, typically ranging from $150-$275 for iPhone 14 back glass replacement.
The prices reflect the complexity of the repair, as newer iPhones have integrated components attached to the back glass.
How does the repair cost of an iPhone’s back glass vary by model?
Older models like iPhone 8 and X typically cost $149-$199 for back glass repair without AppleCare+. These models have simpler construction.
Mid-range models like iPhone 11 and 12 usually cost $249-$349 without coverage. Repair complexity increases with these models.
The latest models such as iPhone 13, 14, and 15 are the most expensive, ranging from $349-$599 for back glass repair without AppleCare+.
With AppleCare+, most models have a standard $99 fee for back glass damage repair, making it much more affordable.
What should one consider when looking for iPhone back glass repair services nearby?
Check if repair shops use genuine Apple parts. This ensures compatibility and maintains your phone’s warranty if applicable.
Read customer reviews to gauge the quality of service. Look for shops with specific experience repairing your iPhone model.
Ask about repair guarantees. Good repair shops offer warranties on their work, typically 30-90 days.
Compare turnaround times. Some shops offer same-day service, while others might take several days. Apple’s official repair service may have longer wait times but provides genuine parts.
Price should not be the only factor. Extremely low prices might indicate poor quality parts or workmanship.
Can a protective case prevent the iPhone’s back glass from cracking, and if so, to what extent?
Quality protective cases significantly reduce the risk of back glass damage. Cases with raised edges provide extra protection for the glass surface.
Cases with air cushion technology or rubber corners absorb impact better than hard plastic cases. This helps prevent cracks from drops.
The level of protection varies by case design. Military-grade cases offer the highest protection but add bulk to your phone.
No case provides 100% protection against all impacts. Severe drops can still damage your phone even with a good case.
Screen protectors for the back glass panel add another layer of defense. Some brands offer back glass protectors specifically designed for iPhones.


