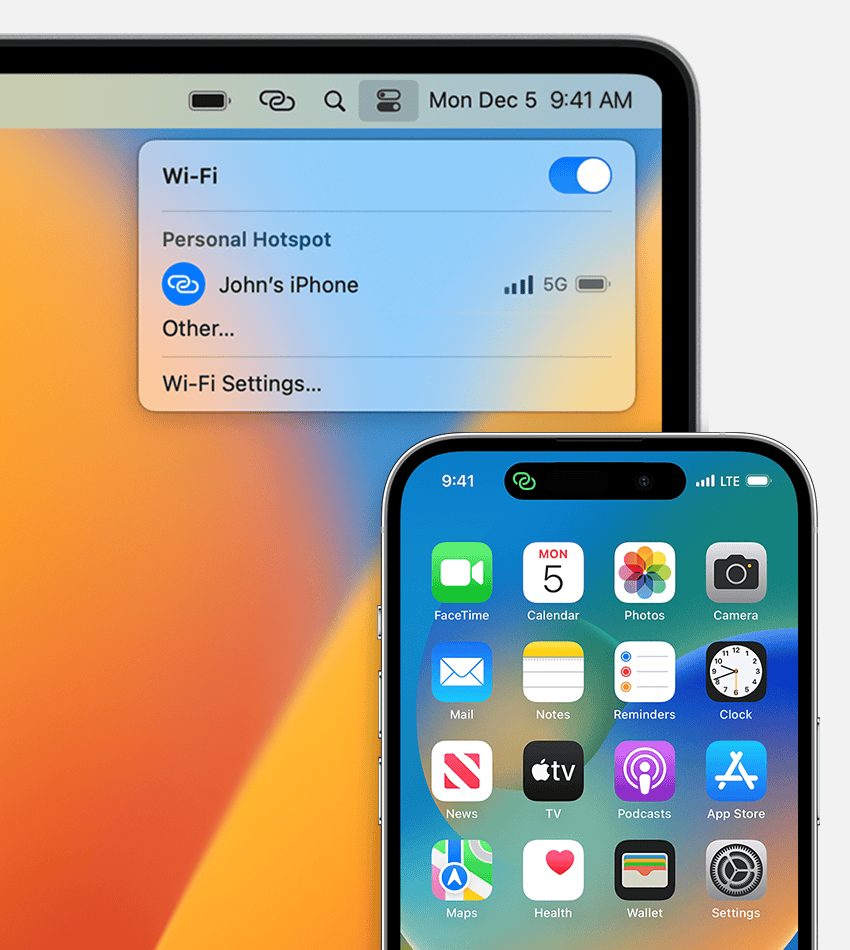
Sharing your iPhone screen on your MacBook has never been easier. With Apple’s built-in tools, you can quickly display your phone’s screen on your computer without downloading extra apps. You can mirror your iPhone to your MacBook using Control Center by tapping the Screen Mirroring button and selecting your Mac as the playback destination.
This helpful feature lets you show photos to friends, demonstrate apps, or view videos on a larger screen. Both devices need to be on the same Wi-Fi network and signed into the same Apple ID. The process works with recent iOS and macOS versions, making it accessible for most Apple users.
Apple has enhanced this connection between devices with iPhone Mirroring, which allows you to control your iPhone directly from your Mac. This newer feature gives you even more options for interacting with your phone content while using your computer.
How To Use Screen Mirroring From iPhone to MacBook: A Step-by-Step Guide
Screen mirroring lets you display your iPhone’s screen on your MacBook, perfect for presentations, gaming, or sharing content on a bigger screen. Here’s how to mirror your iPhone to your MacBook easily.
Requirements
- Both your iPhone and MacBook must be on the same Wi-Fi network.
- Your MacBook needs to be running macOS Monterey (12) or later.
- Your iPhone should be running iOS 15 or later.
Step 1: Enable AirPlay Receiver on Your MacBook
- On your MacBook, click the Apple menu () > System Settings (or System Preferences).
- Go to Sharing.
- Enable AirPlay Receiver by toggling it on.
- Set “Allow AirPlay for” to Everyone on the same network or Anyone on the same network for easier connection.
Step 2: Start Screen Mirroring on Your iPhone
- On your iPhone, swipe down from the top-right corner to open Control Center.
- Tap Screen Mirroring (the icon with two overlapping rectangles).
- From the list, select your MacBook’s name.
- Your iPhone screen will now appear on your MacBook.
Step 3: Stop Screen Mirroring
- To stop mirroring, open Control Center on your iPhone.
- Tap Screen Mirroring.
- Select Stop Mirroring.
Alternative: Using QuickTime Player (Wired Method)
If you prefer a wired connection:
- Connect your iPhone to your MacBook using a Lightning to USB cable.
- Open QuickTime Player on your MacBook.
- Go to File > New Movie Recording.
- Click the arrow next to the record button and select your iPhone as the camera source.
- Your iPhone screen will appear in QuickTime Player.
Tips
- Wireless AirPlay mirroring has slight latency; wired QuickTime mirroring is more responsive.
- Ensure both devices are updated to the latest software for best compatibility.
- You can record your iPhone screen from QuickTime if needed.
By following these steps, you can easily mirror your iPhone screen to your MacBook for presentations, gaming, or sharing videos.
For official Apple support, see Use AirPlay to stream video or mirror your device’s screen.
Key Takeaways
- Screen mirroring works wirelessly through AirPlay when both devices are on the same Wi-Fi network.
- You can access screen mirroring quickly through Control Center on your iPhone by tapping the Screen Mirroring button.
- For more control options, set up iPhone Mirroring in your Mac’s System Settings under Desktop & Dock.
Understanding Screen Mirroring Technology
Screen mirroring lets you display your iPhone screen on your Mac, allowing you to view and interact with your phone content on a larger display. This technology uses wireless protocols to create a seamless connection between your devices.
What Is Screen Mirroring?
Screen mirroring is a technology that wirelessly displays one device’s screen on another. When you mirror your iPhone to your MacBook, everything on your phone screen appears on your computer.
This process works through wireless protocols like AirPlay, which is built into Apple devices. The connection happens in real-time, showing exactly what’s on your phone screen.
Common uses for screen mirroring include:
- Presenting photos or videos on a larger screen
- Giving demonstrations
- Playing mobile games on a bigger display
- Working with mobile apps using a keyboard and mouse
iPhone users can easily mirror their screens to Macs using the new iPhone Mirroring feature, which lets you wirelessly control your iPhone directly from your Mac.
Differences Between Screen Mirroring and Casting
Screen mirroring and casting are often confused, but they work differently. With screen mirroring, your entire device screen appears on the target display. Whatever you see on your iPhone will show up exactly the same on your Mac.
Casting, however, only sends specific content to another screen. When you cast a video, only that video plays on the receiving device, not your whole phone interface.
Key differences:
| Screen Mirroring | Casting |
|---|---|
| Shows your entire screen | Shows only specific content |
| Mirrors all activities | Allows phone use while content plays |
| Usually has slight lag | Often smoother playback |
| Better for presentations | Better for media consumption |
Apple’s AirPlay can do both mirroring and casting depending on how you use it. For full iPhone screen mirroring, you would select the mirroring option in Control Center.
Requirements for Screen Mirroring from iPhone to MacBook
Before you can mirror your iPhone screen to your MacBook, you need to ensure your devices meet certain requirements. Both devices must be compatible, running the right operating system versions, and properly connected to the same network.
Supported iOS and MacOS Versions
For iPhone mirroring to work properly, your iPhone needs to run at least iOS 12 or newer. The latest iPhone Mirroring feature works best with iOS 18, which adds improved performance and reduced latency.
For Macs, you’ll need macOS Monterey (12) or later. The newest macOS Sequoia offers the most seamless experience with enhanced integration between devices. Older versions may still work but might not support all features.
System updates are important for mirroring functions. Apple frequently improves these features with each new release. To check your current versions:
- On iPhone: Go to Settings > General > About
- On Mac: Click Apple Menu > About This Mac
Compatible Devices and Hardware
Not all Apple devices support screen mirroring. Here’s what you need:
| Device Type | Compatible Models |
|---|---|
| iPhone | iPhone 8 or newer |
| Mac | 2018 or newer models with Apple T2 Security Chip |
MacBooks with Touch ID typically have the necessary hardware for optimal mirroring performance. Newer models with M1 or M2 chips provide the smoothest experience.
Your Mac needs enough processing power to handle the mirrored display without lag. At least 8GB RAM is recommended for the best performance when running multiple apps during mirroring.
Required Settings and Connections
Both devices must be on the same Wi-Fi network. A strong, stable connection is necessary to prevent lags or disconnections. 5GHz Wi-Fi networks work better than 2.4GHz for mirroring.
Bluetooth must be enabled on both devices. This helps with the initial connection process, even though the actual mirroring uses Wi-Fi.
Important settings to check:
- Enable AirPlay on your Mac (System Preferences > Displays)
- Turn on Screen Mirroring in Control Center on your iPhone
- Make sure both devices are signed in to the same Apple ID
Firewall settings may need adjustment if you’re having trouble connecting. Allow AirPlay through your firewall for proper functionality.
Setting Up Your Devices for Screen Mirroring
Before you can mirror your iPhone screen to your MacBook, you need to make sure both devices are properly configured. This setup involves connecting to the same network, verifying your Apple account, and checking your connection settings.
Connecting to the Same Wi-Fi Network
Your iPhone and MacBook must be connected to the same Wi-Fi network for screen mirroring to work. This is the most important first step in the setup process.
On your iPhone:
- Open Settings
- Tap Wi-Fi
- Make sure Wi-Fi is turned ON
- Select the same network your MacBook is using
On your MacBook:
- Click the Wi-Fi icon in the menu bar
- Verify it’s connected to the same network as your iPhone
If you’re having trouble, try restarting your router or moving closer to it. Signal strength matters! Poor Wi-Fi can cause lag or disconnections during mirroring.
Signing in to Your Apple Account
Both devices need to be signed into the same Apple ID for seamless screen mirroring. This allows your devices to recognize each other quickly.
On iPhone:
- Open Settings
- Tap your name at the top
- Verify your Apple ID email
On MacBook:
- Click the Apple menu in the top-left corner
- Select System Settings or System Preferences
- Click Apple ID or iCloud
- Check that you’re using the same Apple ID as your iPhone
If you need to sign out and sign back in on either device, do so before attempting to mirror your screen. Two-factor authentication may be required during this process.
Adjusting Bluetooth and Wi-Fi Settings
Fine-tuning your connection settings can improve the mirroring experience and prevent potential issues.
For best results:
- Make sure Bluetooth is enabled on both devices
- Keep Wi-Fi turned on even if you’re using Bluetooth
- Enable AirDrop on both devices
On iPhone:
- Open Control Center (swipe down from top-right)
- Make sure both Bluetooth and Wi-Fi icons are blue (active)
On MacBook:
- Go to System Settings > Bluetooth
- Toggle Bluetooth to ON
- Check that your Mac is discoverable by other devices
If you experience connection problems, try toggling Bluetooth and Wi-Fi off and on again on both devices. This often resolves common connectivity issues without requiring a full restart.
How to Enable Screen Mirroring on Your iPhone
Setting up screen mirroring on your iPhone takes just a few taps. This feature lets you display your iPhone screen on your MacBook, perfect for sharing photos, videos, or presentations.
Using Control Center to Access Screen Mirroring
To start mirroring your iPhone screen to your MacBook, you’ll need to access the Control Center on your iPhone. The steps are simple:
- Swipe down from the top-right corner on iPhone X or later models
- Swipe up from the bottom edge on iPhone 8 or earlier models
- Look for the Screen Mirroring icon (a rectangle with a triangle at the bottom)
- Tap on this icon to view available devices
If you don’t see the Screen Mirroring option, you may need to check your settings. Go to Settings > Control Center and make sure Screen Mirroring is added to your included controls.
Your iPhone and MacBook must be connected to the same Wi-Fi network for this to work. Both devices should also have AirPlay turned on in their settings.
Selecting Your MacBook as the Mirroring Destination
After tapping the Screen Mirroring icon, you’ll see a list of available devices. Here’s what to do next:
- Look for your MacBook’s name in the device list
- Tap on your MacBook’s name to connect
- Wait a few seconds for the connection to establish
Your iPhone screen should now appear on your MacBook. A blue status bar will appear at the top of your iPhone to indicate active mirroring.
If your MacBook doesn’t appear in the list, make sure it’s compatible with iPhone Mirroring. The newest feature requires a Mac running macOS Sonoma or later and an iPhone with iOS 17 or later.
To stop mirroring, open Control Center again, tap the Screen Mirroring icon, and select “Stop Mirroring.”
Screen Mirroring Using AirPlay
AirPlay offers a simple way to mirror your iPhone screen onto your Mac. This wireless technology lets you share photos, videos, or your entire screen without cables or complex setup processes.
Initiating AirPlay from iPhone
To start mirroring your iPhone to your Mac, first make sure both devices are connected to the same Wi-Fi network. Then, open Control Center on your iPhone by swiping down from the top-right corner (iPhone X or later) or up from the bottom edge (iPhone 8 or earlier).
Look for the Screen Mirroring button and tap it. A list of available AirPlay receivers will appear. Your Mac should show up in this list if it’s compatible and properly set up.
Select your Mac from the list of devices. Your iPhone screen should now begin displaying on your Mac within seconds.
If you don’t see your Mac listed, check that both devices have AirPlay enabled in their settings. On Mac, this setting can be found in System Preferences under Sharing.
Authenticating Automatically with Touch ID or Passcode
When connecting to your Mac for the first time, you might need to enter a verification code. This code typically appears on your Mac screen for you to input on your iPhone.
For added convenience, newer iPhones with Touch ID allow for automatic authentication when mirroring. Simply place your finger on the Touch ID sensor when prompted to verify your identity.
This secure process ensures only authorized users can mirror content to your devices. The authentication happens quickly and needs to be done only once for familiar devices.
After successful authentication, your iPhone and Mac will remember each other. This means future mirroring sessions won’t require the verification code again, making the process faster and more seamless.
Troubleshooting Common Screen Mirroring Issues
Screen mirroring problems between iPhone and Mac can be frustrating, but most issues have simple solutions. Connection problems, device compatibility, and quality concerns account for the majority of troubleshooting cases.
Diagnosing Connection Problems
Wi-Fi connectivity is essential for successful iPhone mirroring. Both devices must be connected to the same network for the feature to work properly.
If your devices aren’t detecting each other, try these fixes:
- Check Wi-Fi settings on both devices to confirm they’re on the same network
- Verify AirPlay settings by going to System Preferences > Sharing > AirPlay Receiver and change “Allow AirPlay For” to “Anyone on the same network”
- Toggle Airplane Mode on and off on your iPhone
- Restart both devices to clear temporary network issues
For persistent problems, try turning off Bluetooth and signing out of iCloud on both devices. After restarting, open iPhone mirroring and sign back into iCloud when prompted.
Network interference can also cause problems. Move closer to your router or switch to a less congested Wi-Fi channel if possible.
Ensuring Compatibility and Updating Systems
Device compatibility and software versions significantly impact screen mirroring performance. iPhone Mirroring has specific requirements that must be met.
Your devices must meet these requirements:
| Device | Minimum Requirements |
|---|---|
| iPhone | iOS 17 or later |
| Mac | macOS Sequoia (macOS 15) or later |
| Account | Same Apple ID signed in on both devices |
Always check for software updates on both devices. Outdated software is a common cause of mirroring issues.
If you’re using macOS Sequoia, make sure your Mac is compatible with iPhone Mirroring. The feature works best on newer Mac models with Apple silicon chips (M1 and later).
Both devices must be signed in to the same Apple ID for iPhone Mirroring to function properly. Verify this in Settings on iPhone and System Settings on Mac.
Resolving Audio and Video Quality Issues
Poor audio or video quality during mirroring can stem from several factors. Network speed, device capabilities, and settings all play important roles.
Try these fixes for quality problems:
- Reduce Wi-Fi congestion by disconnecting unused devices from your network
- Close background apps on both devices to free up resources
- Lower screen brightness on your iPhone to reduce data transmission
- Check for interference from other wireless devices nearby
For audio issues, verify that volume is turned up on both devices. Check if the sound is muted or redirected to another output device on your Mac.
Video lag often results from network bandwidth limitations. Connect your Mac to your router via Ethernet cable if possible for a more stable connection.
If you notice screen scaling problems, adjust the display settings on your Mac. Some apps may also have their own display settings that affect mirroring quality.
Alternative Methods for iPhone to MacBook Mirroring
While AirPlay offers a wireless solution for screen mirroring, several other methods can connect your iPhone screen to your Mac. These alternatives provide options for those who need a wired connection or more advanced features.
Using QuickTime Player for a Wired Connection
QuickTime Player is a built-in application on Mac that lets you mirror your iPhone screen through a wired connection. This method works well when you need a reliable connection without Wi-Fi.
To use QuickTime Player for mirroring:
- Connect your iPhone to your Mac using a Lightning or USB-C cable
- Open QuickTime Player on your Mac
- Click on File > New Movie Recording
- Click the dropdown arrow next to the record button
- Select your iPhone from the list of cameras
This method provides a stable, lag-free connection ideal for presentations or recording your iPhone screen. QuickTime Player also allows you to record your mirrored screen directly.
The wired connection often delivers better image quality than wireless options. Plus, it doesn’t drain your iPhone battery as quickly as wireless mirroring.
Third-Party Apps for Screen Mirroring
Several third-party apps offer enhanced features beyond what Apple’s built-in options provide. These apps often include additional tools like screen recording, annotation, and file sharing.
Avica Remote Desktop offers wireless mirroring with additional remote control features. This app lets you not only view your iPhone screen but also control it from your Mac.
AnyMirro is another popular option that supports both WiFi and USB connections. To use it:
- Download and install the app on both devices
- Connect both devices to the same WiFi network
- Select iOS/iPadOS from the main menu
- Follow the on-screen instructions to complete the connection
These apps often work across platforms, allowing you to mirror your iPhone not just to Mac but also to Windows PCs.
Streaming with Reflector, ApowerMirror, or AirDroid Cast
These specialized mirroring applications provide professional-grade features for users who need more than basic screen sharing.
Reflector turns your Mac into an AirPlay receiver. It works wirelessly and supports multiple device connections simultaneously—perfect for comparing different iPhone screens.
ApowerMirror offers:
- Screen recording with audio
- Screenshot capabilities
- Touch control from your Mac
- File transfer between devices
To set up ApowerMirror:
- Install the app on both devices
- Connect to the same network
- Open Control Center on your iPhone
- Tap Screen Mirroring
- Select your Mac from the list
AirDroid Cast provides remote access to your iPhone from anywhere. It works across platforms and doesn’t require both devices to be on the same network.
These tools are ideal for teachers, presenters, and professionals who need reliable screen mirroring with extra features.
Optimizing the Mirroring Experience
Getting the most out of your iPhone to MacBook screen mirroring requires proper setup and configuration. The right settings can make your mirroring smoother, clearer, and more useful for different tasks.
Managing Screen Resolution and Aspect Ratio
When mirroring your iPhone screen to Mac, resolution and aspect ratio differences can cause display issues. iPhones and MacBooks have different screen dimensions, which may result in black bars or stretched images.
To fix this, adjust your MacBook’s display settings. Click the Apple menu, select “System Preferences,” then “Displays.” You can choose the “Scaled” option to find a resolution that works best with your iPhone’s dimensions.
For the best quality, make sure both devices are connected to a strong Wi-Fi network. Weak connections can cause lag or pixelation during mirroring.
You can also rotate your iPhone to match your MacBook’s orientation. This helps when viewing videos or photos that need more screen space.
Using iPhone Mirroring for Presentations and Streaming
iPhone Mirroring makes presentations and media streaming simpler and more professional. With iPhone Mirroring, you can show apps, photos, and videos directly on your MacBook.
For presentations, open your presentation app on your iPhone first. Then start mirroring to display it on your MacBook. This works great when connecting to projectors or larger screens.
To stream videos or music:
- Connect both devices to the same Wi-Fi network
- Open the Control Center on your iPhone
- Tap “Screen Mirroring”
- Select your MacBook from the list
When streaming content, close unnecessary apps on both devices. This reduces lag and improves performance. Also, keep your iPhone charged or plugged in, as mirroring uses more battery power.
Customizing the MacBook Display Settings
Your MacBook offers several options to optimize how mirrored content appears. These settings can improve clarity and match your preferences.
To access display settings while mirroring, click on the display icon in the menu bar. You can adjust brightness, contrast, and color settings to make your iPhone content look better.
For optimal viewing:
- Night Shift: Reduces blue light in evening hours
- True Tone: Adjusts colors based on ambient lighting
- Color profile: Choose between different presets for photos, videos, or text
You can also use your MacBook’s built-in tools to capture what’s happening on your mirrored iPhone. The Screenshot tool (Shift+Command+5) lets you record everything that happens on your screen while mirroring.
For easier access to mirroring, add the Screen Mirroring button to your iPhone’s Control Center through Settings. This saves time when you need to quickly connect.
Frequently Asked Questions
Screen mirroring between an iPhone and MacBook involves several methods and requirements. Users often have questions about wireless options, compatibility, and troubleshooting.
What steps are involved in setting up screen mirroring from an iPhone to a MacBook?
To set up screen mirroring, first make sure both your iPhone and MacBook are connected to the same Wi-Fi network. This connection is necessary for wireless mirroring options to work properly.
For a wired connection, you can use a Lightning cable to connect your iPhone to your Mac. Then open QuickTime Player on your Mac, select “New Movie Recording,” and choose your iPhone as the camera source.
If you have macOS Sonoma or later, you can use the built-in iPhone Mirroring feature. This lets you wirelessly interact with your iPhone from your Mac.
Is it possible to mirror an iPhone’s display to a MacBook without using any cables?
Yes, you can mirror your iPhone to your MacBook wirelessly. AirPlay is the most common method for wireless mirroring between Apple devices.
With newer macOS versions, the iPhone Mirroring feature lets you control your iPhone directly from your Mac without cables. This feature is available on compatible devices.
Third-party apps like Reflector, LonelyScreen, or ApowerMirror also allow wireless mirroring. These apps turn your MacBook into an AirPlay receiver.
How can AirPlay be used to mirror an iPhone screen to a MacBook?
To use AirPlay, ensure both devices are on the same Wi-Fi network. Open Control Center on your iPhone by swiping down from the top-right corner.
Tap the “Screen Mirroring” or “AirPlay” icon. Select your Mac from the list of available devices.
If your Mac doesn’t appear in the list, you may need a third-party app like iTools Pro. After installing it on your Mac, click the Airplayer button from iTools’ window.
Are there any specific requirements for a MacBook to use the iPhone screen mirroring feature?
Your MacBook needs to run macOS that supports AirPlay receiving. For the built-in iPhone Mirroring feature, you need macOS Sonoma or later.
Both devices must be signed in to the same Apple ID. This ensures proper authentication and connection between your devices.
Your MacBook and iPhone should support Continuity features. Generally, devices made after 2015 work best with the latest mirroring features.
How do I troubleshoot issues with screen mirroring between an iPhone and a MacBook?
If mirroring isn’t working, check that both devices are on the same Wi-Fi network. Sometimes switching to a different network or restarting your router helps.
Restart both your iPhone and MacBook. This simple step often fixes connection problems by clearing temporary glitches.
Make sure your software is up to date. Install the latest iOS on your iPhone and macOS on your MacBook for the best compatibility.
What third-party apps are recommended for mirroring an iPhone to a MacBook if native options are not working?
Reflector is a popular app that turns your MacBook into an AirPlay receiver. It works well for classroom demonstrations and presentations.
LonelyScreen offers a simple interface with reliable connection. It’s a good option for basic mirroring needs without extra features.
ApowerMirror provides additional features like screen recording and annotation. It supports both wireless and USB connections for greater flexibility.

