Capturing content on an iPhone screen is a simple process that has become an essential tool for many users. Whether you’re saving a recipe, booking confirmation, or a funny meme, the ability to take a screenshot is a function we often use without a second thought. While taking a screenshot of what is directly visible on the screen is straightforward, Apple’s iOS offers a less known but incredibly helpful feature that allows you to screenshot an entire webpage, saving not just what you see but the full content of the scrollable area.
This handy feature is especially useful when you want to capture a complete article, a set of instructions, or an online receipt that extends beyond the limits of your iPhone’s display. Not only does it save you from taking multiple screenshots of a single webpage, but it also keeps all the information neatly in one file, making management and sharing much easier.
Capturing Your Screen: A Guide to iPhone Screenshots
Taking screenshots on your iPhone is a breeze, and it’s handy for everything from saving recipes to sharing funny memes. Let’s walk through how to capture webpages, both the portion you see and the entire scrolling page.
Basic Screenshot: What’s On Your Screen
- Find Your Buttons: Depending on your iPhone model:
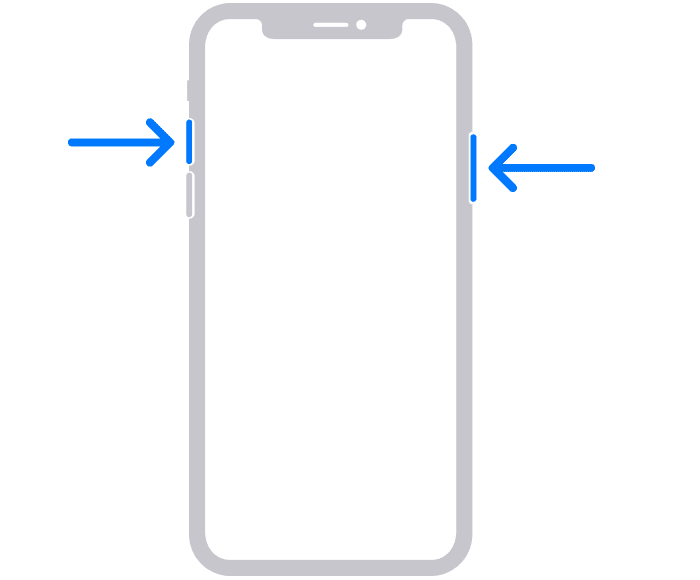
- Face ID models: Press the Side button and Volume Up button simultaneously.
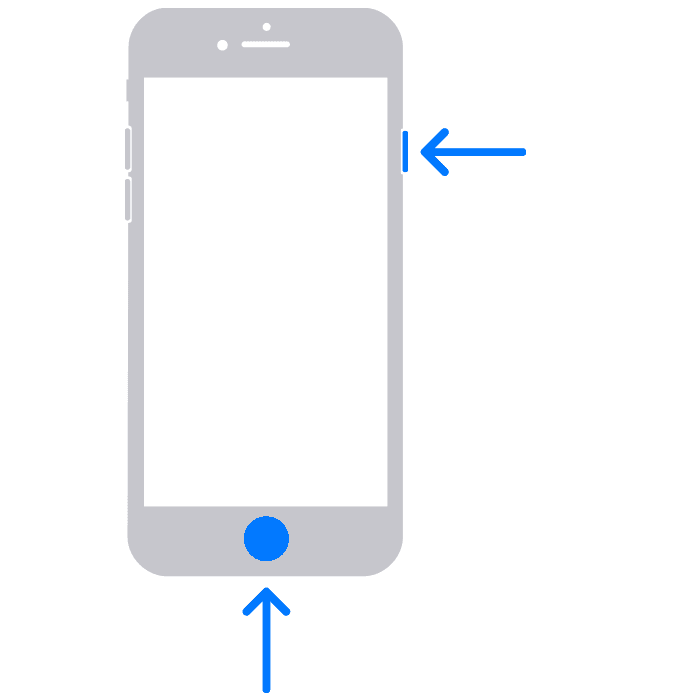
- Home button models: Press the Side (or Top) button and the Home button simultaneously.
- Quick Release: Quickly release both buttons.
- Preview and Edit: A thumbnail of your screenshot will appear in the lower-left corner. Tap it to edit, crop, or mark it up before saving or sharing.
Full-Page Screenshot: Capture the Whole Shebang
- Take the Initial Screenshot: Follow the steps for a basic screenshot above.
- Tap the Thumbnail: Immediately tap the thumbnail preview before it disappears.
- Choose “Full Page”: You’ll see options at the top; select “Full Page.”
- Preview and Save: Scroll through the entire webpage preview, make any edits, and then tap “Done.” Choose to save it as a PDF to Files or directly to your Photos.
Extra Tips and Tricks
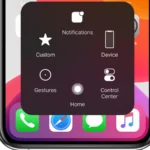
- AssistiveTouch: If your buttons are tricky, enable AssistiveTouch in Settings > Accessibility > Touch. This creates a virtual button you can customize for screenshots.
- Screen Recording: For dynamic content like videos, use screen recording instead. Swipe down from the top-right corner (Face ID models) or up from the bottom (Home button models) to access the Control Center. Tap the Record icon to start.
Troubleshooting
| Issue | Solution |
|---|---|
| Screenshot Not Saving | Check your storage space. Make sure iCloud Photos isn’t full. |
| Can’t Find Screenshot | Look in the Photos app, under the “Screenshots” album. |
| Button Not Working | Try cleaning the buttons or using AssistiveTouch as a workaround. |
Key Takeaways
- Taking a screenshot on an iPhone involves a few simple buttons.
- iOS has a feature to capture full-page screenshots on a webpage.
- Full-page screenshots can be easily saved, managed, and shared.
Taking a Screenshot on iPhone
Capturing the content of a webpage on an iPhone is straightforward. Whether you want to share the information or keep it for personal reference, two methods enable you to take both standard and full-page screenshots with ease.
Using Buttons
For iPhone models with Face ID, press the Side button (formerly known as the lock or power button) and the Volume Up button at the same time to capture a screenshot of the current screen. When you take a screenshot, a thumbnail appears briefly in the lower-left corner. Tap on the thumbnail to open the screenshot. Here, you can tap “Full Page” to take a full-page screenshot. This feature is handy when you need to capture an entire webpage without stitching multiple images together. Once you’re done, you can save the full-page screenshot to the Files app or add it to your Photos.
For iPhones with a Home button, you’ll press the Home button and the Side button simultaneously to capture your screen. The rest of the steps for accessing the full-page screenshot option are the same as described above.
Using AssistiveTouch
If you prefer not to use buttons, AssistiveTouch provides an on-screen menu to complete a variety of tasks, including taking screenshots. First, enable AssistiveTouch in the Settings under Accessibility. Once enabled, a virtual button will appear on your screen. Customize the Top Level Menu to include the screenshot option or add a new gesture for taking screenshots. When you select the screenshot option from the menu, your iPhone will capture the current screen just like using the physical buttons. If you need a full-page screenshot, the process after capturing the screen is the same as with the button method—select “Full Page” in the preview.
Managing and Sharing Screenshots
After capturing a full-page screenshot in Safari, the next steps are editing and sharing the image. These tools enhance the screenshot for clarity and ease of sharing.
Editing Screenshots
Once you take a screenshot, iOS provides a variety of Markup tools. You can access these tools by tapping on the screenshot preview. They let you add text, a signature, or magnify parts of the screenshot. Use the Crop tool to trim unwanted edges. The Full Page tab at the top allows for editing the entire page. Remember, editing in Markup does not alter the original content on Safari.
Saving and Sharing Options
You can save your edited screenshot to Photos or Files. To save as a PDF, choose the Save PDF to Files option. This is helpful for documents and graphics. You can then find it in the Files app. For sharing, iOS 17 supports several methods like AirDrop, email, or Messages. You might upload it to Shared Albums or iCloud Drive for easy access across devices like an iPad or Mac. The Share button brings up all available options that are compatible with your device.