Setting up a personal hotspot on an iPad allows the device to share its internet connection. This function turns the iPad into a source of internet for other devices, such as laptops, smartphones, and tablets. This convenience is particularly useful when there are no other Wi-Fi networks available.
Managing a hotspot involves securing the network and monitoring connected devices. This ensures that only authorized users gain access. Users can change the Wi-Fi password and view devices currently connected to their iPad hotspot.
Turn Your iPad into a Wi-Fi Hotspot: A Quick Guide
Sharing your iPad’s cellular data with other devices is a breeze. It’s perfect when you need an internet connection on the go. Just follow these simple steps to turn your iPad into a personal hotspot.
Before You Start
- Cellular iPad: Ensure your iPad has a cellular data plan.
- Carrier Support: Check with your carrier if Personal Hotspot is included in your plan or if it requires additional charges.
Enabling Personal Hotspot on Your iPad
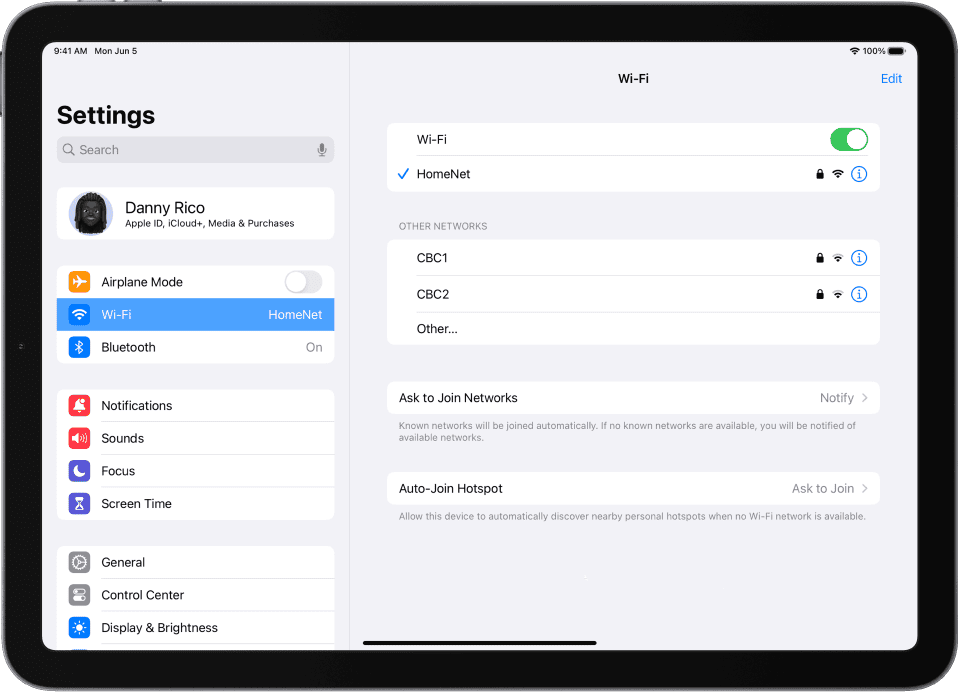
- Go to Settings: Open the Settings app on your iPad.
- Tap Cellular: Locate and tap on the Cellular option.
- Personal Hotspot: Tap “Personal Hotspot.” If you don’t see this option, contact your carrier.
- Toggle On: Slide the Personal Hotspot switch to the ON position.
- Set Up Password: You’ll be prompted to set a Wi-Fi password for your hotspot. Choose a strong password and make note of it.
Connecting Your Devices
Now that your iPad’s hotspot is active, you can connect other devices:
Option 1: Wi-Fi
- On the device you want to connect (laptop, smartphone, etc.), go to its Wi-Fi settings.
- Find and select your iPad’s name from the list of available networks.
- Enter the password you set earlier when prompted.
Option 2: Bluetooth
- On your iPad, go to Settings > Bluetooth and make sure it’s turned on.
- On the other device, enable Bluetooth and make it discoverable.
- Follow the instructions on the other device to pair it with your iPad.
Option 3: USB
- Connect your iPad to your computer using a USB cable.
- In your computer’s network settings, select your iPad as the internet connection.
Additional Tips
- Battery Life: Using your iPad as a hotspot will consume battery power. Keep an eye on your battery level and plug it in when necessary.
- Data Usage: Personal Hotspot uses your cellular data plan. Be mindful of your data limits to avoid unexpected charges.
With these easy steps, you can transform your iPad into a mobile Wi-Fi hub, providing internet access to other devices wherever you go. Happy browsing!
Key Takeaways
- An iPad can share its internet connection as a personal hotspot.
- Hotspot settings and connections are managed directly through the iPad’s settings.
- Proper hotspot management includes securing the network to prevent unauthorized access.
Setting Up iPad Hotspot
Setting up a personal hotspot on an iPad allows other devices to share its internet connection. This guide walks through the necessary steps to enable and manage the hotspot feature.
Enabling Personal Hotspot
To turn on the hotspot, open Settings on your iPad and tap Personal Hotspot or Settings > Cellular > Personal Hotspot if available. Toggle the switch to on to activate the feature.
Configuring Hotspot Settings
Once enabled, it’s important to set a Wi-Fi password for security. In the hotspot settings, choose Wi-Fi Password and enter a strong password. You can also change the hotspot’s name here. Make sure Allow Others to Join is on so others can connect to the hotspot.
Connecting Devices to Your Hotspot
To connect another iOS device, go to the Wi-Fi settings on the device and select your iPad’s hotspot from the list of available networks. Enter the password you’ve set when prompted. Look for a blue band at the top of the screen on your iPad; this indicates that a device is connected through the hotspot. If you have iOS 13 or later, you can use Instant Hotspot for easier connection with devices signed in to your iCloud account.
Managing and Securing Your Hotspot
When setting up a hotspot on your iPad, managing data and ensuring security are crucial. These factors help maintain a reliable connection and protect your personal information.
Understanding Data Usage and Limits
Data caps from your service provider affect your hotspot. Devices connected to your iPad’s network consume your data plan. Too many devices or heavy usage like streaming can drain it. It’s wise to track this to avoid extra charges. Most smartphones, iPads included, allow users to check their current data usage. Keeping an eye on this helps you manage your limits.
Ensuring Your Hotspot’s Security
A secure hotspot protects against unauthorized access. Start by choosing a strong password. It should be a mix of letters, numbers, and symbols. Your iPad’s hotspot gives you the option to set this password. Ensure the network name is not too revealing. Stick to these steps and your personal hotspot’s connectivity stays secure, just like a traditional Wi-Fi network.


